
Introduction
This manual provides essential information for the installation and proper handling of the A-MIND LCD Display Replacement for Nokia C01 Plus models TA-1383, TA-1387, and TA-1391. This product is designed to replace damaged or non-functional LCD screens and touch digitizers, restoring your device's display capabilities. Please read all instructions carefully before proceeding with installation.
Product Compatibility
This LCD display replacement is specifically compatible with the following Nokia C01 Plus models:
- Nokia C01 Plus TA-1383
- Nokia C01 Plus TA-1387
- Nokia C01 Plus TA-1391
Please verify your phone's model number before purchase and installation to ensure compatibility.
What's Included
Your package should contain the following items:
- 1 x LCD Touch Digitizer Assembly for Nokia C01 Plus
- 1 x Set of Repair Tools (Note: These tools are general purpose and may not open all phone models.)

Image: The complete package including the replacement LCD screen, a phone, and the accompanying repair tools.
Important Precautions Before Installation
Please observe the following critical precautions to prevent damage to the product or injury:
- Fragile Component: The LCD is a fragile component. Handle it with extreme care. Avoid bending or applying excessive force, especially to the flex cables. Glass fragments may cause injury if the screen breaks.
- Electrostatic Discharge (ESD): Static electricity can damage electronic components. Always ground yourself using an ESD wrist strap before handling the screen or internal phone parts.
- Pre-Installation Testing: DO NOT INSTALL THE SCREEN BEFORE TESTING IT. Connect the new screen's flex cable to the motherboard without fully installing it. Then, connect the battery and power on the phone to check if the screen functions normally (display, touch response, dead pixels, color issues).
- Professional Installation Recommended: Installation requires specific techniques and equipment. If you are not experienced in phone repair, it is strongly recommended to seek professional service to avoid damage.
- No Manual Included: This product does not come with a printed installation manual. Refer to online video tutorials (e.g., on YouTube) for detailed installation steps.
- Check Malfunction Cause: Before purchasing, ensure your phone's malfunction is indeed caused by the LCD or touch panel, and not other internal components.
Installation Guide (Overview)
This section provides a general overview of the installation process. For detailed, step-by-step instructions, please refer to online video tutorials.
- Power Off and Disassemble: Ensure your phone is completely powered off. Carefully disassemble your phone using appropriate tools. Disconnect the battery cable connector from the motherboard.
- Remove Old Screen: Gently remove the old LCD display and touch screen flex cables from the motherboard.
- Connect New Screen for Test: Connect the new LCD touch digitizer assembly's flex cables to the corresponding connectors on the phone's motherboard. Do not fully install or adhere the screen at this stage.
- Test Functionality: Reconnect the battery cable. Power on the phone. Thoroughly test the new screen's display quality, touch responsiveness across the entire screen, and check for any dead pixels or abnormalities.
- Final Installation: If the screen functions perfectly during testing, power off the phone, disconnect the battery, and proceed with the full installation, carefully securing the new screen into the phone's frame.
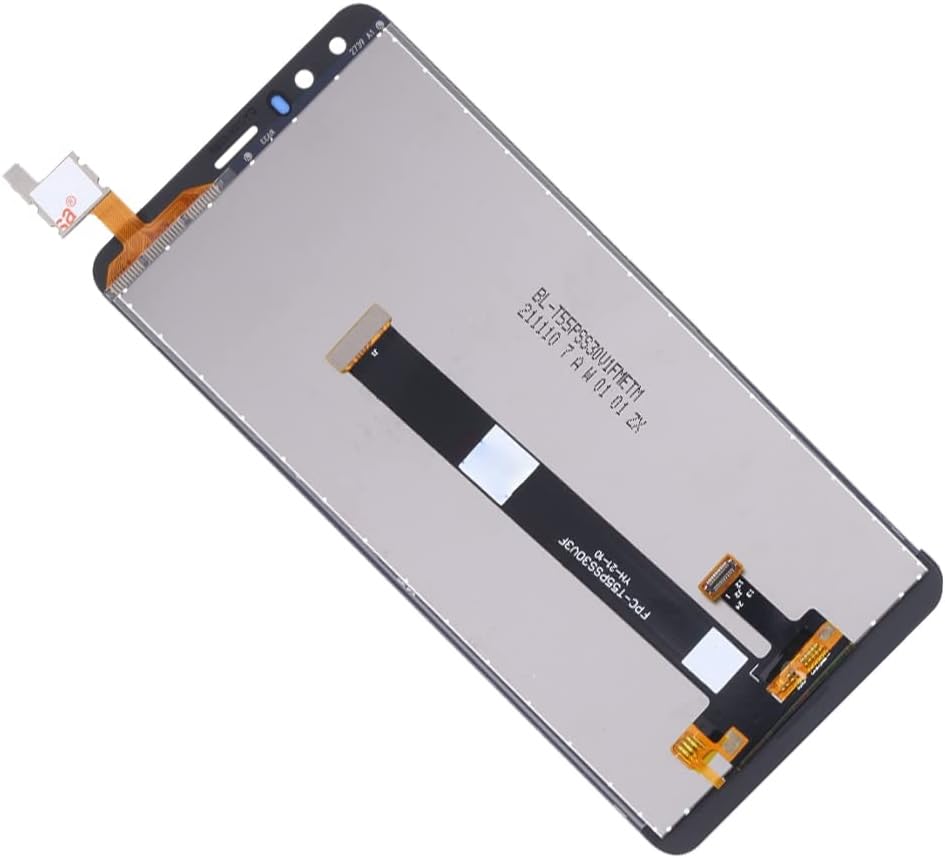
Image: The reverse side of the replacement LCD screen, showing the delicate flex cables that connect to the phone's motherboard.

Image: A close-up view illustrating the connection points of the flex cables from the replacement screen to the phone's internal components.
Maintenance and Care
Once installed, treat your new screen with care to ensure its longevity:
- Avoid dropping the phone or subjecting it to strong impacts.
- Keep the screen clean using a soft, lint-free cloth. Avoid harsh chemicals.
- Protect the screen from scratches by using a screen protector and a protective case.
Troubleshooting
If you encounter issues, consider the following:
- Screen Not Working After Test: If the screen does not function normally during the pre-installation test, immediately disconnect it. Do not force installation. Contact customer service with video or photo evidence of the issue.
- Broken/Damaged/Missing Items Upon Receipt: If any components are broken, damaged, or missing when you receive the package, do not attempt installation. Take photos and contact customer service immediately.
- Installation-Related Damage: Damage caused during the installation process is not covered under warranty. Ensure careful handling and proper technique.
Product Specifications

Image: The replacement LCD screen displaying its key specifications: IPS LCD, 295 ppi, 5.45 inches, 720x1440 pixels.
| Feature | Detail |
|---|---|
| Product Type | LCD Display and Touch Screen Digitizer Assembly |
| Compatibility | Nokia C01 Plus (Models: TA-1383, TA-1387, TA-1391) |
| Screen Size | 5.45 inches |
| Resolution | 720 x 1440 pixels |
| Pixel Density (PPI) | 295 ppi |
| Display Technology | IPS LCD |
| Brand | A-MIND |
| ASIN | B0BLVKKK93 |
| Country of Origin | China |
| Date First Available | November 9, 2022 |
Warranty and Customer Support
A-MIND offers the following support for this product:
- Warranty: We provide a 3-month free replacement or refund for non-human product damage and faults.
- Contact Support: For any questions, issues, or assistance, please email our service team. Provide photos or videos if relevant to your issue.
- Installation Damage: Please note that we are not responsible for any damages or malfunctions caused by incorrect installation work. Use at your own risk.


