
TECKEEN SR3100
User Manual: 2.4GHz DSM2 Compatible 3CH Surface Receiver
Model: SR3100 | Brand: TECKEEN
Introduction
This manual provides detailed instructions for the setup, operation, and maintenance of your TECKEEN 2.4GHz DSM2 Compatible 3CH Surface Receiver. Please read this manual thoroughly before using the product to ensure proper function and safety.
Product Overview
The TECKEEN 3-channel surface receiver is designed for use with 2.4GHz DSM2 compatible transmitters, ideal for RC cars and boats. It features a compact design and a dedicated bind port for easy setup.

Figure 1: Front view of the TECKEEN 2.4GHz DSM2 Compatible 3CH Surface Receiver, showing the antenna, servo ports (BAT/BIND, STR, THR, AUX), and the included bind plug.

Figure 2: Bottom view of the receiver, displaying the model number SR3100 and FCC ID: BRWDASRX11, indicating it was assembled in Malaysia.
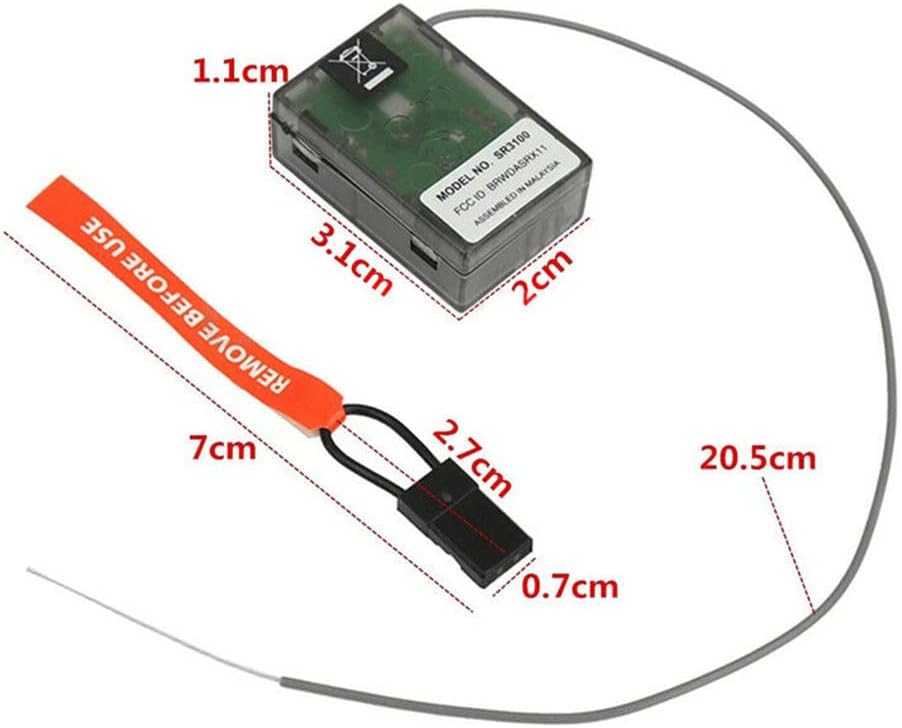
Figure 3: Diagram illustrating the physical dimensions of the receiver (3.1cm length, 2cm width, 1.1cm height) and the bind plug (7cm length, 2.7cm plug length, 0.7cm plug width), along with the antenna length (20.5cm).
Specifications
| Feature | Detail |
|---|---|
| Type | Race receiver |
| Material | Plastic |
| Number of Channels | 3 |
| Modulation | DSM2 |
| Band | 2.4GHz |
| Voltage Range | 3.5–9.6V |
| Dimensions (L x W x H) | Approx. 3.1cm x 2cm x 1.1cm (excluding antenna) |
| Antenna Length | Approx. 20.5cm |
| Item Weight | 0.352 ounces (approx. 10g) |
Setup and Binding Procedure
Follow these steps carefully to bind your receiver to a compatible DSM2 transmitter:
- Ensure the receiver is powered off.
- Insert the included bind plug into the Batt/Bind port on the receiver.
- Apply power to the receiver. The amber LED on the receiver will begin to flash continuously, indicating it is in bind mode.
- Turn on your compatible DSM2 transmitter. Verify that the transmitter is set to the correct model memory you intend to use for this receiver.
- Access the List screen on your transmitter (refer to your transmitter's manual for specific navigation).
- Navigate to and select the Bind screen.
- Before initiating the bind process, set the steering wheel, throttle stick, and any applicable auxiliary channels on your transmitter to their desired failsafe positions. These positions will be stored by the receiver in case of signal loss.
- Initiate the bind process from the transmitter. The word "BIND" will flash on the transmitter screen for a few seconds.
- The transmitter will emit a beep sound, signaling that the binding process is complete.
- Observe the receiver's LED. It should now be solid amber, indicating a successful bind.
- Carefully remove the bind plug from the receiver. Store it in a safe and convenient location for future use.
- Power cycle both the transmitter and receiver to confirm the bind is retained.

Figure 4: The included bind plug, essential for initiating the binding process between the receiver and transmitter.
Operating Instructions
Once successfully bound, the receiver will respond to commands from your transmitter. Ensure all servo connections are correct before operation.
- Channel Connections:
- STR: Connect steering servo.
- THR: Connect throttle/ESC.
- AUX: Connect auxiliary components if applicable.
- Batt/Bind: Used for binding and can also supply power if not using an ESC with BEC.
- Power On Sequence: Always turn on your transmitter first, then power on the receiver. When powering off, disconnect the receiver's power first, then turn off the transmitter.
- Failsafe: The receiver's failsafe function will automatically set the channels to the pre-programmed positions (set during binding) if signal is lost, preventing runaway models.
Maintenance
Proper maintenance ensures the longevity and reliable performance of your receiver.
- Keep Dry: Avoid exposing the receiver to moisture or water. While designed for surface vehicles, it is not waterproof unless explicitly stated or housed in a waterproof enclosure.
- Cleanliness: Keep the receiver free from dirt, dust, and debris. Use a soft, dry brush or compressed air for cleaning.
- Antenna Placement: Ensure the antenna is not cut, kinked, or damaged. Proper antenna orientation is crucial for optimal signal reception. Avoid placing the antenna near large metal objects.
- Storage: Store the receiver in a cool, dry place when not in use.
- Voltage: Do not exceed the specified voltage range (3.5-9.6V) to prevent damage.
Troubleshooting
If you encounter issues with your receiver, refer to the following common problems and solutions:
- Receiver LED Flashing Continuously (Not Binding):
- Ensure the bind plug is fully inserted into the Batt/Bind port.
- Verify your transmitter is in bind mode and set to the correct model.
- Confirm the transmitter is DSM2 compatible.
- Try moving the transmitter closer to the receiver during the bind process.
- Ensure no other 2.4GHz devices are causing interference during binding.
- No Response from Receiver After Binding:
- Check all servo and power connections for correct polarity and secure fit.
- Ensure the receiver is receiving adequate power within its specified voltage range.
- Re-bind the receiver to the transmitter.
- Verify the transmitter's battery is charged.
- Intermittent Signal Loss / Glitching:
- Check antenna placement and ensure it is not obstructed or damaged.
- Ensure the receiver is not mounted directly against large metal objects or carbon fiber, which can block signals.
- Check for external interference sources (e.g., other 2.4GHz devices, high-power electrical lines).
- Verify the range of your transmitter and receiver.
- Servos Not Centering / Incorrect Movement:
- Check servo connections to ensure they are plugged into the correct channels (STR, THR, AUX).
- Verify servo functionality by testing with another receiver or servo tester.
- Adjust servo trims and sub-trims on your transmitter.
Package Contents
The package includes the following items:
- 1x DSM2 Compatible 3CH Surface Receiver
- 1x Bind Plug
Warranty and Support
For warranty information or technical support, please refer to the retailer or manufacturer's official website where you purchased this product. Specific warranty terms may vary by region and seller.
Ask a question about this manual
Ask about setup, troubleshooting, compatibility, parts, safety, or missing instructions. Manuals+ will review the question and use this page’s manual context to help answer it.