
1. Introduction and Overview
This manual provides comprehensive instructions for the proper installation, operation, and maintenance of your Holosun SCS-MP2-GR Solar Charging Sight. The SCS-MP2-GR is a multi-reticle reflex sight specifically designed for direct attachment to Smith & Wesson M&P-M2.0 full-size 9mm and .40 S&W handguns. It integrates a solar charging system for extended operation.
Important Note: This sight is compatible only with M&P-M2.0 full-size models and is not designed for 1.0 or Shield models.

Figure 1: Holosun SCS-MP2-GR Reflex Sight
2. Key Features
- Direct Mount Compatibility: Designed for direct attachment to S&W M&P-M2.0 slides, eliminating the need for adapter plates.
- Solar Charging System (SCS): Utilizes multi-directional light sensors for automatic brightness adjustment and continuous power.
- Internal Rechargeable Battery: Features an internal power reserve with an estimated 20,000-hour life, allowing for indefinite operation under sufficient light conditions.
- Multi-Reticle System (MRS): Offers selectable reticle patterns: a 32 MOA circle with a 2 MOA dot, a 2 MOA dot only, or a 32 MOA circle only.
- Intensity Override Function: Allows manual activation of a high brightness mode for 30 minutes.
- Low Power Indicator: Provides advance warning when the internal battery charge is low.
- Multilayer Reflective Glass: Optical-quality lenses with coatings for maximum light transmission, reduced glare, and enhanced battery efficiency.
- Durable Construction: Housing made from 7075 T6 Aluminum.

Figure 2: Multi-Reticle System (MRS) options
3. Setup and Installation
Proper installation is crucial for the performance and safety of your reflex sight. Always ensure the firearm is unloaded and safe before beginning installation.
- Unload Firearm: Verify the firearm is unloaded and clear of ammunition. Engage the safety.
- Prepare Slide: Ensure the pistol slide is clean and free of debris in the optic cut area.
- Position Sight: Carefully place the Holosun SCS-MP2-GR sight onto the designated optic cut on your S&W M&P-M2.0 slide. The sight is designed for a direct fit without an adapter plate.
- Secure Screws: Insert the provided mounting screws through the sight and into the slide. It is recommended to apply a small amount of thread locker (e.g., blue Loctite) to the screw threads to prevent loosening from recoil.
- Tighten Screws: Tighten the screws evenly to the manufacturer's specified torque settings. Overtightening can damage the sight or slide. Refer to your firearm's manual for specific torque recommendations if available, or use a hand-tight plus a quarter turn approach if no torque spec is provided.
- Verify Secure Fit: Once tightened, gently attempt to move the sight to ensure it is securely mounted and does not wobble.

Figure 3: Side view of the SCS-MP2-GR, illustrating its low-profile design for direct mounting.
4. Operation
4.1 Power On/Off and Brightness Adjustment
The SCS-MP2-GR features an automatic brightness adjustment system powered by its solar cells. The sight is always on and will adjust reticle intensity based on ambient light conditions.
- Automatic Brightness: The multi-directional light sensors on the sight will automatically adjust the reticle brightness to match the surrounding environment. In brighter conditions, the reticle will be brighter; in lower light, it will dim.
- Intensity Override: To temporarily increase brightness for 30 minutes, locate the button on the side of the sight and press it. This function is useful in situations where a higher brightness is desired regardless of ambient light.
- Low Power Indicator: The sight includes a low power indicator that will alert you several days before the internal battery requires charging. Ensure the sight is exposed to light to recharge the internal battery.
4.2 Reticle Selection
The Multi-Reticle System (MRS) allows you to choose your preferred reticle pattern.
- Cycling Reticles: Press the button on the side of the sight to cycle through the available reticle options: 32 MOA Circle with 2 MOA Dot, 2 MOA Dot Only, and 32 MOA Circle Only.
4.3 Windage and Elevation Adjustment
Adjustments for windage and elevation are made using the adjustment turrets on the sight.
- Adjustment Value: Each click of the adjustment turret corresponds to 1 MOA (Minute of Angle).
- Windage Adjustment: The windage adjustment turret is typically located on the right side of the sight. Turning it will move the point of impact left or right.
- Elevation Adjustment: The elevation adjustment turret is typically located on the top of the sight. Turning it will move the point of impact up or down.
- Zeroing: After installation, it is essential to zero your sight at your preferred distance. This involves firing test shots and adjusting the reticle until the point of aim matches the point of impact.

Figure 4: Top view of the SCS-MP2-GR, indicating the elevation adjustment turret.
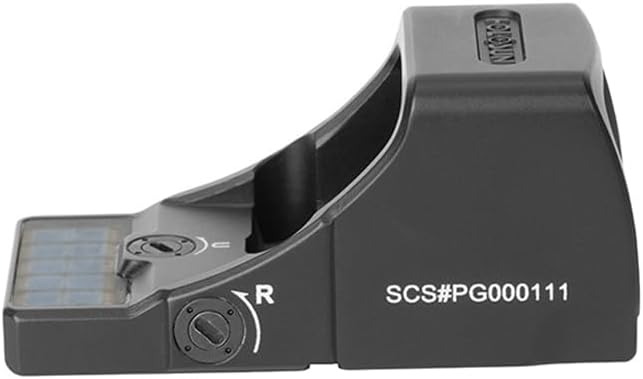
Figure 5: Side view of the SCS-MP2-GR, indicating the windage adjustment turret.
5. Maintenance
Regular maintenance ensures the longevity and optimal performance of your Holosun SCS-MP2-GR sight.
- Lens Cleaning: Use a soft, lint-free cloth and lens cleaning solution specifically designed for optics. Gently wipe the lens surfaces to remove dust, dirt, or smudges. Avoid using abrasive materials or harsh chemicals.
- Housing Cleaning: Wipe the sight's aluminum housing with a damp cloth to remove dirt and grime. For stubborn residue, a mild soap solution can be used, followed by wiping with a clean, damp cloth. Ensure no moisture enters the internal components.
- Solar Cell Maintenance: Keep the solar charging cells on top of the sight clean and unobstructed to ensure efficient power generation.
- Storage: When not in use, store the sight in a cool, dry place, away from direct sunlight and extreme temperatures.
6. Troubleshooting
If you encounter issues with your SCS-MP2-GR sight, refer to the following common troubleshooting steps:
- Reticle Not Visible/Dim:
- Ensure the solar cells are clean and exposed to sufficient light.
- Check the low power indicator. If active, expose the sight to bright light for an extended period to recharge the internal battery.
- Activate the intensity override function to see if the reticle appears brighter.
- Reticle Flickering:
- This may occur in rapidly changing light conditions as the automatic brightness adjusts. If persistent, ensure solar cells are clean.
- Inaccurate Point of Impact:
- Verify the sight is securely mounted to the firearm. Check mounting screws for proper torque.
- Re-zero the sight following the instructions in Section 4.3.
- Button Unresponsive:
- Ensure the button is not obstructed by debris.
- If the sight has been exposed to extreme conditions, allow it to return to normal operating temperature.
If these steps do not resolve the issue, please contact Holosun customer support for further assistance.
7. Specifications
| Feature | Specification |
|---|---|
| Model Name | Holosun SCS-MP2-GR |
| Reticle | 2 MOA Dot & 32 MOA Circle (Green) |
| Light Wavelength | 540nm |
| Magnification | 1x |
| Eye Relief | Unlimited |
| Parallax | Parallax Free |
| Power Source | Solar & Internal Rechargeable Battery |
| Battery Life (Hours) | Unlimited (with sufficient light) |
| Brightness Setting | Automatic |
| Housing Material | 7075 T6 Aluminum |
| Window Size | 0.58 x 0.77 inches |
| Adjustment per Click | 1 MOA |
| Windage & Elevation Travel Range | ±30 MOA |
| Item Dimensions (LxWxH) | 1.62 x 1.07 x 0.95 inches |
| Item Weight | 0.08 Pounds |
8. Warranty and Support
For information regarding the product warranty, please refer to the official Holosun website or the warranty card included with your product. For technical support, service, or replacement parts, please contact Holosun customer service directly. Contact details can typically be found on the manufacturer's website or in the product packaging.


