
1. Important Safety Information
Before operating the RYOBI 40V 12-inch Cordless Snow Shovel, carefully read and understand all safety instructions. Failure to follow these instructions may result in serious injury.
- Wear appropriate safety gear, including gloves and eye protection.
- Be cautious when operating near power lines or other hazards.
- Ensure the work area is clear of debris, rocks, and other objects that could be thrown by the snow shovel.
- Keep bystanders, especially children and pets, away from the operating area.
- Do not operate the snow shovel in poor visibility or in conditions where you cannot maintain control.
- Always remove the battery pack when cleaning, servicing, or when the tool is not in use.
2. Product Overview
The RYOBI 40V 12-inch Cordless Snow Shovel is designed for efficient snow removal from sidewalks, driveways, and decks. This battery-powered unit offers portability and ease of use without the need for extension cords.
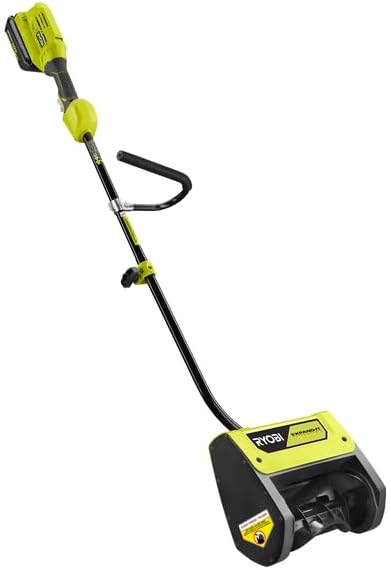
Figure 1: RYOBI 40V 12-inch Cordless Snow Shovel. This image shows the complete snow shovel assembly, including the battery inserted at the top, the main shaft, the auxiliary handle, and the snow clearing head at the bottom.
Key features include a 12-inch clearing width, capability to clear snow up to 6 inches deep, and a variable speed trigger for controlled operation. The unit is also attachment-capable, allowing integration with RYOBI Expand-It attachments.
3. Package Contents
Verify that all items are present upon unpacking:
- (1) RY408110 - 40V Snow Shovel Unit
- (1) OP40404 - 40V 4Ah Battery
- (1) OP404A - 40V Charger
- (1) Operator's Manual (this document)
4. Setup and Assembly
4.1 Battery Charging
- Connect the 40V Charger (OP404A) to a standard electrical outlet.
- Slide the 40V 4Ah Battery (OP40404) onto the charger. Ensure it clicks into place.
- Allow the battery to charge fully before first use. Refer to the charger's indicator lights for charging status.
4.2 Attaching the Snow Shovel Head
The RYOBI 40V Snow Shovel features an attachment-capable system. To attach the snow shovel head:
- Align the shaft of the snow shovel head with the coupler on the main power head.
- Push the shafts together until the lock/unlock coupler engages.
- Rotate the coupler 180 degrees to secure the attachment. Ensure it is firmly locked.
4.3 Installing the Battery
- Ensure the snow shovel is turned off.
- Slide the charged 40V battery into the battery port on the power head until it clicks securely into place.
- To remove, press the battery release latch and pull the battery out.
5. Operating Instructions
5.1 Starting the Snow Shovel
- Ensure the battery is fully charged and properly installed.
- Grip the main handle and the auxiliary handle firmly.
- Press and hold the safety button (if applicable) and then squeeze the variable speed trigger to start the unit.
5.2 Clearing Snow
- Push the snow shovel forward into the snow. The unit is designed to clear a 12-inch path and snow up to 6 inches deep.
- Adjust the variable speed trigger to control the throwing distance and power. Higher speeds are suitable for deeper or heavier snow.
- Overlap each pass slightly to ensure complete snow removal.
- For deeper snow, clear the top layer first, then make a second pass to clear the remaining snow.
- Direct the thrown snow away from windows, vehicles, and other objects. The unit can throw snow up to 22 feet.
5.3 Stopping the Snow Shovel
Release the variable speed trigger to stop the unit. Always remove the battery when finished operating or before performing any adjustments or maintenance.
6. Maintenance
6.1 Cleaning
- After each use, remove the battery.
- Use a dry cloth to wipe down the exterior of the snow shovel.
- Clear any snow or ice buildup from the auger and chute area using a non-metallic tool. Do not use your hands.
6.2 Storage
- Store the snow shovel in a dry, protected area away from children.
- Remove the battery from the unit before storing for extended periods.
- Store the battery in a cool, dry place, away from direct sunlight and extreme temperatures.
7. Troubleshooting
If the snow shovel does not operate as expected, consult the following table:
| Problem | Possible Cause | Solution |
|---|---|---|
| Unit does not start | Battery not installed correctly or discharged. | Ensure battery is fully charged and securely inserted. |
| Reduced snow throwing distance | Snow is too deep/heavy; auger is clogged. | Clear snow in shallower passes; remove battery and clear auger with a non-metallic tool. |
| Unit stops during operation | Overload protection activated; battery discharged. | Release trigger, wait a few seconds, then restart. If issue persists, check for obstructions or replace battery. |
8. Specifications
| Feature | Detail |
|---|---|
| Brand | RYOBI |
| Model Number | RY408110 |
| Power Source | Battery Powered (40V) |
| Clearing Width | 12 inches (30.48 cm) |
| Ideal Snow Depth | Up to 6 inches (15 cm) |
| Snow Throwing Distance | Up to 22 feet |
| Item Weight | 17 pounds |
| Engine Type | Electric |
| Color | Yellow |
| UPC | 046396039415 |
9. Warranty and Support
The RYOBI 40V 12-inch Cordless Snow Shovel (Model RY408110) is backed by a 5-year limited warranty. The included 40V 4Ah battery is covered by a 3-year limited warranty.
For warranty claims, technical support, or to purchase replacement parts, please contact RYOBI customer service or visit the official RYOBI website. Keep your proof of purchase for warranty validation.
For additional information, you may visit the RYOBI Tools website.


