Introduction
Thank you for choosing the Kalawen Wireless Weather Station. This device provides comprehensive weather information, including indoor and outdoor temperature and humidity, weather forecasts, atmospheric pressure, and moon phases. It also features a DCF radio-controlled clock and alarm functions. This manual will guide you through the setup, operation, and maintenance of your weather station.

Image: The Kalawen Wireless Weather Station main unit with its digital color display and the accompanying outdoor sensor.
Safety Information
- Do not expose the main unit or outdoor sensor to extreme temperatures, direct sunlight, or moisture.
- Avoid dropping the device or subjecting it to strong impacts.
- Do not attempt to disassemble or repair the unit yourself. Contact customer support for assistance.
- Keep batteries out of reach of children. Dispose of used batteries responsibly according to local regulations.
- Use only the specified power adapter for the main unit.
Package Contents
Please check the package contents to ensure all items are present:
- Kalawen Wireless Weather Station Main Unit
- Wireless Outdoor Sensor
- Power Adapter for Main Unit
- User Manual (this document)
Product Overview
The Kalawen Weather Station consists of a main display unit and a remote outdoor sensor. The main unit displays various environmental data and time information, while the outdoor sensor collects external temperature and humidity data.

Image: Detailed diagram of the weather station's display, indicating various data points and control buttons. Key elements include frost alarm, weather forecast, pressure trend, time, alarm clock, temperature alert, remote sensor channel, temperature, dew point, heat index, humidity, weekday, calendar, and moon phase.
Setup
1. Powering the Main Unit
The main unit can be powered by the included power adapter or by 3 AAA batteries (not included).
- Using the Power Adapter: Connect the power adapter to the DC port on the back of the main unit and plug it into a wall outlet. The display will light up continuously.
- Using Batteries: Open the battery compartment on the back of the main unit and insert 3 new AAA batteries, observing the correct polarity (+/-). When powered by batteries, the display will automatically turn off after 30 seconds to conserve energy. Press any button to temporarily illuminate the display.
2. Installing Batteries in the Outdoor Sensor
The outdoor sensor requires 2 AAA batteries (not included).
- Open the battery compartment on the back of the outdoor sensor.
- Insert 2 new AAA batteries, ensuring correct polarity.
- Close the battery compartment securely.

Image: The rear view of the main weather station unit, illustrating the battery compartment for AAA batteries and the port for the power adapter. The outdoor sensor is also shown, indicating its battery requirement.
3. Pairing the Outdoor Sensor
After powering both units, the main unit will automatically search for the outdoor sensor. The outdoor temperature and humidity should appear on the display within a few minutes. If not, press and hold the 'CHANNEL' button on the main unit to initiate a manual search.
4. Initial Time and Date Setup (DCF Radio Clock)
The weather station is equipped with a DCF radio clock. Upon initial power-up, it will attempt to synchronize with the DCF signal to set the time and date automatically. This process may take several minutes or hours depending on signal strength. Ensure the unit is placed away from electronic interference.
- If the DCF signal is not received, you can manually set the time and date. Refer to the 'Operating' section for manual settings.
5. Outdoor Sensor Placement
For accurate readings, place the outdoor sensor in a shaded, dry location, protected from direct sunlight and rain. The maximum transmission range is up to 60 meters (197 feet) in open areas. Avoid placing it near large metal objects or other electronic devices that may interfere with the signal.

Image: Illustrations demonstrating suitable locations for the outdoor sensor to ensure a stable signal transmission range of up to 60 meters. Examples include a patio, under an eave, or on a fence.
Operating Instructions
1. Understanding the Display
The color display is divided into several sections, showing various data:
- Top Left: Weather Forecast icons (Sunny, Partly Cloudy, Cloudy, Rainy, Snowy).
- Top Right: Outdoor Temperature and Humidity, Frost Alarm, Temperature Alert, Dew Point, Heat Index.
- Middle Left: Atmospheric Pressure and Pressure Trend.
- Middle Right: Day, Date, Calendar, Moon Phase.
- Bottom Left: Time Zone, Current Time, Alarm Clock status.
- Bottom Right: Indoor Temperature and Humidity.

Image: A visual representation of the weather forecast icons on the display, including sunny, partly cloudy, rainy, and snowy conditions.
2. Setting Time and Date Manually
If DCF synchronization fails or you prefer manual setting:
- Press and hold the 'TIME' button to enter time setting mode.
- Use the '+' or '-' buttons to adjust the values (e.g., hour, minute, year, month, day).
- Press 'TIME' again to confirm each setting and move to the next.
- Press 'TIME' one last time to exit setting mode.
3. Setting Alarms
The weather station supports two independent alarms.
- Press the 'ALARM' button repeatedly to select Alarm 1 or Alarm 2.
- Press and hold the 'ALARM' button to enter alarm setting mode for the selected alarm.
- Use the '+' or '-' buttons to adjust the hour and minute.
- Press 'ALARM' to confirm each setting.
- To activate/deactivate an alarm, press the 'ALARM' button briefly when the alarm time is displayed. An alarm icon will appear/disappear.
4. Snooze Function
When an alarm sounds, press the 'SNOOZE/LIGHT' button to activate the snooze function. The alarm will sound again after 5 minutes. To stop the alarm completely, press any other button.
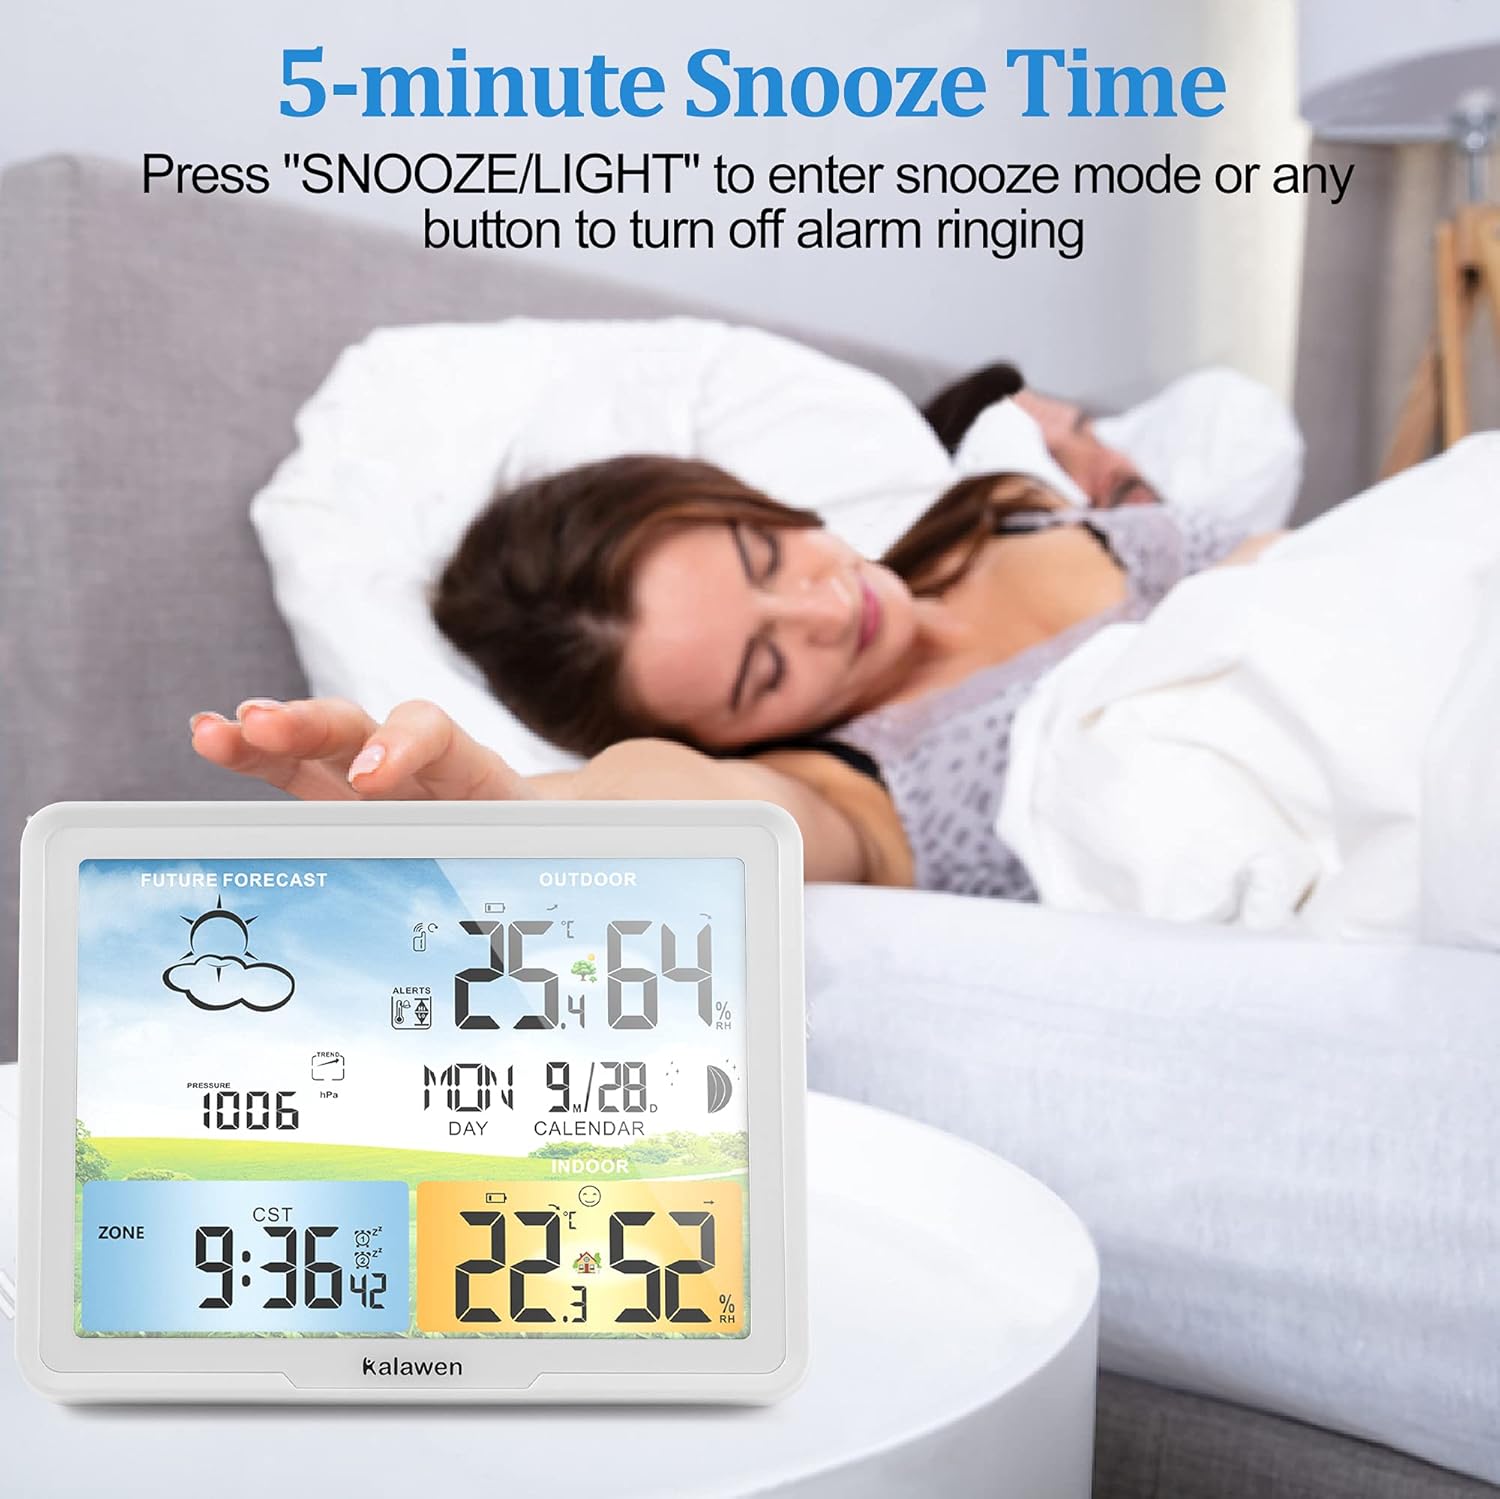
Image: The weather station displaying the time with an alarm icon, illustrating the 5-minute snooze feature activated by pressing the 'SNOOZE/LIGHT' button.
5. Display Brightness Adjustment
The display has 3 brightness levels. When powered by the adapter, press the 'SNOOZE/LIGHT' button to cycle through the brightness levels or turn the display off.

Image: Three different brightness settings of the weather station's color display are shown, ranging from dim to bright, along with an option to turn the display off.
6. Temperature and Humidity Alerts
The weather station can be set to alert you when indoor or outdoor temperature/humidity exceeds or falls below a set range. Refer to the detailed instructions in the full manual for setting these alerts.
7. Multiple Outdoor Sensors (Optional)
The main unit supports up to 3 outdoor sensors (one included). To add additional sensors, ensure they are powered on, then press the 'CHANNEL' button on the main unit to cycle through channels or initiate a search for new sensors.
Maintenance
- Cleaning: Wipe the display and unit surfaces with a soft, damp cloth. Do not use abrasive cleaners or solvents.
- Battery Replacement: Replace batteries in both the main unit and outdoor sensor when the low battery indicator appears on the display. Ensure to use new batteries of the specified type (AAA).
- Storage: If storing the device for an extended period, remove all batteries to prevent leakage.
Troubleshooting
| Problem | Possible Solution |
|---|---|
| No display on main unit. | Check power adapter connection or replace AAA batteries. If using batteries, press 'SNOOZE/LIGHT' to illuminate. |
| Outdoor temperature/humidity not displayed. | Ensure outdoor sensor batteries are installed correctly and are not depleted. Press and hold 'CHANNEL' on the main unit to re-establish connection. Ensure sensor is within range (max 60m) and not blocked by obstacles. |
| Incorrect time/date. | Allow time for DCF signal synchronization. Ensure the unit is placed in an area with good reception. Manually set time and date if necessary. |
| Weather forecast inaccurate. | The weather forecast is based on atmospheric pressure changes over 8-24 hours and is an estimation, not a guarantee. Allow the unit to operate for several days to calibrate. |
| Display too dim. | If using the power adapter, press 'SNOOZE/LIGHT' to adjust brightness. If on battery power, the display is designed to dim to save energy. |
Specifications
| Feature | Detail |
|---|---|
| Model | 20A |
| Main Unit Power | Power Adapter (included) or 3 x AAA Batteries (not included) |
| Outdoor Sensor Power | 2 x AAA Batteries (not included) |
| Wireless Range | Up to 60 meters (197 feet) in open areas |
| Temperature Accuracy | ±1 °C |
| Special Features | Alarm, Wireless, Adjustable Brightness, DCF Radio Clock |
| Color | White |
| Dimensions (Package) | 24.7 x 22.7 x 6.9 cm |
| Weight (Package) | 560 g |
Support
For any questions, issues, or technical assistance, please contact Kalawen customer support directly via Amazon. We are committed to resolving any problems within 24 hours and take full responsibility for product quality issues.


