
Introduction
The KRK GoAux 3 portable nearfield monitors are engineered to deliver high-quality sound in a compact, travel-friendly design. Ideal for musicians, producers, and audio enthusiasts on the go, these monitors provide accurate audio reproduction for mixing, monitoring, and general listening. This manual provides essential information for setting up, operating, and maintaining your GoAux 3 monitors.

Figure 1: Front view of the KRK GoAux 3 Portable Studio Monitors.
Package Contents
Verify that all items listed below are included in your package:
- KRK GoAux 3 Portable Studio Monitors (Pair)
- Adjustable Monitor Stands (Pair)
- Speaker Link Cable
- Power Cable
- Nylon Carrying Bag
- Quick Start Guide

Figure 2: KRK GoAux 3 monitors and included accessories within the carrying bag.

Figure 3: The durable nylon carrying bag for the GoAux 3 monitors.

Figure 4: Included speaker link cable and power cable.
Setup
1. Speaker Placement and Stands
Position the monitors on a stable, flat surface, ideally at ear level in an equilateral triangle with your listening position. The included adjustable stands allow for optimal angling to direct sound towards your ears.
- Unfold the adjustable monitor stands.
- Secure each monitor to its stand using the provided thumb screws, aligning the screw with the threaded insert on the bottom of the monitor.
- Adjust the stand to your desired angle for optimal listening.

Figure 5: The adjustable monitor stands.
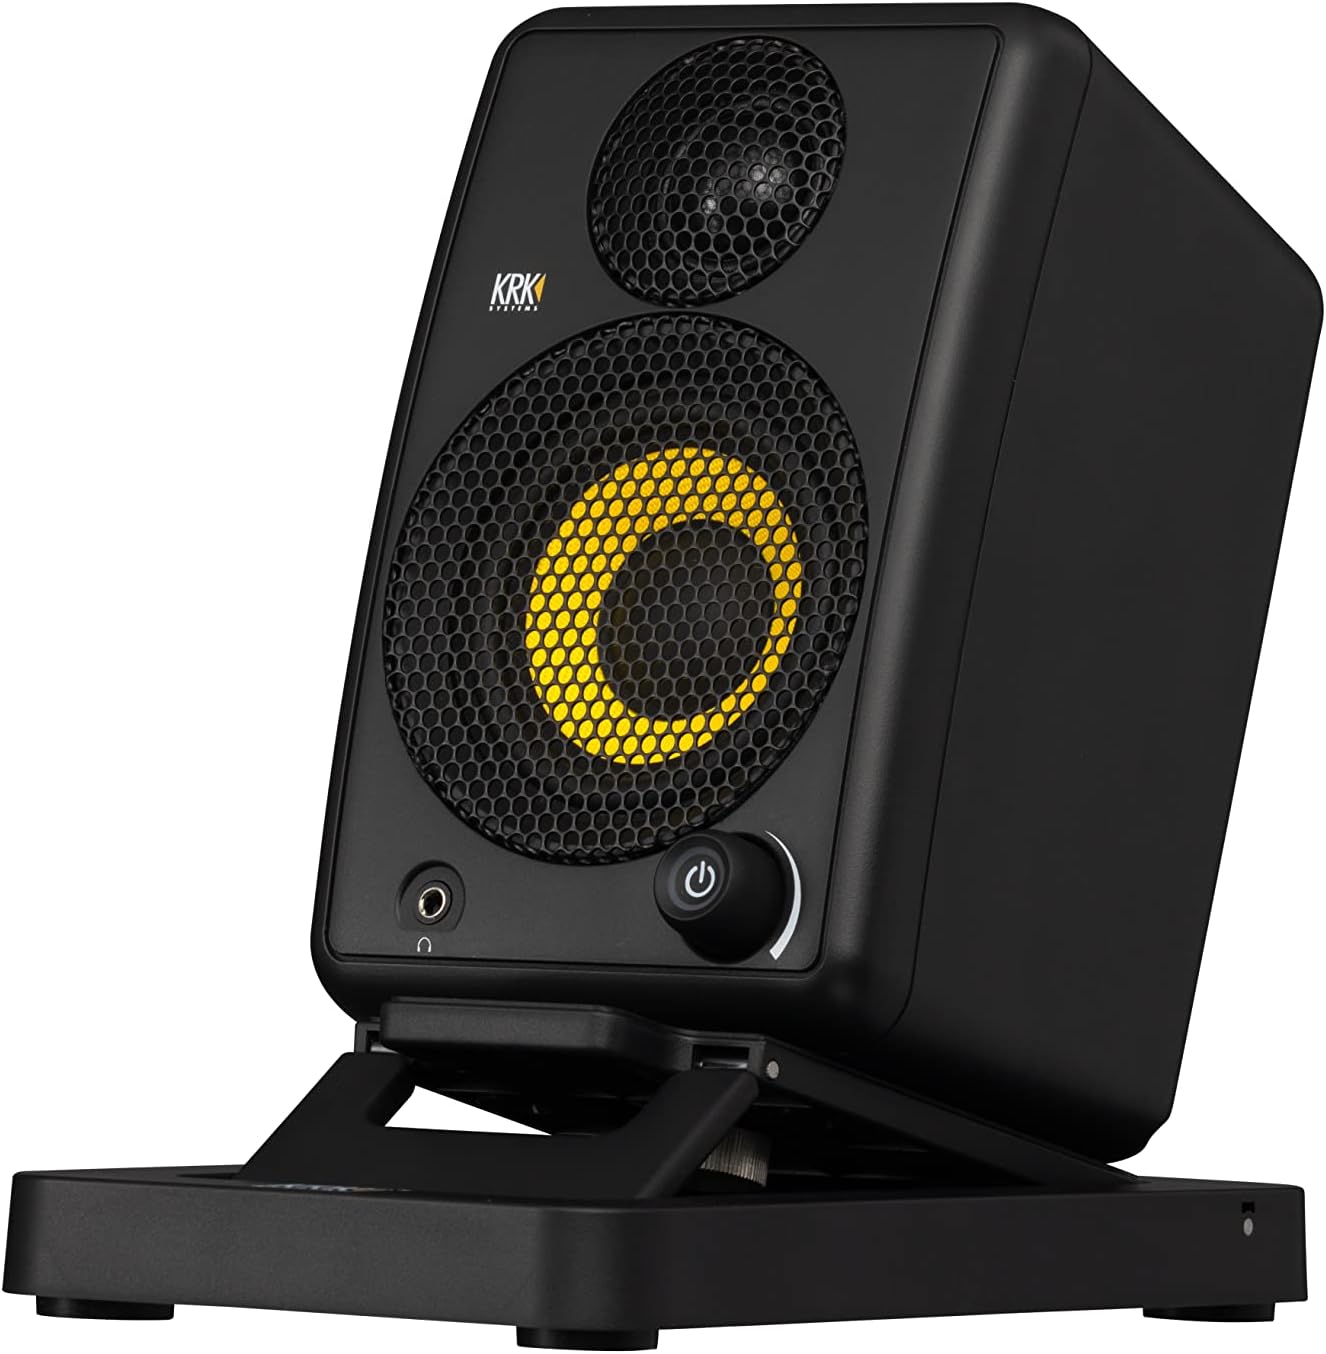
Figure 6: GoAux 3 monitor on its adjustable stand.
2. Connecting Speakers
- Connect the provided speaker link cable from the 'OUT TO RIGHT' port on the rear of the left (main) speaker to the 'RIGHT SPEAKER' input on the rear of the right (passive) speaker.
- Connect the power cable to the AC input on the rear of the left (main) speaker, then plug it into a suitable AC power outlet.
3. Audio Input Connections
The GoAux 3 offers multiple input options:
- Aux Input: Use a 1/8" (3.5mm) stereo cable to connect devices like smartphones, tablets, or laptops to the 'AUX IN' port.
- RCA Inputs: Use RCA cables to connect audio interfaces, DJ mixers, or other audio equipment to the 'LEFT IN' and 'RIGHT IN' RCA ports.
- Bluetooth: For wireless connection, refer to the 'Bluetooth Pairing' section under Operating.
4. Headphone Connection
A 1/8" (3.5mm) stereo headphone output is located on the front panel of the left speaker. Plugging in headphones will automatically mute the GoAux 3 speakers, allowing for private monitoring.
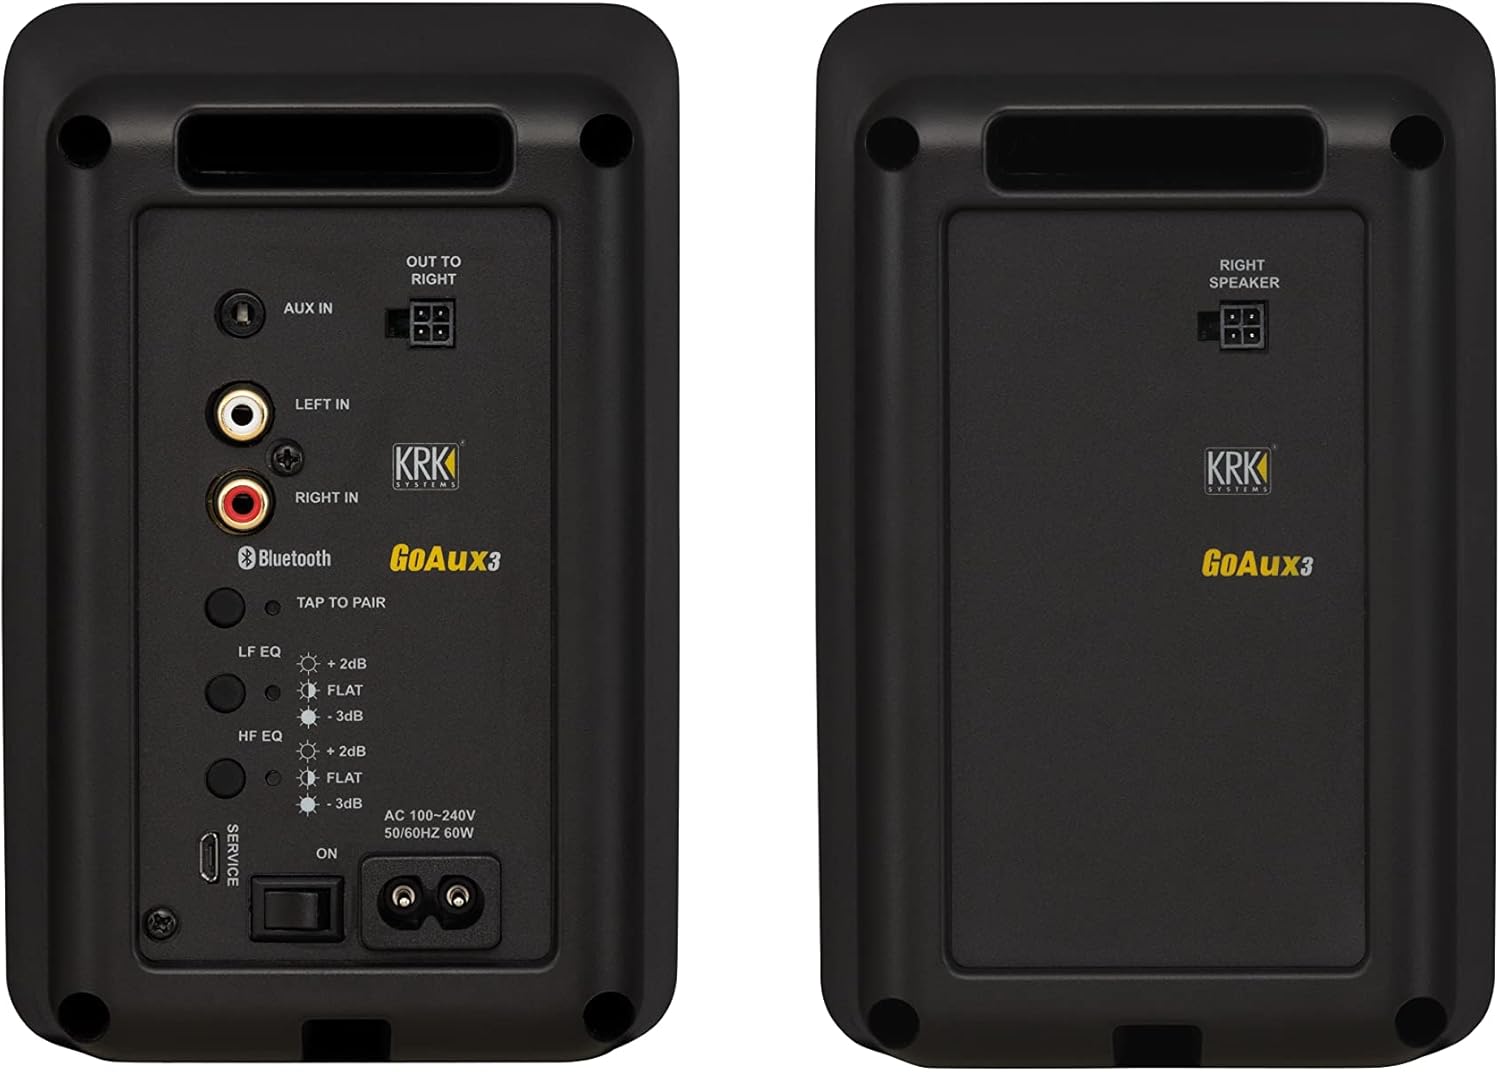
Figure 7: Rear panel of the GoAux 3 (left) and GoAux 4 (right) monitors. Note: GoAux 3 features Aux In, RCA In, Bluetooth, LF/HF EQ, and speaker link out. GoAux 3 does not include USB Audio In or Auto ARC functionality.
Operating the GoAux 3
1. Power On/Off and Volume Control
- To power on the monitors, flip the 'ON/OFF' switch on the rear panel of the left speaker to 'ON'.
- The front panel power/volume knob will illuminate. Rotate this knob clockwise to increase volume and counter-clockwise to decrease.
- To power off, flip the 'ON/OFF' switch to 'OFF'.
2. EQ Adjustments
The GoAux 3 features Low Frequency (LF) and High Frequency (HF) EQ controls on the rear panel of the left speaker to tailor the sound to your environment and preference.
- LF EQ: Adjusts the bass response. Options typically include +2dB, FLAT, and -3dB.
- HF EQ: Adjusts the treble response. Options typically include +2dB, FLAT, and -3dB.
- Press the respective LF EQ or HF EQ buttons to cycle through the available settings. The illuminated indicator will show the current setting.
3. Bluetooth Pairing
- Ensure the monitors are powered on.
- Press the 'TAP TO PAIR' button on the rear panel of the left speaker. The Bluetooth indicator will begin blinking.
- On your Bluetooth-enabled device (smartphone, tablet, computer), search for available devices and select 'KRK GoAux 3'.
- Once paired, the Bluetooth indicator will glow solid blue.
4. Standby Mode
The GoAux 3 monitors feature an automatic standby mode to conserve power. If no audio signal is detected for approximately 30 minutes, the monitors will enter standby mode, indicated by a dimming of the power/volume knob LED.
- To manually enter standby mode, press and hold the power/volume knob for 3 seconds.
- To exit standby mode, double-tap the power/volume knob.
Video 1: An overview of the KRK GoAux 3 Portable Monitors, highlighting key features and portability.
Video 2: A detailed look at the KRK GoAux 3, including connections and controls. Note: The video briefly shows the rear panel of a GoAux 4 model; please refer to Figure 7 for the specific GoAux 3 rear panel layout.
Maintenance
- Cleaning: Use a soft, dry cloth to clean the exterior of the monitors. Avoid abrasive cleaners or solvents.
- Storage: When not in use or for transport, store the monitors and accessories in the provided nylon carrying bag to protect them from dust and damage.
- Ventilation: Ensure adequate airflow around the rear of the main speaker to prevent overheating.
Troubleshooting
- No Sound:
- Check power connections and ensure the monitors are powered on.
- Verify audio source connection (Aux, RCA, Bluetooth).
- Ensure volume is turned up on both the monitors and the audio source.
- If headphones are plugged in, unplug them to enable speaker output.
- Distorted Sound:
- Reduce the volume on both the monitors and the audio source.
- Check audio cables for damage or loose connections.
- Ensure EQ settings are appropriate for your listening environment.
- Bluetooth Pairing Issues:
- Ensure the monitors are in pairing mode (blinking Bluetooth LED).
- Forget 'KRK GoAux 3' from your device's Bluetooth settings and attempt to re-pair.
- Move your device closer to the monitors.
- Monitors Enter Standby Unexpectedly:
- This is normal behavior if no audio signal is detected for 30 minutes. Double-tap the power/volume knob to wake them.
Specifications
| Feature | Specification |
|---|---|
| Model Name | GoAUX 3 |
| Speaker Type | Portable Nearfield Monitor |
| Woofer Diameter | 3 Inches (Glass Aramid) |
| Tweeter Diameter | 1 Inch (Soft Textile Dome) |
| Total System Power | 60 Watts RMS (Bi-amplified) |
| Frequency Response | 65 Hz - 20 kHz |
| Signal-to-Noise Ratio | 95 dB |
| Connectivity Technology | Bluetooth, 1/8" Aux, RCA Stereo |
| Bluetooth Range | 10 Meters |
| EQ Controls | LF EQ (+2dB, FLAT, -3dB), HF EQ (+2dB, FLAT, -3dB) |
| Headphone Output | 1/8" (3.5mm) Stereo (Front Panel) |
| Cabinet Material | Acrylonitrile Butadiene Styrene (ABS) |
| Product Dimensions (each) | 4.72"D x 6.8"W x 4.37"H |
| Item Weight | 10.18 pounds (Pair) |

Figure 8: Dimensions of the KRK GoAux 3 monitor on its stand.
Warranty and Support
Warranty Information
The KRK GoAux 3 Portable Studio Monitors come with a Limited Warranty. Please refer to the warranty card included in your package or visit the official KRK website for detailed terms and conditions regarding coverage, duration, and service procedures.
Customer Support
For technical assistance, troubleshooting beyond this manual, or warranty claims, please contact KRK Customer Support through their official website or the contact information provided in your product documentation. Ensure you have your product model number (GoAUX 3) and proof of purchase available when contacting support.