Introduction
The ToolkitRC M7AC is a versatile multi-function smart balance charger designed for various battery types and applications. It features dual AC/DC input and supports 2-6S batteries. Beyond its primary charging capabilities, the M7AC integrates several useful tools, including a power supply, multimeter, signal source, drone charger, and signal tester, making it an indispensable tool for hobbyists and professionals alike.
Key features include:
- Dual AC/DC Input for flexible power options.
- XT30/XT60 Output for broad compatibility.
- Supports 2-6S LiPo, LiHV, LiFe, Lion, LTO batteries, 1-16S NiMh, and 1-10S Pb batteries.
- Integrated functions: Power supply, multimeter, signal source, drone charger, and signal tester.
- IPS 2.4 inch LCD display for clear information.
Safety Information
Please read and understand all safety warnings and instructions before using the M7AC charger. Improper use can lead to property damage, injury, or death.
- Always operate the charger in a well-ventilated area, away from flammable materials.
- Do not leave the charger unattended during operation.
- Ensure correct battery type and cell count settings before charging.
- Use only compatible power sources and cables.
- Keep the device away from water, moisture, and extreme temperatures.
- Do not attempt to disassemble or modify the charger.
Product Overview
Familiarize yourself with the components and interfaces of your M7AC charger.

Figure 1: Front View. This image displays the front of the M7AC charger, highlighting its 2.4-inch IPS LCD screen. The screen shows real-time charging data, including voltage, current, capacity, and individual cell voltages. To the right of the screen are the navigation button and scroll wheel for menu interaction.

Figure 2: Side View (Ports). This image shows the side of the M7AC charger where various input and output ports are located. Visible ports include a USB-A output (5.0V 2.1A), a balance port (2-6S), and dual XT60 output ports labeled "OUTPUT".

Figure 3: Signal Output Display. This image captures the M7AC's screen displaying the "Signal Output" function, specifically for SBUS. It shows multiple channels with adjustable pulse widths, demonstrating the device's capability as a signal source or tester.
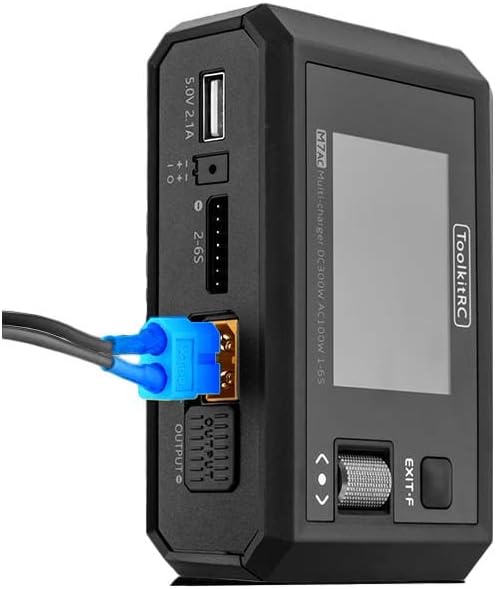
Figure 4: XT60 Output in Use. This image illustrates an XT60 connector plugged into one of the M7AC's output ports, demonstrating how a battery or device would connect for charging or power supply functions.
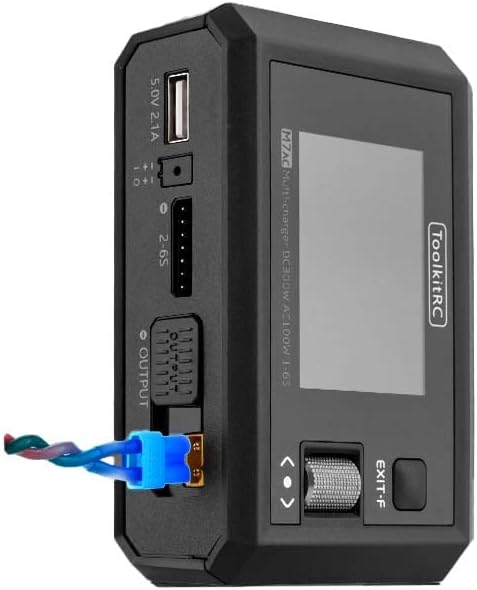
Figure 5: XT60 and Balance Lead Connected. This image provides another perspective of the M7AC with an XT60 connector and a balance lead connected, showing the typical setup for balanced charging of a multi-cell battery pack.
Setup
- Power Connection:
- For AC input, connect the provided AC power cable to the charger's AC input port and then to a standard wall outlet (AC 100-240V).
- For DC input, connect a DC power source (7.0-28.0V) to the charger's DC input port. Ensure correct polarity.
- Initial Power On: Once connected to power, the charger will automatically power on and display the main menu on the IPS LCD screen.
- Navigation: Use the scroll wheel and button on the right side of the charger to navigate through menus and select options.
Operating Instructions
1. Battery Charging
- Connect Battery: Connect your battery's main discharge lead to one of the XT60 output ports. For multi-cell batteries, also connect the balance lead to the appropriate balance port (2-6S).
- Select Battery Type: From the main menu, navigate to the "Charger" function. Select the correct battery type (LiPo, LiHV, LiFe, Lion, LTO, NiMh, Pb) and cell count (e.g., 3S, 6S).
- Set Charging Parameters: Adjust the charging current (up to 15A) and mode (e.g., Balance Charge, Fast Charge, Storage Charge) as required for your battery. The maximum charging power is 300W.
- Start Charging: Confirm settings and start the charging process. The screen will display real-time charging status, including total voltage, current, charged capacity, and individual cell voltages.
2. Battery Discharging
The M7AC supports discharging batteries with a power of up to 300W in Recycle mode or 15W in Normal mode.
- Connect Battery: Connect the battery to the XT60 output and balance port.
- Select Discharge Function: Navigate to the "Discharge" function in the menu.
- Set Parameters: Set the discharge current and target voltage.
- Start Discharging: Initiate the discharge process. Monitor the battery temperature and voltage during discharge.
3. Power Supply Function
The M7AC can act as a regulated DC power supply (1.0-28.0V, 0.5-15A).
- Access Power Supply Mode: Select the "Power Supply" option from the main menu.
- Set Output Voltage and Current: Adjust the desired output voltage and current limit using the scroll wheel.
- Connect Device: Connect your device requiring power to the XT60 output port.
- Activate Output: Enable the power supply output.
4. Multimeter Function
Measure voltage and internal resistance of batteries.
- Voltage Measurement: Connect the battery to the balance port to measure individual cell voltages (1.0-5.0V per cell, 1-6S).
- Internal Resistance Measurement: The charger can measure internal resistance from 0.1 mR to 99mR for 1-6S batteries.
5. Signal Source / Tester
The M7AC can generate and test various signals.
- PWM Output: Generate PWM signals (500-2500us @ 20-1000Hz).
- PPM Output: Generate PPM signals (880-2200us * 8CH @ 20-50Hz).
- SBUS Output: Generate SBUS signals (880-2200us * 16CH @ 20-100Hz).
6. USB-A Output
The USB-A port provides 5.0V at 2.1A, suitable for charging mobile devices or powering small electronics.
Maintenance
- Cleaning: Use a soft, dry cloth to clean the charger's exterior. Do not use solvents or abrasive cleaners.
- Storage: Store the charger in a cool, dry place away from direct sunlight and extreme temperatures.
- Cable Inspection: Regularly inspect all cables and connectors for signs of wear or damage. Replace damaged cables immediately.
- Firmware Updates: Check the ToolkitRC official website periodically for firmware updates to ensure optimal performance and access to new features. The TF Card slot (128MB-16GB) is used for updates.
Troubleshooting
| Problem | Possible Cause | Solution |
|---|---|---|
| Charger does not power on. | No power input or faulty cable. | Check AC/DC power connection. Ensure power source is active. Try a different power cable. |
| Battery not detected. | Incorrect connection or damaged battery. | Ensure main and balance leads are securely connected. Verify battery is not severely over-discharged or damaged. |
| Charging error message. | Incorrect battery settings (type, cell count) or battery fault. | Double-check battery type and cell count settings. Inspect battery for swelling or damage. |
| Screen is unresponsive. | Temporary software glitch. | Disconnect power, wait a few seconds, then reconnect to restart the device. |
Specifications
| Category | Parameter | Value |
|---|---|---|
| Charger | Input Voltage | AC 100-240V MAX 100W 1.5A / DC 7.0-28.0V @MAX 20A |
| Battery Type Support | Lipo LiHV LiFe Lion LTO@1-6S / NiMh @1-16S Pb @1-10S | |
| Charging Power | 300W @MAX 15A | |
| Discharge Power | 300W @MAX 15A Recycle mode / 15W@3A Normal mode | |
| Balance Current | 800mA @ 4.2V | |
| USB-A Output | 10W@5.0V | |
| General | LCD | IPS 2.4 inch LCD 320*240 resolution |
| Product Size | 112x73x38mm | |
| Product Weight | 245g | |
| TF Card Support | 128MB-16GB | |
| Color | Black | |
| Measurement | Internal Resistance | 0.1 mR-99mR @ 1-6S |
| Voltage | 1.0-5.0V @ 1-6S | |
| SBUS | 880-2200us * 16CH @ 20-100Hz | |
| PPM | 880-2200us * 8CH @ 20-50Hz | |
| PWM | 880-2200us @ 20-400Hz | |
| Output | Power Supply | 1.0-28.0V @0.5-15A mode: CC CVSBUS |
| SBUS | 880-2200us * 16CH @ 20-100Hz | |
| PPM | 880-2200us * 8CH @ 20-50Hz | |
| PWM | 500-2500us @ 20-1000Hz | |
| Other | Item Weight | 12.96 ounces (approx. 367g) |
| Manufacturer Recommended Age | 14 years and up | |
| Specification Met | UL |
Warranty and Support
ToolkitRC products are manufactured to high quality standards. For warranty information and technical support, please refer to the official ToolkitRC website or contact their customer service directly. Keep your purchase receipt as proof of purchase for any warranty claims.
For further assistance, visit the ToolkitRC Official Website.


