
1. Introduction
Thank you for choosing the BOMGE CTX 12-Channel Audio Mixing Console. This professional-grade mixer is designed to provide high-quality audio processing for various applications, including live performances, studio recording, and home entertainment. Featuring 12 channels, USB and Bluetooth connectivity, 48V phantom power, and comprehensive equalization controls, this console offers versatility and superior sound performance. Please read this manual thoroughly before operating the device to ensure proper use and to maximize its potential.
2. Safety Instructions
- Power Supply: Use only the specified power adapter. Ensure the voltage matches the requirements of your region.
- Water and Moisture: Do not expose the mixer to rain, moisture, or any liquids. Do not place objects filled with liquids on the mixer.
- Ventilation: Ensure adequate ventilation around the unit. Do not block ventilation openings.
- Heat Sources: Keep the mixer away from heat sources such as radiators, heat registers, stoves, or other apparatus that produce heat.
- Cleaning: Clean only with a dry cloth. Disconnect from power before cleaning.
- Servicing: Do not attempt to service this product yourself. Refer all servicing to qualified service personnel.
- Cables: Protect the power cord from being walked on or pinched, particularly at plugs, convenience receptacles, and the point where they exit from the apparatus.
- Phantom Power: When using 48V phantom power for condenser microphones, ensure the microphone is connected before activating phantom power to prevent damage.
3. Product Overview
The BOMGE CTX 12-Channel Audio Mixing Console features a robust design with intuitive controls for seamless audio management. Below is an overview of the main components and their functions.

Figure 3.1: Front view of the BOMGE CTX 12-Channel Audio Mixing Console, showing all channels, controls, and the main output section.
3.1. Control Panel Layout
Each channel on the mixer is equipped with a set of controls for precise audio shaping. The main section includes master controls and the digital media player interface.

Figure 3.2: Detailed view of a single channel's controls, including Microphone Audio Input, Line Input, Gain Adjustment Knob, High Frequency Adjustment, Medium Frequency Adjustment, Low Frequency Adjustment, Auxiliary Drive, Reverb Adjustment, Left and Right Channel Balance Adjustment (PAN), Peak Signal Indicator, Volume Fader, and Monitor Button.
3.2. Digital Media Player Section
The integrated digital media player supports USB and Bluetooth connectivity, allowing for versatile audio playback and recording.

Figure 3.3: Close-up of the MP3 player section, showing the display, USB socket, MP3 playback audio and video controls, MP3 playback signal distribution button, Function button, 48V phantom power switch, Auxiliary sending master, Monitor button, Tape Input volume knob, Headphone volume control, Effect send signal main knob, Impact interval of processor latency, Echo frequency and depth adjustment, and Acoustic and visual positioning.
3.3. Key Features
- 3-Band Equalization: Each channel features adjustable high, medium, and low frequencies for precise tone control.
- Reverb and Delay Effects: Built-in effects to enhance vocal and instrument performances.
- +48V Phantom Power: Provides necessary power for condenser microphones, ensuring high-quality audio input.
- USB Interface: Supports connection to computers for recording and playback, and direct playback from USB flash drives.
- Bluetooth Connectivity: Wireless connection to mobile phones and other smart devices for audio streaming.
- LED Indicators: Visual feedback for signal levels and operational status.

Figure 3.4: The built-in 48V power supply provides the exact voltage rating required for condenser microphones, ensuring stable mixer operation.
4. Setup
Follow these steps to set up your BOMGE CTX mixer:
- Unpacking: Carefully remove the mixer and all accessories from the packaging.
- Placement: Place the mixer on a stable, flat surface, ensuring adequate ventilation around the unit.
- Power Connection: Connect the provided power adapter to the mixer's power input and then to a suitable power outlet. Do not power on the unit yet.
- Connecting Inputs:
- Microphones: Connect XLR microphones to the MIC inputs. If using condenser microphones, ensure the 48V phantom power is OFF before connecting, then turn it ON after connection.
- Line-Level Devices: Connect instruments (keyboards, guitars with preamps), CD players, or other line-level devices to the LINE inputs using 1/4-inch TS/TRS cables.
- PC/USB: For computer recording/playback, connect a USB cable from the mixer's USB port to your computer.
- Connecting Outputs:
- Main Output: Connect the L/R MAIN OUT to your power amplifier or active speakers using XLR or 1/4-inch cables.
- Headphones: Connect headphones to the PHONES output for monitoring.
- RCA Output: Use the RCA outputs for connecting to recording devices or other audio equipment.
- Power On: Once all connections are secure, turn on the mixer's power switch.

Figure 4.1: The mixer is compatible with a wide range of audio equipment, including microphones, speakers, electronic organs, portable sound systems, computers, power amplifiers, and CD players.
5. Operating Instructions
5.1. Basic Mixing
- Gain Adjustment: Adjust the GAIN knob for each input channel to achieve an optimal input level. The peak indicator should occasionally flash but not stay lit.
- Equalization (EQ): Use the HF (High Frequency), MF (Medium Frequency), and LF (Low Frequency) knobs to shape the tone of each channel.
- Auxiliary Send (AUX): Use the AUX knob to send a portion of the channel's signal to an external effects processor or monitor mix.
- Effects (FX): Use the FX knob to control the amount of internal reverb or delay applied to the channel.
- Pan (PAN): Adjust the PAN knob to position the channel's sound in the stereo field (left to right).
- Channel Fader: Use the channel fader to control the volume of each individual channel in the main mix.
- Main Mix Fader: Adjust the L/R MAIN fader to control the overall output volume of the mixer.
5.2. Bluetooth Connectivity
The mixer supports wireless audio streaming via Bluetooth.
- Activate Bluetooth: On the digital media player section, press the MODE button until "Bluetooth" is displayed.
- Pairing: On your mobile device (smartphone, tablet), enable Bluetooth and search for available devices. Select "BOMGE Mixer" or a similar name from the list.
- Connection: Once paired, your device will connect to the mixer. You can now play audio from your device through the mixer.
- Volume Control: Adjust the volume using the dedicated fader for the Bluetooth channel on the mixer.
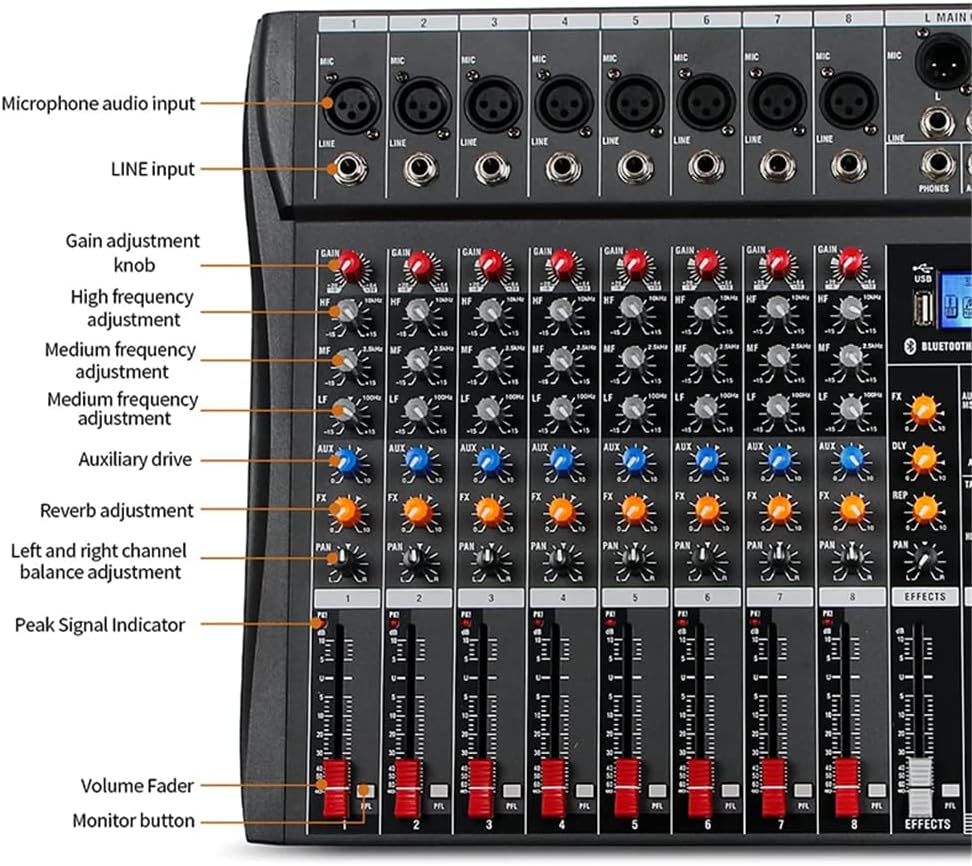
Figure 5.1: Wireless Bluetooth fast connection, synchronous matching with smart devices, offering fast speed, zero delay, and instant connection for audio playback.
5.3. USB Recording and Playback
The USB interface allows for direct playback from USB flash drives and connection to a computer for recording and playback.
- USB Flash Drive Playback: Insert a USB flash drive containing MP3 audio files into the USB port. The mixer will automatically detect and begin playing the files. Use the media player controls (play/pause, next/previous) to navigate.
- Computer Connection (Recording/Playback): Connect the mixer to your computer via a USB cable. The mixer will be recognized as an audio device. You can then use your preferred Digital Audio Workstation (DAW) software to record audio from the mixer or play audio from your computer through the mixer.

Figure 5.2: The USB interface supports connection of a computer or USB flash drive, compatible with USB, flash reader, MP3, mix, and record functions.
6. Maintenance
Proper maintenance ensures the longevity and optimal performance of your mixer.
- Cleaning: Regularly wipe the surface of the mixer with a soft, dry, lint-free cloth. Do not use abrasive cleaners, solvents, or waxes.
- Dust Protection: When not in use, cover the mixer with a dust cover to prevent dust and debris from accumulating on controls and inside the unit.
- Storage: Store the mixer in a cool, dry place away from direct sunlight and extreme temperatures.
- Fader and Knob Care: Avoid applying excessive force to faders and knobs. If they become stiff, do not attempt to lubricate them yourself; consult qualified service personnel.
7. Troubleshooting
If you encounter issues with your BOMGE CTX mixer, refer to the following common problems and solutions:
| Problem | Possible Cause | Solution |
|---|---|---|
| No sound output | Power off; cables disconnected; main fader down; channel fader down; incorrect input selection. | Check power connection; ensure all cables are securely connected; raise main and channel faders; verify correct input source. |
| Distorted sound | Input gain too high; output level too high; faulty cable. | Reduce input GAIN; lower main output level; try a different cable. |
| Microphone not working (condenser mic) | 48V phantom power not activated; faulty microphone or cable. | Activate 48V phantom power; test with a different microphone or cable. |
| Bluetooth not connecting | Bluetooth not in pairing mode; device too far; interference. | Ensure mixer is in Bluetooth mode; bring device closer; restart both mixer and device. |
| USB playback not working | USB drive not formatted correctly; unsupported file format; faulty USB drive. | Ensure USB drive is FAT32 formatted; use MP3 files; try a different USB drive. |
If the problem persists after trying these solutions, please contact customer support.
8. Specifications
Detailed technical specifications for the BOMGE CTX 12-Channel Audio Mixing Console:
- Model Number: CTX12-12 Channels
- Number of Channels: 12
- Dimensions (L x W x H): 51.6 x 34 x 3.7 cm (20.3 x 13.4 x 1.4 inches)
- Weight: 5.5 Kilograms (12.1 lbs)
- Body Material: Metal
- Connectivity Technology: USB 2.0, Bluetooth, XLR, 0.25 inch (TS/TRS), RCA
- Phantom Power: +48 Volts
- Power Source: Electrical
- Output Connector Type: RCA
- Audio Input: RCA
- Frequency: 3E+4 Hz (30 kHz)

Figure 8.1: Product dimensions of the BOMGE CTX mixer.

Figure 8.2: Key product details including the clear HD screen display, support for XLR and unbalanced 1/4" plugs for Mic/Stereo line inputs, and damping sense buttons for 10-segment stereo output level meter and 3-band EQ on all channels.
9. Warranty and Support
BOMGE products are manufactured to high-quality standards. For warranty information and customer support, please refer to the documentation included with your purchase or visit the official BOMGE website. Keep your proof of purchase for any warranty claims.
For technical assistance or service inquiries, please contact BOMGE customer support through the contact information provided on the official product page or in your product packaging.


