
1. Product Overview
The Cleiscry USB Bluetooth Pixel Controller is designed to manage WS2812B, SK6812, and similar RGB LED strips. It offers versatile control options via a mobile application and an included remote control, enabling dynamic lighting effects, music synchronization, and customizable color patterns. This controller is specifically designed for 5V LED strip lights when using the USB connection.
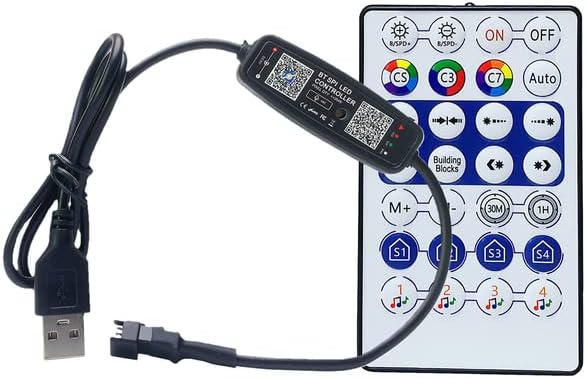
Figure 1: The USB Bluetooth Pixel Controller with its included remote control. The controller features a USB plug for power input and a connector for the LED strip.
2. Product Specifications
| Parameter | Value |
|---|---|
| Rated Voltage (USB) | 5V |
| Rated Voltage (DC) | 5~24V (Note: This model is USB 5V only) |
| Rated Power | 144W |
| Controllable Points | Max 2048 points |
| Supported ICs | WS2812, WS2811, WS16703, WS16704, WS1903, SK6812, WS1003, WS2904, etc. |
| Remote Control Battery | 1x CR2025 (not included) |
| Connection Method | USB (for this model) |
| Control Method | Mobile phone APP remote control, Wireless 2.4G remote control |
| Control Range | 40m (open area) |
| Material | Metal |
| Item Weight | 1.44 ounces |
| Package Dimensions | 4.33 x 2.91 x 0.75 inches |
3. Setup Instructions
3.1 Connecting the LED Strip
- Ensure your LED strip is a 5V addressable pixel strip (e.g., WS2812B, SK6812). This USB controller is designed for 5V strips only.
- Locate the 3-pin connector on your LED strip.
- Connect the 3-pin output from the USB controller to the corresponding input on your LED strip. Ensure correct polarity (Data, Ground, VCC).
3.2 Powering the Controller
- Plug the USB connector of the controller into a standard 5V USB power source (e.g., USB wall adapter, power bank, computer USB port).
- The LED strip will illuminate once power is supplied.

Figure 2: Diagram showing the USB Bluetooth Pixel Controller connected to a coiled LED strip, illustrating the power input via USB and the data output to the strip.
3.3 Installing Remote Control Battery
- The remote control requires one CR2025 battery (not included).
- Locate the battery compartment on the back of the remote control.
- Insert the CR2025 battery with the positive (+) side facing up.
- Close the battery compartment securely.
3.4 Mobile Application Download
To utilize the full features of the controller, download the companion mobile application. Scan the QR codes below with your smartphone's camera to access the download links.

Figure 3: This image contains QR codes for downloading the ZENGGE APP and for accessing FAQ/support. Scan the left QR for the app, and the right QR for support.
Direct App Link: Download ZENGGE APP
Direct FAQ Link: FAQ & Support
4. Operating Instructions
4.1 Remote Control Functions
The included 2.4G wireless remote control provides direct access to common functions. Ensure the remote has a working CR2025 battery.

Figure 4: Detailed diagram of the remote control buttons and their corresponding functions.
- ON/OFF: Power the LED strip on or off.
- Speed/Brightness +/-: Adjust the speed of dynamic modes or the brightness of static colors.
- Static Colors Switch (CS, C3, C7, Auto): Select predefined static colors or cycle through them automatically.
- Loop Mode: Activate various looping light patterns.
- Overlay (From middle to both sides): Specific dynamic effect.
- Fading out (From right to left)/ (From left to right): Specific dynamic fading effects.
- 7 Colors Flow Gradually: Smooth transition through 7 colors.
- 7 Colors Overlay: Layered display of 7 colors.
- 7 Colors Run Circularly: Circular pattern of 7 colors.
- Mode +/- (M+, M-): Cycle through different built-in dynamic modes (100+ modes available).
- Timing Delay Off (30M, 1H): Set a timer for the lights to turn off after 30 minutes or 1 hour.
- Scene 1-4 (S1, S2, S3, S4): Recall pre-programmed or user-saved scenes.
- Music Mode 1-4: Activate different music synchronization modes.
4.2 Mobile Application Control
The mobile application (ZENGGE APP) provides comprehensive control over the LED strip, including:
- Adjusting color and brightness via smart Bluetooth.
- Accessing over 100 built-in jump modes, DIY modes, rainbow running water mode, meteor mode, and turn on/off curtain mode.
- Music mode synchronization with audio input from the device's microphone.
- Timing delay switch for scheduled operation.
- Setting the number of segments for advanced control.
- Freely setting the color and dynamic effect of each pixel point, with options for color block gradient or mixed gradient.
Figure 5: Example of the mobile application interface, demonstrating the music mode functionality where the lights react to sound.
5. Maintenance
The Cleiscry USB Bluetooth Pixel Controller requires minimal maintenance.
- Keep the controller and remote clean by wiping with a dry, soft cloth.
- Avoid exposing the device to water or excessive moisture, as it is not water resistant.
- Store in a cool, dry place when not in use.
- Replace the remote control battery (CR2025) when its performance degrades.
6. Troubleshooting
- LED Strip Not Lighting Up:
- Ensure the USB power source is active and providing 5V.
- Verify the LED strip is correctly connected to the controller with proper polarity.
- Confirm the LED strip is a 5V addressable type (e.g., WS2812B, SK6812). This controller is not compatible with 12V or 24V strips.
- Check if the remote control or app is set to "OFF".
- Remote Control Not Responding:
- Check and replace the CR2025 battery in the remote control.
- Ensure there are no obstructions between the remote and the controller.
- Mobile App Fails to Connect:
- Ensure Bluetooth is enabled on your mobile device.
- Make sure the controller is powered on.
- Restart the mobile application and try connecting again.
- Try restarting your mobile device.
- Some users have reported compatibility issues with certain phone models or Android updates. Refer to the FAQ & Support link for potential solutions or updates.
- Inconsistent Light Effects:
- Verify the number of controllable points set in the app matches your LED strip's length/pixel count (max 2048 points).
- Ensure the LED strip is receiving adequate power, especially for longer strips.
7. Warranty and Support
7.1 Warranty Information
No specific warranty duration or terms are provided with this product. Please retain your purchase receipt for any potential claims. For issues, refer to the troubleshooting section or contact customer support.
7.2 Customer Support
For further assistance or technical support, please refer to the official FAQ and support page by scanning the QR code provided in Section 3.4 or by visiting the direct link: