1. Introduction
Thank you for choosing the IWEUKJLO DC403 Digital Camera. This compact and versatile camera is designed for ease of use, making it suitable for students, teens, and adults. It features 1080P FHD video recording, 44MP photo resolution, 16X digital zoom, and various functions to capture your memorable moments. Please read this manual carefully to ensure proper operation and maintenance of your device.
2. Product Overview
The IWEUKJLO DC403 Digital Camera is a portable device equipped with a range of features for both photography and videography. Its lightweight design makes it ideal for on-the-go use.
Key Features:
- High Resolution: 1080P FHD video and 44MP (max) photo resolution.
- Digital Zoom: 16X digital zoom for capturing distant subjects.
- Image Stabilization: Digital anti-shaking function for clearer shots.
- Smart Functions: Face detection, smile capture, self-timer, continuous shooting.
- Built-in Light: Fill light for improved low-light photography.
- Connectivity: USB Type-C for data transfer and webcam functionality.
- Audio: Internal microphone and speaker for sound recording.
What's in the Box:
- IWEUKJLO DC403 Digital Camera
- 32GB TF Card
- Rechargeable Li-ion Battery (3.7V 700mAh)
- USB Type-C Cable
- Power Adapter
- Wrist Strap
- Camera Pouch
- Cleaning Cloth
- User Manual


3. Setup
3.1. Battery Installation
- Locate the battery compartment cover on the side of the camera.
- Slide the cover to open the compartment.
- Insert the provided Li-ion battery into the compartment, ensuring the correct orientation (match the arrows/contacts).
- Close the battery compartment cover until it clicks securely into place.
3.2. Memory Card Installation
- With the battery compartment open, locate the TF (Micro SD) card slot.
- Insert the 32GB TF card into the slot with the metal contacts facing down, until it clicks into place.
- To remove, gently push the card inward until it springs out.

3.3. Charging the Battery
- Connect the USB Type-C cable to the camera's charging port.
- Connect the other end of the USB cable to the provided power adapter.
- Plug the power adapter into a wall outlet.
- The charging indicator light on the camera will illuminate during charging and turn off when fully charged.
4. Operating Instructions
4.1. Power On/Off
- To power on: Press and hold the power button located on the top of the camera.
- To power off: Press and hold the power button again. The camera also features an auto power-off function (configurable in settings).
4.2. Taking Photos
- Ensure the camera is in photo mode (indicated by an icon on the screen).
- Frame your shot using the LCD screen.
- Press the shutter button (usually the large button on top) halfway down to focus, then fully press to capture the photo.
4.3. Recording Videos
- Switch the camera to video mode (usually via a mode button or dial).
- Press the shutter button to start recording. A timer will appear on the screen.
- Press the shutter button again to stop recording.
- Use the 'OK' button to pause or resume recording.
4.4. Zoom Function
Use the W (Wide) and T (Telephoto) buttons on the camera to zoom in or out digitally. The camera supports up to 16X digital zoom.

4.5. Menu Navigation and Settings
Press the 'M' (Menu) button to access camera settings. Use the directional buttons (up, down, left, right) to navigate and 'OK' to select.
- Image Size: Adjust photo resolution (e.g., 5MP, 8MP, 10MP, 12MP, 44MP).
- Anti-Shake: Enable or disable digital image stabilization.
- Face Detect: Turn on/off face detection for improved portrait shots.
- Smile Capture: Automatically takes a photo when a smile is detected.
- Self-Timer: Set a delay (e.g., 2s, 5s, 10s) before taking a photo.
- ISO: Adjust light sensitivity (Auto, 100, 200, 400).
- Effects: Apply various filters (Normal, B&W, Sepia, Red, etc.).
- Language: Select your preferred language.
- Date: Set the current date and time.
- Auto Power Off: Configure the time before the camera automatically shuts down (e.g., 1, 2, or 3 minutes).
- Sound Effect: Enable or disable button sounds.

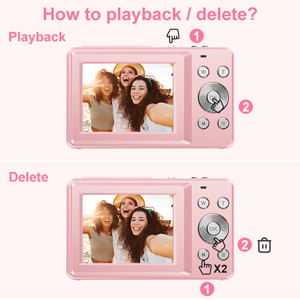
4.6. Viewing and Deleting Photos/Videos
- Press the 'M' (Menu) button twice to enter playback mode.
- Use the directional buttons to scroll through your captured media.
- To delete a file: While viewing a photo/video, press the trash can icon button (often combined with 'OK' or a dedicated button). Confirm deletion when prompted.
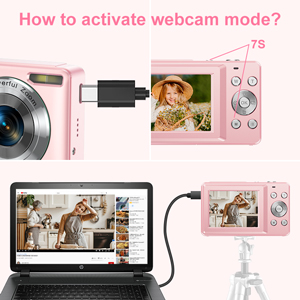
4.7. Webcam Mode and Connecting to Computer
- Connect the camera to your computer using the USB Type-C cable.
- The camera should prompt you to select a mode (e.g., Mass Storage, PC Camera/Webcam). Select 'PC Camera' or 'Webcam'.
- Your computer should recognize the camera as a webcam. You can then use it for video calls or live streaming on compatible platforms.
- For transferring photos/videos, select 'Mass Storage' mode when connected to the computer. The camera's memory card will appear as a removable drive.

5. Maintenance
5.1. Cleaning the Camera
- Use the provided cleaning cloth to gently wipe the camera body and LCD screen.
- For stubborn smudges, slightly dampen the cloth with water or a specialized lens cleaning solution (do not spray directly onto the camera).
- Avoid using harsh chemicals or abrasive materials.
5.2. Battery Care
- Store the battery in a cool, dry place when not in use.
- Avoid exposing the battery to extreme temperatures.
- If the camera will not be used for an extended period, remove the battery.
6. Troubleshooting
- Camera won't turn on: Ensure the battery is correctly inserted and fully charged.
- Cannot take photos/videos: Check if the memory card is inserted correctly and has sufficient free space.
- Poor image quality: Ensure the lens is clean. Adjust ISO settings for low light. Check lighting conditions.
- Camera freezes: Remove and reinsert the battery to reset the device.
- Computer not recognizing camera: Ensure the USB cable is securely connected and try a different USB port. Select the correct mode on the camera (Mass Storage or PC Camera).
7. Specifications
| Model Number | DC403 |
| Product Dimensions | 2.24 x 0.78 x 3.66 inches |
| Item Weight | 9.1 ounces |
| Photo Resolution | 44MP (max) |
| Video Resolution | 1080P FHD |
| Optical Zoom | 16X |
| Image Stabilization | Digital |
| Photo Sensor Technology | CMOS |
| Supported File Format | AVI |
| Batteries | 1007 12V batteries required (Li-ion polymer Battery 3.7V 700mAh) |
| Manufacturer | IWEUKJLO |
8. Warranty and Support
This product comes with a standard manufacturer's warranty. For any issues, suggestions, or warranty claims, please contact IWEUKJLO customer support through your purchase platform or the contact information provided in the product packaging. Please retain your proof of purchase for warranty service.


