
Introduction
This manual provides comprehensive instructions for the ASUS ROG STRIX B650E-F Gaming WiFi ATX Motherboard. This motherboard is designed for AMD Ryzen AM5 processors, offering advanced features such as PCIe 5.0, DDR5 memory support, WiFi 6E, and robust power delivery. Please read this manual thoroughly before installation and operation to ensure proper setup and optimal performance.
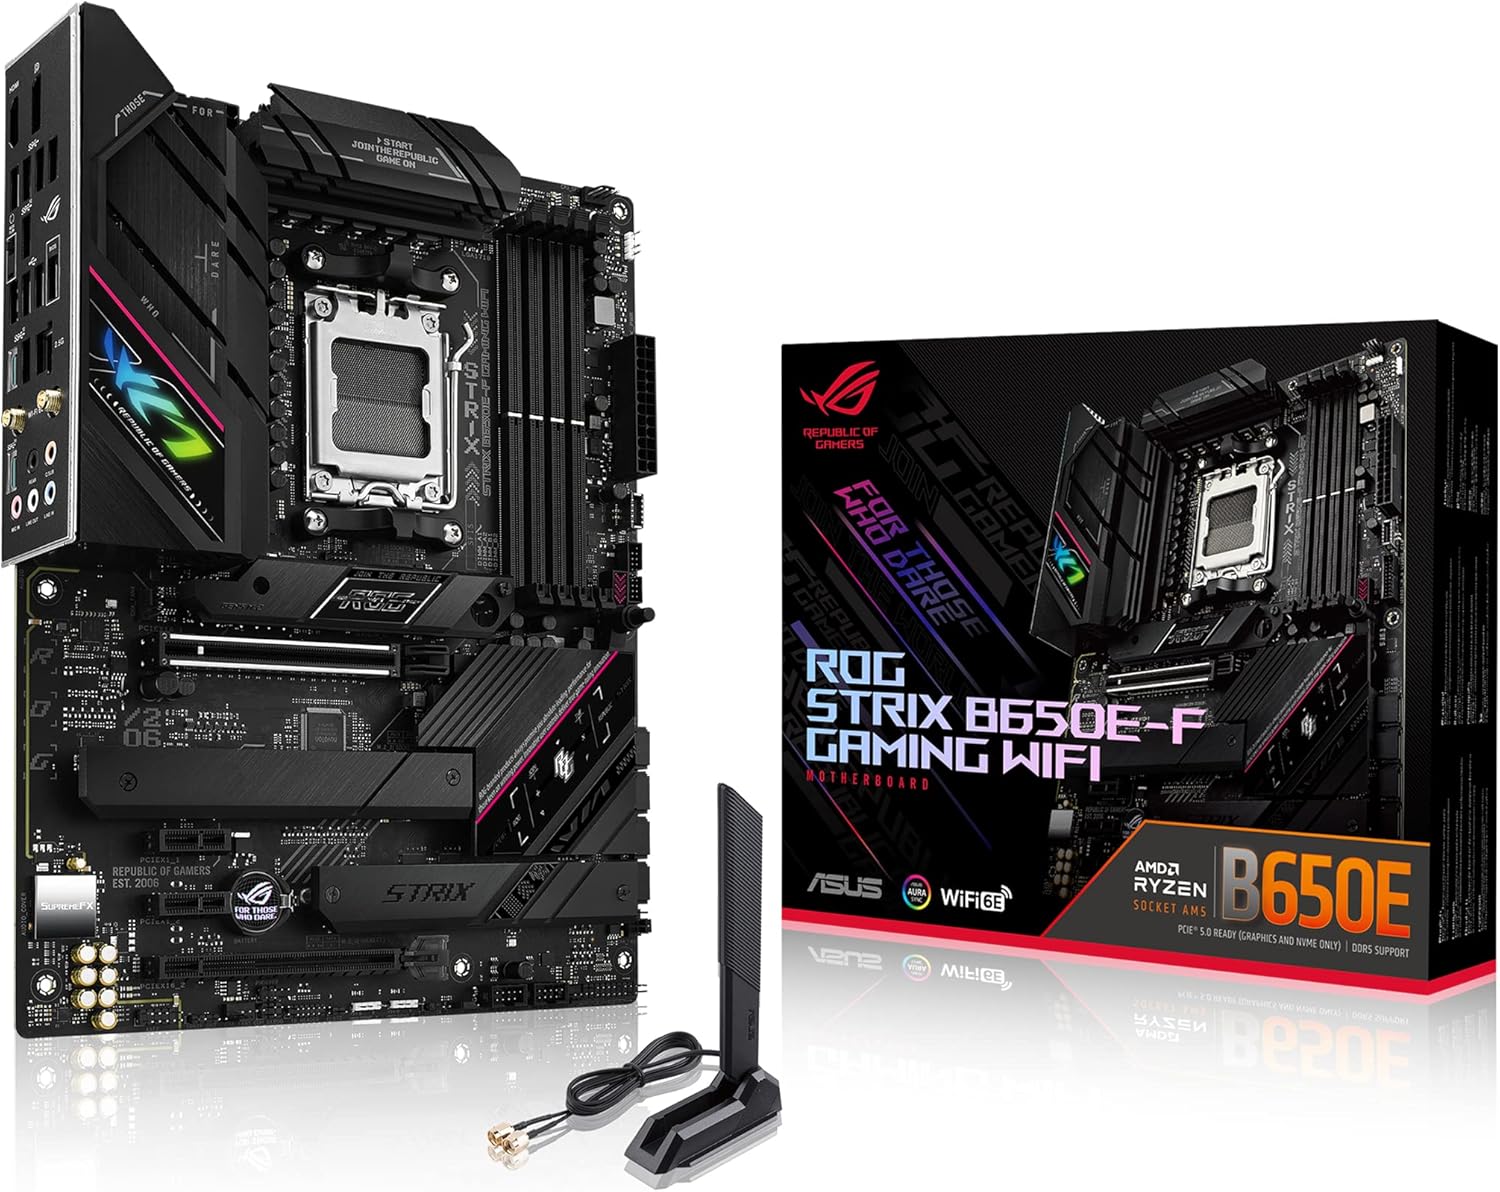
Figure 1: ASUS ROG STRIX B650E-F Gaming WiFi ATX Motherboard overview.
What's in the Box
Verify that all components are present in the package before proceeding with installation.
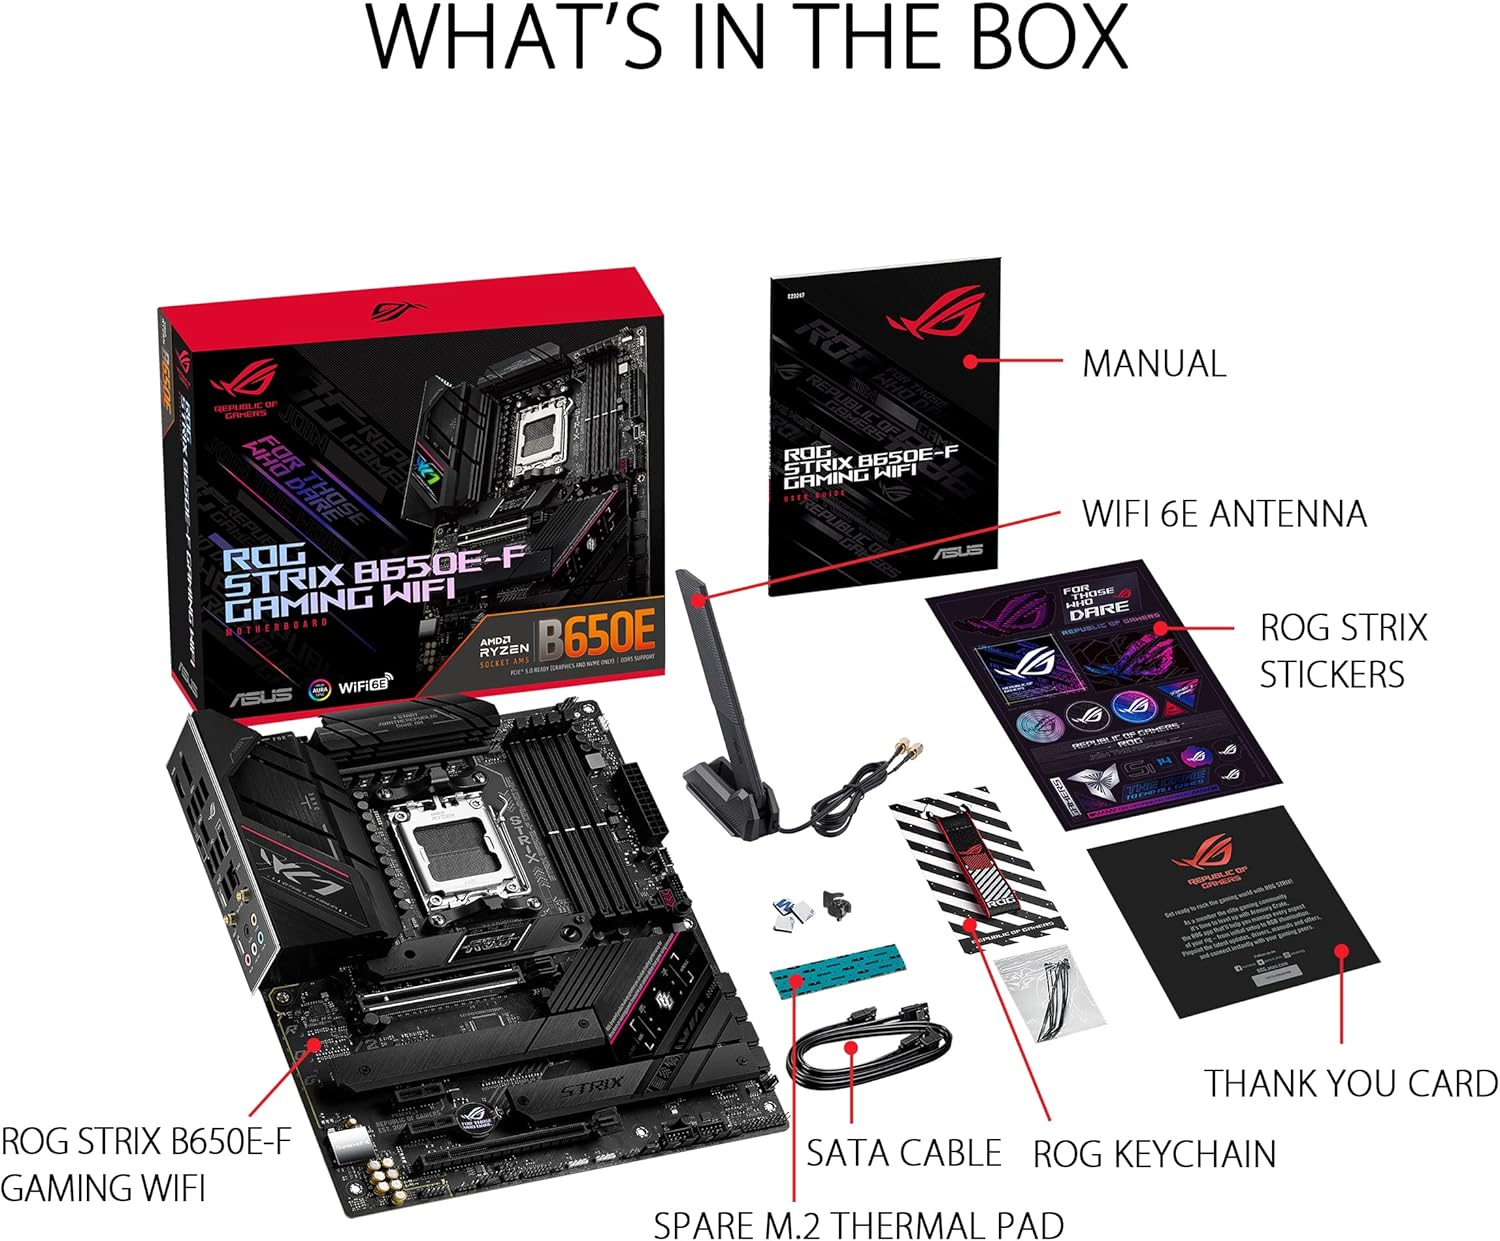
Figure 2: Package contents including the motherboard, manual, WiFi antenna, SATA cables, ROG keychain, spare M.2 thermal pad, and ROG STRIX stickers.
- ASUS ROG STRIX B650E-F Gaming WiFi Motherboard
- User Manual
- WiFi 6E Antenna
- SATA Cables
- ROG Keychain
- Spare M.2 Thermal Pad
- ROG STRIX Stickers
- Thank You Card
Setup and Installation
Follow these steps for proper installation of your motherboard and its components.
1. Component Overview and Expansion
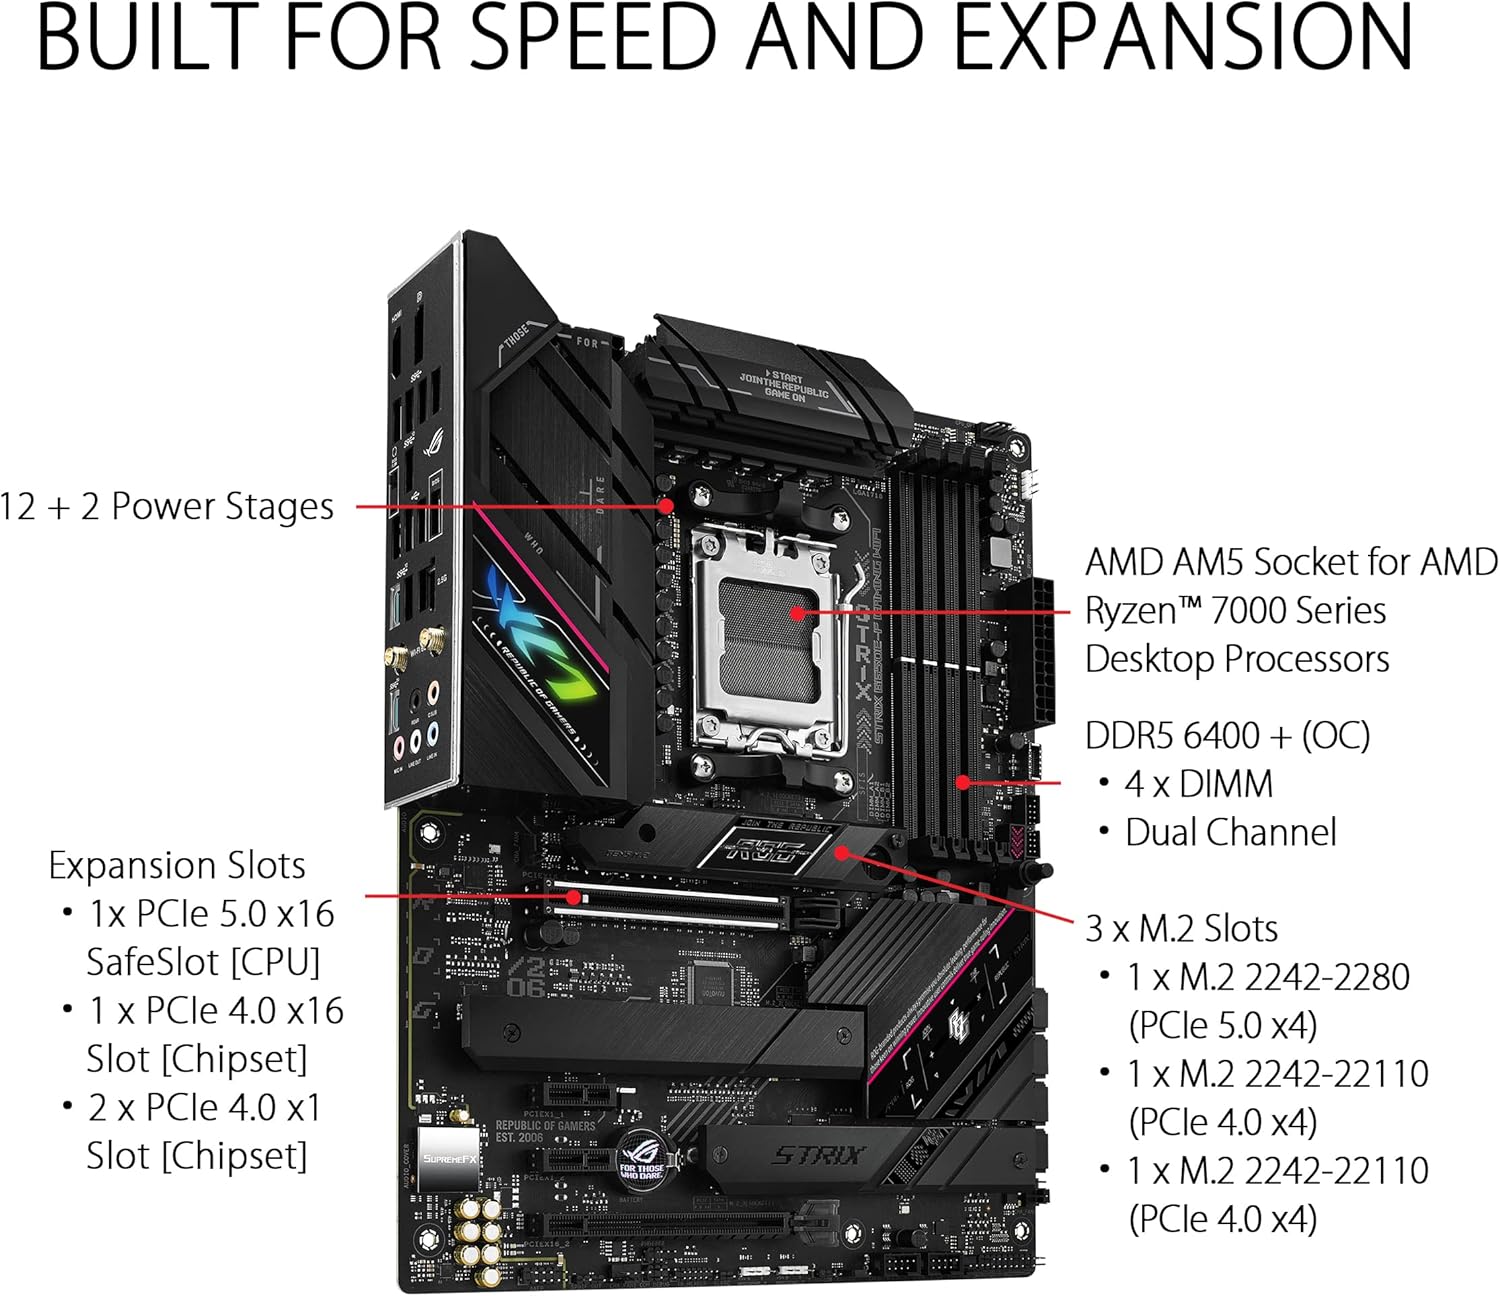
Figure 3: Key components and expansion capabilities, including the AMD AM5 Socket, DDR5 DIMM slots, PCIe 5.0 x16, and multiple M.2 slots.
- CPU Installation: Carefully install your AMD Ryzen 7000 Series processor into the AM5 socket. Ensure proper alignment before securing the retention arm.
- Memory Installation: Install DDR5 RAM modules into the four DIMM slots. For dual-channel performance, refer to the motherboard manual for recommended slot configurations.
- Storage Devices: Utilize the three M.2 slots for NVMe SSDs. One slot supports PCIe 5.0 x4 (2242-2280), and two slots support PCIe 4.0 x4 (2242-22110). Connect SATA drives to the 4x SATA 6Gb/s ports.
- Expansion Cards: Install graphics cards and other expansion cards into the PCIe 5.0 x16 (CPU), PCIe 4.0 x16 (Chipset), and two PCIe 4.0 x1 (Chipset) slots.
2. Connectivity

Figure 4: Overview of the motherboard's full connectivity options, including USB ports, HDMI, DisplayPort, LAN, WiFi 6E, and audio jacks.
- Rear I/O Ports: Connect peripherals to the various USB ports (USB 3.2 Gen 2x2 Type-C, USB 3.2 Gen 2 Type-A/Type-C, USB 3.2 Gen 1 Type-A), HDMI, DisplayPort, 2.5G LAN, WiFi 6E antenna connectors, and 5x audio jacks.
- Internal Headers: Utilize internal headers for additional USB ports (USB 3.2 Gen 2, USB 3.2 Gen 1, USB 2.0), front panel audio, and a Thunderbolt header.
- Power Connections: Connect the 24-pin ATX power connector and CPU power connectors from your power supply.
Operating Instructions
After physical installation, configure your system for optimal performance.
- First Boot and BIOS Setup: Power on your system. Press the designated key (usually DEL or F2) during startup to enter the UEFI BIOS. Configure boot order, enable XMP/EXPO for memory, and set up other system parameters.
- Driver Installation: Install all necessary drivers from the ASUS support website or the provided support DVD/USB. This includes chipset, LAN, WiFi, audio, and graphics drivers.
- Software Utilities: Install ASUS utilities such as Armoury Crate for system monitoring, fan control, and Aura Sync RGB lighting customization.
- Network Connectivity: Connect to your network via the 2.5G LAN port or the integrated WiFi 6E. Ensure the WiFi antenna is properly connected for optimal wireless performance.
Audio and Visual Experience

Figure 5: Details on the SupremeFX ALC4080 CODEC, Savitech SV3H712 AMP, and Aura RGB headers for customizable lighting.
The motherboard features SupremeFX ALC4080 CODEC with Savitech SV3H712 AMP for high-fidelity audio, including 120 dB SNR stereo playback and 113 dB SNR recording. Aura Sync RGB headers allow for customizable lighting effects across compatible components.
Maintenance
Regular maintenance helps ensure the longevity and stable performance of your motherboard.
- Dust Removal: Periodically clean dust from the motherboard and case using compressed air. Ensure the system is powered off and unplugged before cleaning.
- BIOS Updates: Check the ASUS support website for the latest BIOS updates. Updating the BIOS can improve system stability, compatibility, and performance. Follow the instructions provided by ASUS carefully during the update process.
- Driver Updates: Keep all drivers updated to their latest versions to ensure compatibility and optimal performance with your operating system and hardware.
- Thermal Management: Ensure proper airflow within your PC case. The motherboard features robust thermal control with VRM heatsinks, M.2 heatsinks, and a chipset heatsink to manage temperatures effectively.

Figure 6: Thermal control features, including VRM heatsink, M.2 heatsinks, chipset heatsink, and various fan/pump connectors.
Troubleshooting
If you encounter issues, refer to the following common troubleshooting steps.
- No Power/No Boot:
- Check all power connections (24-pin ATX, CPU power).
- Ensure the power supply is functional.
- Reseat RAM modules and graphics card.
- Clear CMOS (refer to the full manual for jumper location).
- Display Issues:
- Ensure the monitor cable is connected to the graphics card (if dedicated) or the motherboard (if using integrated graphics).
- Reseat the graphics card.
- Test with a different monitor or cable.
- USB Port Instability:
- Ensure all chipset and USB drivers are up to date.
- Check for BIOS updates that may address USB stability issues.
- Test different USB devices and ports to isolate the problem.
- Network Connectivity Problems:
- Verify LAN cable connection or WiFi antenna installation.
- Update LAN and WiFi drivers.
- Check router/modem functionality.
- BIOS FlashBack™ Button: If your system fails to boot due to a BIOS issue, use the BIOS FlashBack™ feature to update the BIOS without a CPU or RAM installed. Refer to the full manual for detailed instructions on using this feature.
Specifications
| Feature | Detail |
|---|---|
| Brand | ASUS |
| Model Name | ASUS ROG STRIX B650E-F GAMING WIFI AMD B650 Emplacement AM5 ATX |
| CPU Socket | Socket AM5 |
| Compatible Processors | AMD Ryzen 7000, 9000 Series |
| Chipset | AMD B650 |
| RAM Technology | DDR5 |
| Memory Clock Speed | Up to 6400 MHz (OC) |
| Max RAM Capacity | 128 GB |
| Memory Slots | 4 |
| Graphics Interface | PCI Express 5.0 x16 |
| PCIe Slots | 1x PCIe 5.0 x16 (CPU), 1x PCIe 4.0 x16 (Chipset), 2x PCIe 4.0 x1 (Chipset) |
| M.2 Slots | 3 (1x PCIe 5.0 x4, 2x PCIe 4.0 x4) |
| SATA Ports | 4x SATA 6Gb/s |
| USB Ports (Rear) | 1x USB 3.2 Gen 2x2 Type-C, 3x USB 3.2 Gen 2 (2x Type-A, 1x Type-C), 4x USB 3.2 Gen 1 Type-A |
| USB Ports (Internal) | 1x USB 3.2 Gen 2 connector (supports USB Type-C), 1x USB 3.2 Gen 1 header (supports 2x USB 3.2 Gen 1 ports), 2x USB 2.0 headers (supports 4x USB 2.0 ports) |
| Video Output | 1x HDMI, 1x DisplayPort |
| LAN | 2.5G LAN |
| Wireless Connectivity | WiFi 6E, Bluetooth |
| Audio | SupremeFX ALC4080 CODEC + Savitech SV3H712 AMP |
| Form Factor | ATX |
| Dimensions (L x W x H) | 24.5L x 5W x 24.5H centimeters |
| Weight | 1.4 Kilograms |
| Part Number | 90MB1BQ0-M0EAY0 |
Warranty and Support
Your ASUS ROG STRIX B650E-F Gaming WiFi Motherboard comes with a manufacturer's warranty.
- Warranty Period: 2-year manufacturer warranty. Please retain your proof of purchase for warranty claims.
- Technical Support: For technical assistance, driver downloads, and further information, please visit the official ASUS support website. You can find detailed FAQs, troubleshooting guides, and contact information for customer service there.
- Online Resources: Refer to the official ASUS website for the latest BIOS updates, utility software, and comprehensive product documentation.


