Introduction
This manual provides detailed instructions for the operation and maintenance of your Technical Pro 6000 Watts Professional Portable PA System. Please read this manual thoroughly before operating the unit to ensure proper use and to prevent damage.
Safety Information
Always observe the following basic safety precautions when using this product:
- Do not expose this unit to rain or moisture.
- Do not remove the cover. No user-serviceable parts inside. Refer servicing to qualified personnel.
- Ensure proper ventilation. Do not block ventilation openings.
- Connect only to a grounded power outlet.
- Protect the power cord from being walked on or pinched.
- Unplug the unit during lightning storms or when unused for long periods.
Product Overview
The Technical Pro TPPOWER60 is a 2-channel digital stereo power amplifier designed for professional audio applications. It features high-quality components and robust construction for reliable performance.
Front Panel

Image: Front view of the Technical Pro TPPOWER60 amplifier, showing the power switch, channel volume controls, and LED meters.
- POWER Switch: Toggles the unit on or off.
- CH1/CH2 Volume Controls: Adjust the output level for each channel.
- Spectrum LED Display: Visualizes the audio signal levels for each channel.
- Indicators (CLIP, SIGNAL, PROTECT): Provide status feedback on the amplifier's operation.
Rear Panel

Image: Rear view of the Technical Pro TPPOWER60 amplifier, showing input and output connections, and cooling fans.
- Audio Inputs (XLR, 1/4'', RCA): Connect audio sources to the amplifier.
- Speaker Outputs (Banana binding post, Speakon, 1/4''): Connect speakers to the amplifier.
- Cooling Fans: Ensure proper heat dissipation during operation.
- Power Inlet: Connects the amplifier to an AC power source.
Setup
Unpacking
Carefully remove the amplifier from its packaging. Retain the original packaging materials for future transport or storage.
Placement
Place the amplifier on a stable, flat surface. Ensure adequate ventilation around the unit. Do not place it near heat sources or in direct sunlight. Allow sufficient space for the cooling fans to operate effectively.

Image: The amplifier integrated into a home entertainment system, demonstrating typical placement.
Connections
- Audio Input Connection: Connect your audio source (mixer, pre-amplifier, etc.) to the amplifier's input jacks (XLR, 1/4'', or RCA) on the rear panel. Ensure secure connections for both channels.
- Speaker Output Connection: Connect your speakers to the appropriate output terminals (Banana binding post, Speakon, or 1/4'') on the rear panel. Observe correct polarity (+ to + and - to -) to prevent phase issues.
- Power Connection: Ensure the amplifier's power switch is in the OFF position. Connect the supplied power cord to the power inlet on the rear panel and then to a suitable grounded AC power outlet.
Operating Instructions
Power On/Off
To power on the unit, press the POWER switch on the front panel. The LED display and indicators will illuminate. To power off, press the POWER switch again.
Volume Control
Adjust the CH1 and CH2 volume controls on the front panel to set the desired output level for each channel. Start with the volume controls at their minimum setting before powering on to avoid sudden loud sounds.
Input Selection
The amplifier automatically detects the active input. Ensure only one type of input (XLR, 1/4'', or RCA) is connected per channel at a time to avoid signal conflicts.
Bluetooth Pairing
This amplifier supports Bluetooth connectivity for wireless audio streaming. To pair a device:
- Ensure the amplifier is powered on.
- Activate Bluetooth on your mobile device (smartphone, tablet, etc.).
- Search for available Bluetooth devices and select "Technical Pro" or a similar identifier.
- Once paired, audio from your device will stream through the amplifier.
Image: A visual representation of the amplifier's Bluetooth compatibility, showing a smartphone icon next to the amplifier.
LED Display Interpretation
- Spectrum LED Display: Provides a visual representation of the audio signal strength. Higher bars indicate a stronger signal.
- SIGNAL Indicator: Illuminates when an audio signal is present.
- CLIP Indicator: Illuminates when the input signal is too strong, causing distortion. Reduce the input level or amplifier volume if this indicator lights up frequently.
- PROTECT Indicator: Illuminates if the amplifier enters protection mode due to overheating, short circuit, or other issues. Power off the unit, check connections, and allow it to cool before restarting.
Maintenance
To ensure the longevity and optimal performance of your amplifier, follow these maintenance guidelines:
- Cleaning: Use a soft, dry cloth to wipe the exterior of the unit. Do not use liquid cleaners or solvents.
- Ventilation: Regularly check that the ventilation openings and cooling fans are free from dust and debris. Use compressed air to gently clear any blockages.
- Storage: If storing the unit for an extended period, disconnect it from power and store it in a cool, dry place, preferably in its original packaging.
Troubleshooting
| Problem | Possible Cause | Solution |
|---|---|---|
| No power | Power cord not connected; Power outlet faulty; Power switch off. | Ensure power cord is securely connected; Test power outlet with another device; Press the POWER switch to ON. |
| No sound output | Input cables not connected; Speaker cables not connected; Volume controls too low; PROTECT indicator on. | Check all input and speaker connections; Increase volume controls; Refer to PROTECT indicator solution. |
| Distorted sound / CLIP indicator on | Input signal too high; Amplifier volume too high. | Reduce the output level from your audio source; Lower the amplifier's volume controls. |
| PROTECT indicator on | Overheating; Short circuit in speaker wiring; Speaker impedance too low. | Turn off the unit, allow it to cool; Check speaker wiring for shorts; Ensure speaker impedance matches amplifier requirements. |
| Bluetooth pairing issues | Device too far; Bluetooth not enabled on device; Interference. | Move device closer to amplifier; Enable Bluetooth on your device; Reduce interference from other wireless devices. |
Specifications
| Feature | Detail |
|---|---|
| Peak Power Output | 6000 Watts |
| Frequency Response | 20Hz-20kHz ±1 dB |
| Damping Factor | >200 @ 8 ohm |
| Total Harmonic Distortion | <0.02% |
| Signal to Noise Ratio | -105 dB (unweighted 20Hz-20kHz) |
| Input Sensitivity | .775V (0dBu) |
| Inputs | XLR, 1/4'', RCA |
| Outputs | Banana binding post, Speakon, 1/4'' |
| Cooling | Dual cooling speed fans |
| Dimensions (D x W x H) | 11.14" x 19.02" x 3.94" |
| Weight | 13.92 pounds |

Image: A visual representation of the amplifier's dimensions, indicating 11.14 inches depth, 19.02 inches width, and 3.94 inches height.
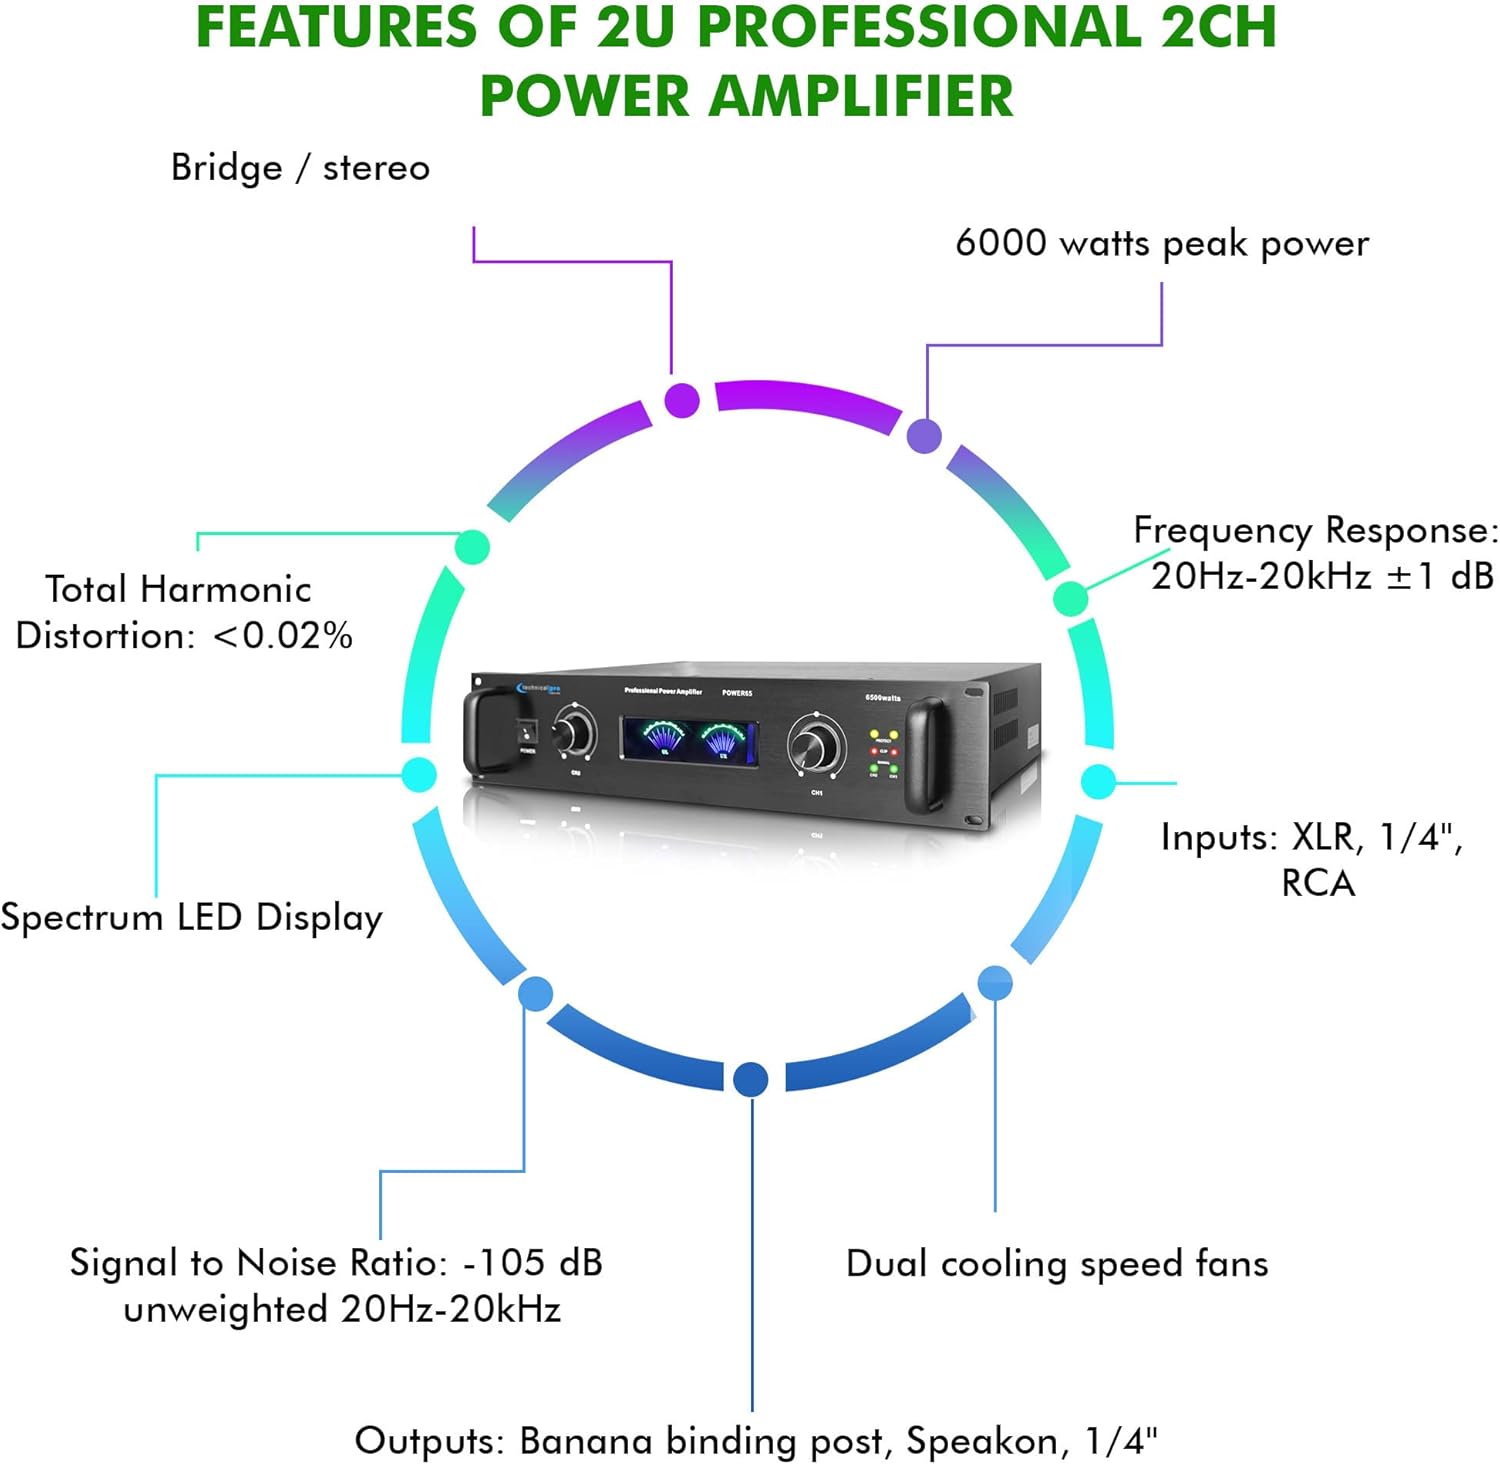
Image: A circular diagram highlighting key features such as 6000 watts peak power, frequency response, inputs, outputs, dual cooling fans, signal to noise ratio, total harmonic distortion, and spectrum LED display.
What's in the Box
The package includes:
- Technical Pro 6000 Watts Professional Portable PA System, 2 Channel Digital Stereo Power Amplifier with Dual Cooling Speed Fans
- Power Cord
- User Manual (this document)
Warranty and Support
Technical Pro products are designed for reliability and performance. For warranty information and technical support, please refer to the official Technical Pro website or contact their customer service department. Keep your purchase receipt as proof of purchase for any warranty claims.
For further assistance, visit the Technical Pro Store on Amazon.


