
GIGABYTE Z790 AORUS ELITE AX
GIGABYTE Z790 AORUS Elite AX Motherboard User Manual
Model: Z790 AORUS ELITE AX | Brand: GIGABYTE
1. Introduction
This manual provides detailed instructions for the installation, operation, and maintenance of your GIGABYTE Z790 AORUS Elite AX motherboard. Designed for optimal performance, this motherboard supports 13th and 12th Gen Intel Core Series Processors and features advanced connectivity and thermal solutions.
Key features include DDR5 memory support, multiple M.2 slots, PCIe 5.0, USB 3.2 Gen 2x2 Type-C, Intel WiFi 6E, and 2.5GbE LAN. Please read this manual thoroughly before proceeding with installation to ensure proper setup and functionality.

Figure 1.1: GIGABYTE Z790 AORUS Elite AX Motherboard and Retail Box.
2. Safety Information
- Always disconnect the power cord from the wall outlet before touching any components inside the computer case.
- Wear an anti-static wrist strap when handling the motherboard or other components to prevent electrostatic discharge (ESD) damage.
- Ensure proper ventilation within your computer case to prevent overheating.
- Do not expose the motherboard to moisture or extreme temperatures.
- Refer to the component manufacturer's instructions for specific installation details of your CPU, RAM, and other peripherals.
3. Setup and Installation
Follow these steps for the proper installation of your motherboard and its components.
3.1. Motherboard Overview

Figure 3.1: Top-down view of the motherboard highlighting key areas.
Familiarize yourself with the layout of the motherboard, including the CPU socket, DIMM slots, PCIe slots, and M.2 connectors.
3.2. CPU Installation (LGA 1700)
- Carefully open the CPU socket retention lever.
- Align the CPU with the socket, ensuring the triangular mark on the CPU matches the mark on the socket.
- Gently place the CPU into the socket without applying force.
- Close the retention lever until it clicks into place, securing the CPU.
3.3. DDR5 Memory Installation
The motherboard supports DDR5 memory modules. It features 4 SMD DIMM slots with XMP 3.0 support.
- Open the clips at both ends of the DIMM slot.
- Align the memory module with the slot, ensuring the notch on the module matches the key in the slot.
- Press down firmly on both ends of the memory module until the clips snap into place.

Figure 3.2: The motherboard is engineered for optimal DDR5 performance.
3.4. M.2 SSD Installation
The motherboard includes 4 PCIe 4.0 x4 M.2 slots and supports PCIe 5.0 for high-speed storage. Utilize the M.2 Thermal Guard III for optimal drive cooling.
- Locate the desired M.2 slot and remove the M.2 Thermal Guard.
- Insert the M.2 SSD into the slot at an angle.
- Secure the M.2 SSD with the provided screwless design or screw.
- Reattach the M.2 Thermal Guard.
3.5. Graphics Card Installation (PCIe EZ-Latch)
The PCIe 5.0 EZ-Latch feature simplifies graphics card installation and removal.
- Open the EZ-Latch mechanism on the PCIe x16 slot.
- Align your graphics card with the PCIe slot and press down firmly until it clicks into place.
- The EZ-Latch will automatically secure the card.
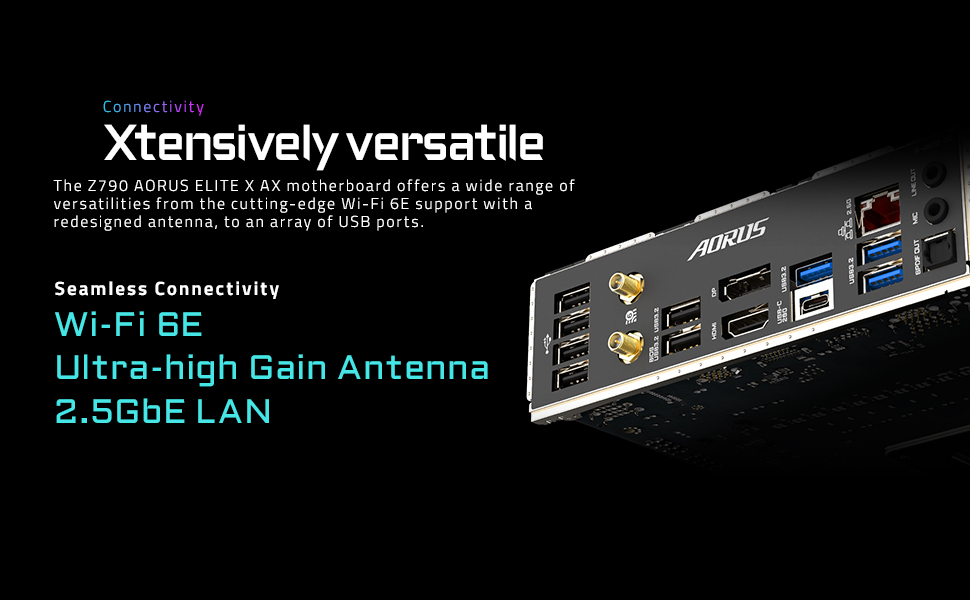
Figure 3.3: The EZ-Latch design facilitates easy component installation.
3.6. Connecting Peripherals and Power
- Connect the 24-pin ATX power connector and the 8-pin CPU power connector(s) from your power supply to the motherboard.
- Connect front panel headers (power button, reset button, USB ports, audio jacks) according to the motherboard manual.
- Utilize the rear I/O panel for external devices. The motherboard features USB 3.2 Gen 2x2 Type-C, 2.5GbE LAN, and Intel WiFi 6E with an AORUS Antenna.

Figure 3.4: Rear I/O panel with various connectivity options.

Figure 3.5: The motherboard offers extensive connectivity, including Wi-Fi 6E and 2.5GbE LAN.
4. Operating Your Motherboard
Once all components are installed and connected, you can power on your system.
4.1. Initial Boot and BIOS/UEFI Setup
- Press the power button on your computer case.
- During the boot process, repeatedly press the DEL key to enter the BIOS/UEFI setup utility.
- In the BIOS/UEFI, you can configure boot order, enable XMP for memory, adjust fan curves with Smart Fan 6, and manage other system settings.
- Save your changes and exit the BIOS/UEFI to continue booting into your operating system installation media.
4.2. Software and Drivers
After installing your operating system, install the necessary drivers for the motherboard components. These can typically be found on the GIGABYTE official website for your specific motherboard model.
- Chipset Drivers
- LAN Drivers (2.5GbE)
- Wireless Drivers (Intel WiFi 6E)
- Audio Drivers
- Utility Software (e.g., RGB FUSION 2.0 for lighting control, Smart Fan 6 for fan management).
5. Maintenance
Regular maintenance helps ensure the longevity and optimal performance of your motherboard.
- Dust Removal: Periodically clean dust from inside your computer case, especially from heatsinks and fans, using compressed air. Ensure the system is powered off and unplugged before cleaning.
- BIOS Updates: Check the GIGABYTE website for the latest BIOS updates. BIOS updates can improve stability, compatibility, and performance. Use the Q-Flash Plus feature to update the BIOS without installing a CPU, memory, or graphics card.
- Driver Updates: Keep your drivers updated to ensure compatibility and access to the latest features and performance improvements.
- Thermal Management: Ensure all M.2 Thermal Guards and MOSFET heatsinks are properly seated to maintain effective cooling.
6. Troubleshooting
If you encounter issues, refer to the following common troubleshooting steps:
- No Power:
- Check all power connections (24-pin ATX, 8-pin CPU) are securely seated.
- Ensure the power supply is switched on.
- Verify the front panel power button connection to the motherboard.
- No Display:
- Ensure the graphics card is properly seated in the PCIe slot and has adequate power.
- Check that the monitor cable is connected to the graphics card (not the motherboard I/O if using a dedicated GPU).
- Try reseating RAM modules.
- System Instability/Crashes:
- Verify all components are compatible and properly installed.
- Update BIOS and drivers to the latest versions.
- Check CPU and GPU temperatures to ensure they are within safe operating limits.
- If using XMP, try disabling it to rule out memory instability.
- Q-Flash Plus: If your system does not boot due to CPU incompatibility or other BIOS-related issues, use Q-Flash Plus to update the BIOS. Refer to the GIGABYTE website for detailed instructions on using Q-Flash Plus.
7. Specifications
| Feature | Detail |
|---|---|
| Brand | GIGABYTE |
| Series | Z790 AORUS ELITE AX |
| Model Name | Z790 AORUS ELITE AX |
| CPU Socket | LGA 1700 |
| Compatible Processors | 12th Generation Intel Core, 13th Generation Intel Core, 14th Generation Intel Core |
| Chipset Type | Intel Z790 |
| RAM Memory Technology | DDR5 |
| Memory Speed | 7600 MHz (up to 8266 MT/s with overclocking) |
| Memory Storage Capacity (Max) | 128 GB |
| PCIe Slots | SMD PCIe 5.0, PCIe EZ-Latch |
| M.2 Slots | 4x PCIe 4.0 x4 M.2 (with M.2 Thermal Guard III) |
| USB Ports | USB 3.2 Gen 2x2 Type-C, USB 3.2 Gen 2, USB 3.2 Gen 1, USB 2.0 |
| Wireless Type | Intel WiFi 6E 802.11ax (2T2R & BT5 with AORUS Antenna) |
| LAN | 2.5GbE LAN |
| Audio | High-End Audio Capacitor, Audiophile WIMA Capacitors |
| Dimensions (LxWxH) | 10.62 x 3.14 x 13.18 inches |
| Item Weight | 4.35 pounds |
8. Warranty and Support
GIGABYTE products are designed for reliability and performance. For warranty information and technical support, please refer to the official GIGABYTE website or contact their customer service.
- Official Website: Visit www.gigabyte.com for product registration, driver downloads, BIOS updates, and detailed warranty terms.
- Technical Support: If you encounter issues that cannot be resolved using this manual or the troubleshooting section, please contact GIGABYTE technical support for assistance.
Related documentsZ790 AORUS ELITE AX


Ask a question about this manual
Ask about setup, troubleshooting, compatibility, parts, safety, or missing instructions. Manuals+ will review the question and use this page’s manual context to help answer it.