
Introduction
This manual provides detailed instructions for the safe and effective use of your OLIGHT Marauder Mini flashlight. Please read this manual thoroughly before operating the device and retain it for future reference.

Image: The OLIGHT Marauder Mini flashlight, showcasing its compact design and multi-LED head.
Package Contents
- OLIGHT Marauder Mini Flashlight (1)
- Customized Rechargeable Lithium-Ion Battery (pre-installed)
- MCC3 Magnetic Charging Cable (1)
- Lanyard (1)
- Holster (1)
- User Manual (1)
Setup
Initial Charging
The Marauder Mini comes with a pre-installed rechargeable lithium-ion battery. Before first use, fully charge the flashlight.
- Connect the MCC3 magnetic charging cable to a USB power source.
- Attach the magnetic end of the charging cable to the charging port located at the tailcap of the flashlight. The indicator on the charging cable will turn red during charging and green when fully charged.

Image: The Marauder Mini flashlight connected to a power bank via its magnetic charging cable.
Lanyard Attachment
Attach the included lanyard to the designated lanyard hole for secure carrying and to prevent accidental drops.
Operating Instructions
The Marauder Mini features a dual-switch system: a toggle switch for beam type selection and a rotary knob for brightness and mode adjustments.
Power On/Off
- To turn on/off: Press the rotary knob switch once.
Beam Type Selection (White Light)
Use the toggle switch located on the flashlight body to select between floodlight and spotlight modes.
- Flip the toggle switch up for spotlight mode (focused beam).
- Flip the toggle switch down for floodlight mode (wide, diffused beam).
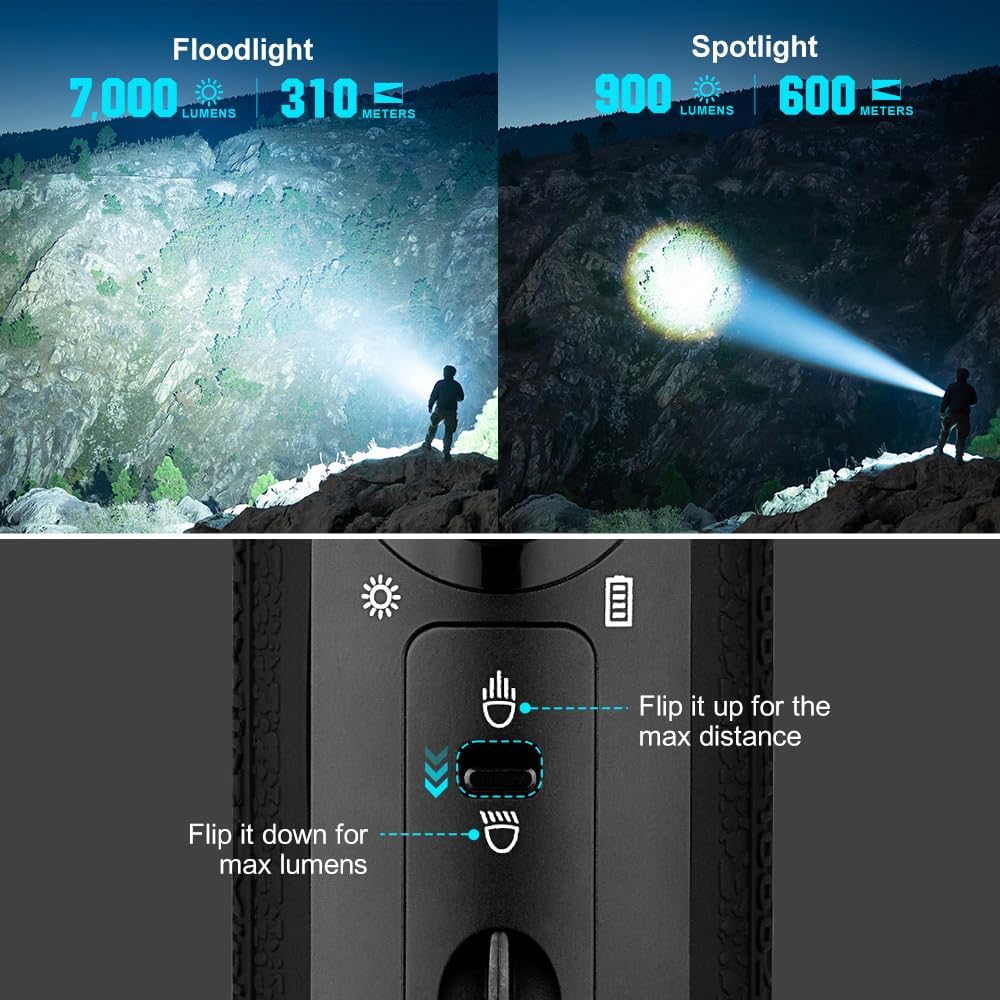
Image: Visual comparison of the flashlight's floodlight mode (wide illumination) and spotlight mode (focused beam).
Brightness Adjustment (White Light)
Once the flashlight is on and in white light mode, rotate the knob switch to adjust brightness levels. The indicators around the knob will show the current brightness level.
- Rotate the knob clockwise to increase brightness.
- Rotate the knob counter-clockwise to decrease brightness.
RGB Light Modes
The Marauder Mini features Red, Green, and Blue (RGB) light options.
- To activate RGB lights: With the flashlight on, quickly double-press the rotary knob switch.
- To cycle through RGB colors (Red, Green, Blue): While in RGB mode, rotate the knob switch.
- To return to white light: Quickly double-press the rotary knob switch again.
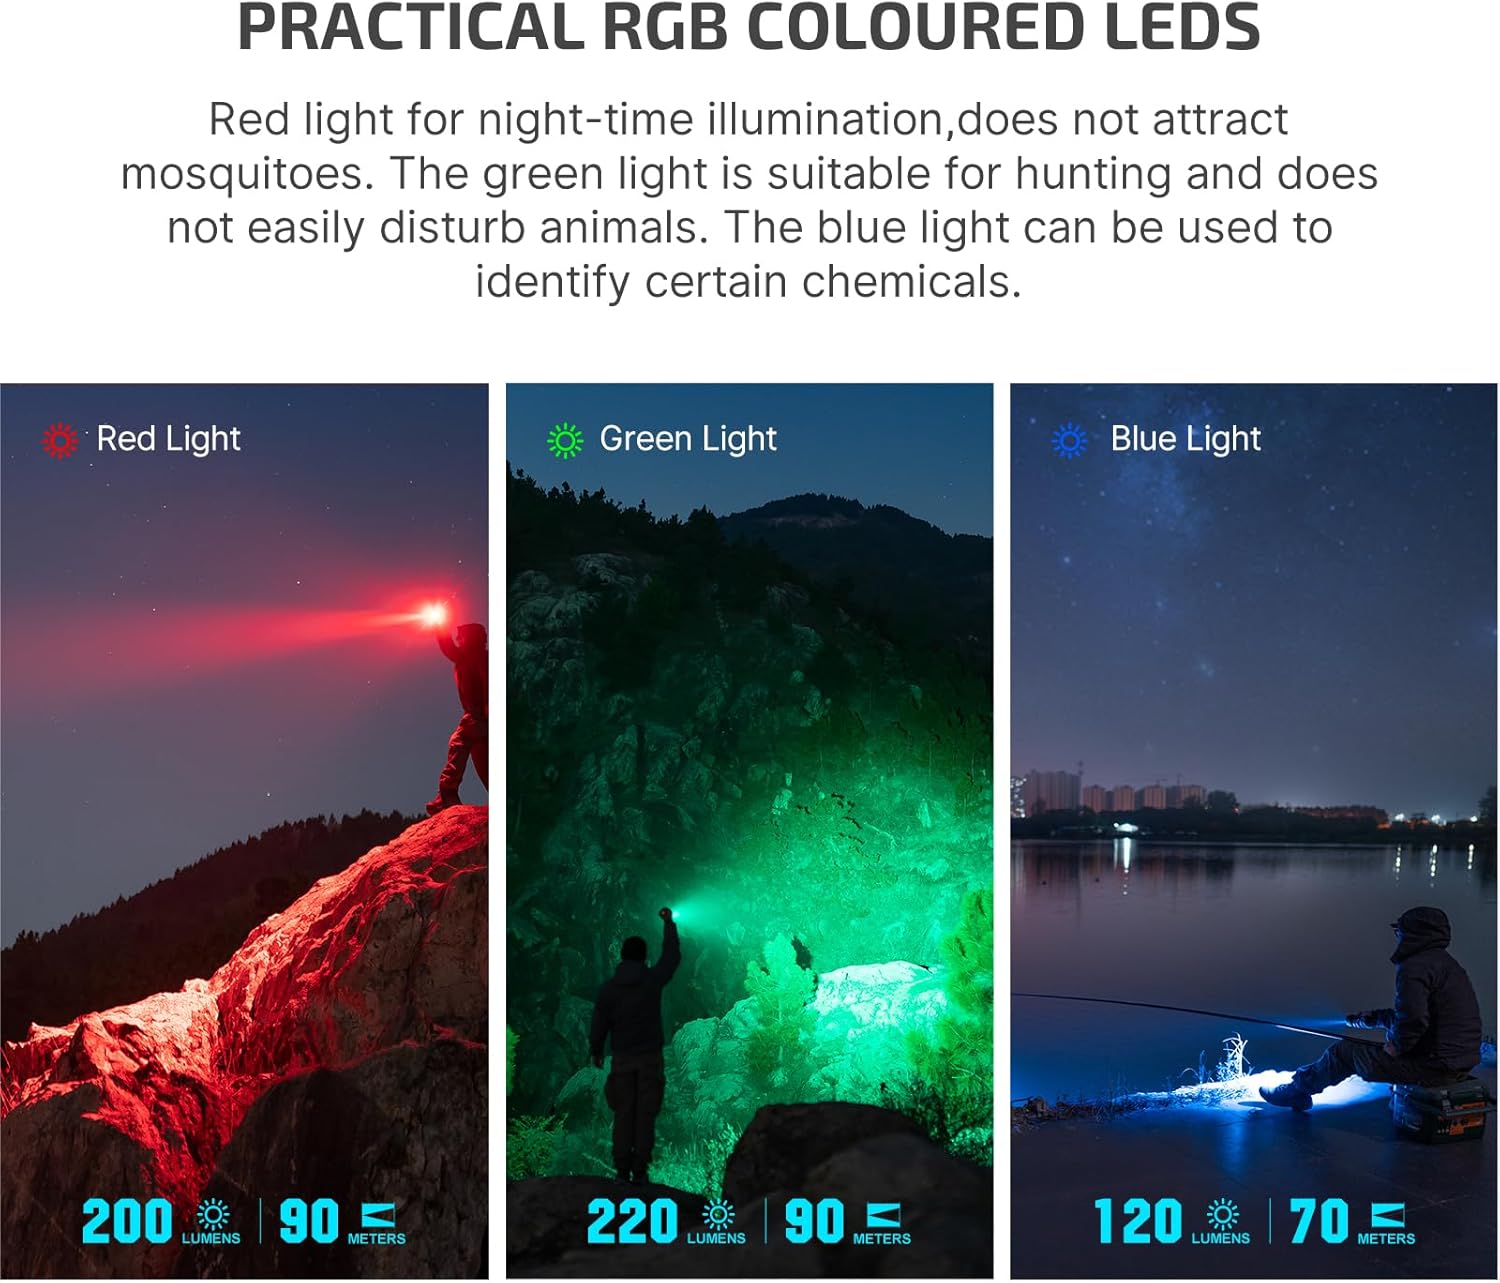
Image: Demonstrations of the flashlight emitting red, green, and blue light, highlighting their potential uses.
Strobe Mode
To activate strobe mode: With the flashlight on, quickly triple-press the rotary knob switch. Triple-press again to exit strobe mode.
Lockout Function
The flashlight features a smart lockout function to prevent accidental activation.
- Automatic Lockout: The flashlight will automatically lock out after 10 seconds of non-operation when it is off.
- Manual Lockout: To manually lock out the flashlight, press and hold the rotary knob switch for approximately 2 seconds until the light briefly flashes, indicating lockout mode.
- Unlocking: To unlock, quickly rotate the rotary knob switch more than 90 degrees. The flashlight will turn on to the previously used brightness setting.

Image: Diagram illustrating the lockout and unlock procedure for the rotary knob switch.
Indicators
The Marauder Mini features intuitive indicators around the rotary knob:
- Brightness Level Indicator: Located on the left side, shows the current white light brightness level.
- Battery Level Indicator: Located on the right side, displays the remaining battery charge.
- Light Color Indicator: At the bottom, indicates the active RGB color mode.
- Vibrating Indicator: The flashlight provides haptic feedback (vibration) when reaching the highest or lowest brightness settings.

Image: Close-up of the flashlight's control panel, highlighting the brightness, battery, and light color indicators around the rotary knob.
Maintenance
Cleaning
Regularly clean the lens and body of the flashlight with a soft, damp cloth. Avoid using abrasive materials or harsh chemicals that could damage the finish or optical components.
O-Ring Lubrication
To maintain water resistance, periodically inspect and lubricate the O-rings with silicone grease. Replace O-rings if they appear damaged or worn.
Battery Care
Store the flashlight with a partially charged battery if not used for extended periods. Avoid fully discharging the battery frequently, as this can reduce its lifespan.
Troubleshooting
Flashlight Not Turning On
- Ensure the battery is fully charged.
- Check if the flashlight is in lockout mode. Unlock by quickly rotating the knob switch more than 90 degrees.
- Verify that the battery is correctly inserted.
Reduced Brightness or Runtime
- The battery may be low. Recharge the flashlight.
- Clean the lens if it appears dirty, as debris can obstruct light output.
Overheating
High-lumen flashlights can generate significant heat during prolonged use at maximum output. The Marauder Mini is designed with thermal management to reduce output and prevent damage. If the flashlight becomes excessively hot, reduce the brightness level or turn it off to allow it to cool down.
Specifications

Image: Infographic displaying key specifications of the Marauder Mini, including max output, throw, runtime, drop test rating, battery type, and waterproof rating.
| Feature | Detail |
|---|---|
| Brand | OLIGHT |
| Model | Marauder Mini |
| Max White Brightness | 7000 Lumens |
| Max Beam Distance | 600 Meters |
| Light Source Type | LED (White, Red, Green, Blue) |
| Power Source | Battery Powered (1 Lithium Ion battery included) |
| Material | Aluminum Alloy |
| Water Resistance Level | Waterproof (IPX8 rated) |
| Product Dimensions | 7.17"D x 4.76"W x 3.03"H |
| Item Weight | 1.78 pounds |
| Special Features | Adjustable Light Modes, High Power, Long Range, RGB lights, Magnetic Rechargeable |
White Light Performance (Floodlight)

Image: Table detailing lumen output, runtime, and beam distance for various white light floodlight and spotlight modes.
RGB Light Performance

Image: Table detailing lumen output, runtime, and beam distance for various Red, Green, and Blue light modes.
Warranty and Support
Warranty Information
The OLIGHT Marauder Mini flashlight comes with a Lifetime Warranty for products purchased after January 1st, 2023. This warranty covers manufacturing defects and ensures the product's quality and performance.
Customer Support
Should you encounter any issues or have questions regarding your OLIGHT Marauder Mini, please contact OLIGHT customer support. Contact information can typically be found on the official OLIGHT website or through your purchase retailer.


