
Lanzar VCT4110, HTG137
Lanzar Car Amplifier Bundle User Manual
Models: VCT4110 (4-Channel) & HTG137 (Monoblock)
Introduction
This user manual provides detailed instructions for the installation, operation, and maintenance of your Lanzar Car Amplifier Bundle, which includes the VCT4110 4-Channel High Power MOSFET Amplifier and the HTG137 2000 Watt Monoblock Car Amplifier. Please read this manual thoroughly before attempting installation or operation to ensure proper use and to prevent damage to the units or your vehicle's electrical system.
Safety Information
Always observe the following safety precautions during installation and operation:
- Disconnect the vehicle's negative battery terminal before beginning any installation.
- Ensure proper grounding for all components to prevent electrical shorts and damage.
- Use appropriate gauge wiring for power, ground, and speaker connections as specified.
- Avoid installing amplifiers in locations exposed to direct sunlight, excessive heat, moisture, or dust.
- Securely mount the amplifiers to prevent movement during vehicle operation.
- If you are unsure about any part of the installation process, consult a professional car audio installer.
Product Overview
Lanzar VCT4110 4-Channel Amplifier

The Lanzar VCT4110 is a 2000 Watt 4-Channel High Power MOSFET Amplifier designed for versatile car audio setups. It features variable high-pass and low-pass crossovers, variable input level control, and a bass boost switch. Its slim design allows for easier installation in various vehicle spaces. This amplifier is 2 Ohm stable and includes thermal, overload, and short circuit protection for reliable performance.
Lanzar HTG137 Monoblock Amplifier
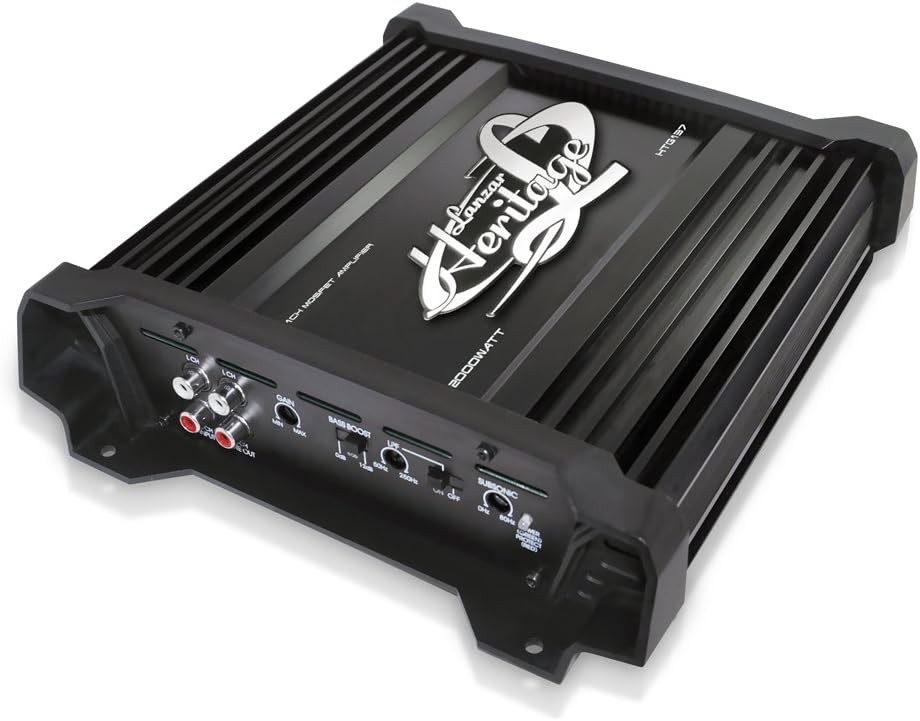
The Lanzar HTG137 is a 2000 Watt Monoblock Amplifier from the Heritage Series, optimized for driving subwoofers with powerful bass. It includes an electronic crossover network, bass boost circuitry, and low/high pass filters. This amplifier is 2 Ohm stable and features RCA inputs and line outputs for system expansion. It also incorporates power and protection LED indicators and soft turn-on/off circuitry.
Setup and Installation
Proper installation is crucial for optimal performance and longevity of your amplifiers. Follow these steps carefully.
General Installation Guidelines
- Power Wiring: Connect the main power wire (typically 4-gauge or 8-gauge depending on total wattage) directly from the positive terminal of the vehicle's battery to the amplifier's +12V terminal. Install an in-line fuse holder within 18 inches of the battery.
- Ground Wiring: Connect the ground wire (same gauge as power wire) from the amplifier's GND terminal to a clean, unpainted metal surface on the vehicle's chassis. Ensure a solid, low-resistance connection.
- Remote Turn-On: Connect the remote turn-on wire from your head unit's remote output to the amplifier's REM terminal. This wire signals the amplifier to turn on and off with your head unit.
- RCA Inputs: Connect RCA cables from your head unit's pre-amp outputs to the amplifier's RCA input jacks.
- Speaker Wiring: Connect speaker wires from the amplifier's speaker output terminals to your speakers. Pay close attention to polarity (+ to + and - to -).
Lanzar VCT4110 4-Channel Amplifier Connections

The VCT4110 features clearly labeled input and output panels. The right panel includes power (BATT, REM, GND) and speaker output terminals (CH1-CH4, BRIDGEABLE). The left panel provides RCA inputs (CH1/2, CH3/4), gain controls (LEVEL), and crossover frequency adjustments (X-OVER). Ensure all connections are secure and properly insulated.
- Power Input: Connect +12V, REM, and GND as per general guidelines.
- Speaker Outputs: Connect up to four speakers. For bridged operation (2-channel mode), connect speakers to the designated bridged terminals (e.g., CH1+ and CH2- for one bridged channel). Refer to the amplifier's diagram for specific bridging instructions.
- RCA Input: Connect your head unit's RCA outputs to the amplifier's CH1/2 and CH3/4 inputs.
- Line Output: The VCT4110 includes a line output for connecting additional amplifiers in a multi-amp system.
Lanzar HTG137 Monoblock Amplifier Connections

The HTG137's connection panel includes power input (GND, REM, BATT), speaker output, RCA inputs (LCH, RCH), and line outputs. Controls for gain, bass boost, LPF (Low Pass Filter), and Subsonic filter are also present. Ensure all connections are tight and free from short circuits.
- Power Input: Connect +12V, REM, and GND as per general guidelines.
- Speaker Output: Connect your subwoofer(s) to the single speaker output terminal. Ensure the subwoofer's impedance matches the amplifier's stable impedance (2 Ohm stable).
- RCA Input: Connect your head unit's subwoofer or full-range RCA outputs to the amplifier's LCH and RCH inputs.
- Line Output: The HTG137 provides line-out jacks for daisy-chaining to another amplifier without needing external splitters.
Operating the Amplifiers
Once installed, adjust the amplifier settings for optimal sound performance.
Gain Control (LEVEL)
The gain control matches the amplifier's input sensitivity to the output voltage of your head unit. Start with the gain set to minimum. Play a familiar track at about 75% of your head unit's maximum volume. Slowly increase the amplifier's gain until you hear distortion, then back it off slightly. This is not a volume control.
Crossover Settings
- VCT4110 (4-Channel):
- Variable Hi-Pass (HPF): 40 Hz - 250 Hz. Use for full-range speakers to filter out low frequencies they cannot reproduce, preventing distortion.
- Variable Low-Pass (LPF): 40 Hz - 250 Hz. Use for subwoofers (if bridging channels for subwoofers) to filter out high frequencies.
- HTG137 (Monoblock):
- LPF Freq. Resp.: 50Hz - 250Hz. Essential for subwoofers to ensure only low frequencies are reproduced.
- Subsonic Filter: Filters out extremely low frequencies below the audible range, which can waste amplifier power and damage subwoofers. Typically set around 20-30Hz.
Bass Boost
Both amplifiers feature a bass boost function (VCT4110: 0-18dB switch; HTG137: variable). Use this feature sparingly as excessive bass boost can lead to distortion and potential speaker damage. Adjust to personal preference while monitoring for clarity.
LED Indicators
- Power LED: Illuminates when the amplifier is receiving power and operating normally.
- Protection LED: Illuminates (often red) when the amplifier enters protection mode due to thermal overload, short circuit, or low voltage. If this LED lights up, turn off your system immediately and troubleshoot the issue.
Maintenance
Regular maintenance ensures the longevity and optimal performance of your amplifiers.
- Cleaning: Periodically wipe down the amplifier's exterior with a soft, dry cloth. Do not use liquid cleaners or solvents. Ensure cooling fins are free of dust and debris to maintain proper heat dissipation.
- Connections: Occasionally check all power, ground, remote, RCA, and speaker connections to ensure they are secure and free from corrosion. Loose connections can cause performance issues or damage.
- Ventilation: Ensure the area around the amplifiers remains clear to allow for adequate airflow and cooling. Do not obstruct the cooling fins.
Troubleshooting
If you experience issues with your Lanzar amplifiers, refer to the following common problems and solutions:
| Problem | Possible Cause | Solution |
|---|---|---|
| No Power (Power LED Off) | Blown fuse, loose power/ground/remote wire, no remote signal from head unit. | Check in-line fuse and amplifier fuses. Verify all power, ground, and remote connections are secure and receiving voltage. Check head unit's remote output. |
| Protection LED On | Overheating, short circuit in speaker wiring, speaker impedance too low, low voltage. | Allow amplifier to cool. Check speaker wiring for shorts (bare wires touching). Verify speaker impedance is within amplifier's stable range. Check vehicle's battery voltage. |
| No Sound Output | Loose RCA cables, incorrect gain setting, muted head unit, faulty speakers. | Ensure RCA cables are securely connected at both ends. Adjust gain. Check head unit volume and mute settings. Test speakers with another audio source if possible. |
| Distorted Sound | Gain set too high, incorrect crossover settings, poor ground connection, damaged speakers. | Reduce gain. Adjust crossover frequencies. Verify ground connection is solid. Inspect speakers for damage. |
| Engine Noise/Whine | Poor grounding, RCA cables too close to power wires, faulty alternator. | Improve ground connection. Reroute RCA cables away from power wires. Consider a ground loop isolator. Have alternator checked. |
Specifications
Lanzar VCT4110 4-Channel Amplifier
| Feature | Specification |
|---|---|
| Power Output (4 Ohms) | 500W x 4 |
| Bridged Output (2 Ohms) | 1000W x 2 |
| Amplifier Class | MOSFET |
| 2 Ohm Stable | Yes |
| Variable Hi-Pass | 40 Hz - 250 Hz |
| Variable Low-Pass | 40 Hz - 250 Hz |
| Variable Input Level (Gain) | 6V - 200mV |
| Bass Boost Switch | 0-18dB |
| Protection | Thermal / Overload / Short Circuit |
| Frequency Response | 15 Hz - 30K Hz |
| Signal to Noise Ratio | >95dB |
| THD | 0.1 % |
| Fuse Type | 2x30 Amp Maxi Type |
| Dimensions (W x H x L) | 10.63'' x 1.78'' x 14.02'' |
Lanzar HTG137 Monoblock Amplifier
| Feature | Specification |
|---|---|
| RMS Power (4 Ohm) | 1 x 650 Watt |
| Peak Power (4 Ohm) | 1 x 1250 Watt |
| RMS Power (2 Ohm) | 1 x 1500 Watt |
| Max Power (2 Ohm) | 1 x 2000 Watt |
| Amplifier Class | MOSFET (1 Channel) |
| 2 Ohm Stable | Yes |
| T.H.D. | <0.01% |
| S/N Ratio | >90dB |
| Frequency Response | 10Hz - 45kHz |
| HPF Freq. Resp. | 80Hz |
| LPF Freq. Resp. | 50Hz - 250Hz |
| Fuse | 40A x 1 |
| Dimensions (L x H x W) | 13.0'' x 2.4'' x 8.8'' |
Warranty and Support
Lanzar products are designed for reliability and performance. For specific warranty details, please refer to the documentation included with your purchase or visit the official Lanzar website. For technical support or service inquiries, please contact Lanzar customer service.
An official PDF user manual is also available for download: Download PDF User Manual
Related documentsVCT4110, HTG137

Ask a question about this manual
Ask about setup, troubleshooting, compatibility, parts, safety, or missing instructions. Manuals+ will review the question and use this page’s manual context to help answer it.