
1. Introduction and Overview
This manual provides comprehensive instructions for the setup, operation, maintenance, and troubleshooting of your Protmex 9-in-1 Wireless Weather Station. This device is designed to provide accurate indoor and outdoor environmental data, including temperature, humidity, and air pressure, along with weather forecasts and timekeeping functions.
The weather station features a clear LCD display and connects wirelessly to up to three remote sensors, offering versatile monitoring capabilities for various locations.
2. Product Features
- 9-in-1 Functionality: Measures outdoor temperature, humidity, air pressure, indoor temperature, indoor humidity, displays time, date, moon phase, and provides weather forecasts.
- High-Precision Sensors: Built-in sensors accurately measure environmental conditions.
- Wireless Connectivity: Supports up to 3 remote wireless sensors with a transmission range of 50-100 meters (164-328 feet).
- Clear LCD Display: Features a large, easy-to-read LCD screen with LED backlight for visibility in various lighting conditions.
- Weather Forecast: Displays 7 live weather icons (sunny, cloudy, overcast, rainy, thunderstorms, snowy, heavy snow) to predict trends for the next 6-24 hours.
- Alarm Clock Function: Includes daily alarms and a snooze function.
- Low Power Reminder: Automatically alerts you when batteries are low.
- Comfort Status Indicator: Provides visual cues for indoor comfort levels.

Figure 2.1: Overview of the weather station's display and key features.
3. Package Contents
Please check the package for the following items:
- 1 x Main Weather Station Unit
- 3 x Wireless Remote Sensors
- 1 x Power Adapter
- 1 x User Manual
- 3 x AAA Batteries (for main unit, additional batteries may be required for sensors)

Figure 3.1: Contents of the Protmex 9-in-1 Wireless Weather Station package.
4. Setup Instructions
4.1 Battery Installation
- Open the battery compartment on the back of the main weather station unit.
- Insert 3 AAA batteries (included), ensuring correct polarity (+/-).
- Close the battery compartment.
- For each remote sensor, open its battery compartment and insert 2 AAA batteries (not always included, check packaging). Close the compartment.
4.2 Powering On and Initial Calibration
- Connect the power adapter to the main unit's power socket and plug it into a wall outlet.
- The display will light up. The weather station will begin an initial radio control time calibration process, which may take 3 to 7 minutes. During this time, the device attempts to synchronize its clock.
- The data on the display will automatically update every 30 seconds.
4.3 Sensor Placement
The wireless sensors can be placed in various locations such as gardens, garages, storage rooms, attics, or cellars. Ensure the sensor is within the 50-100 meter (164-328 feet) transmission range of the main unit and is protected from direct rain or extreme weather conditions.
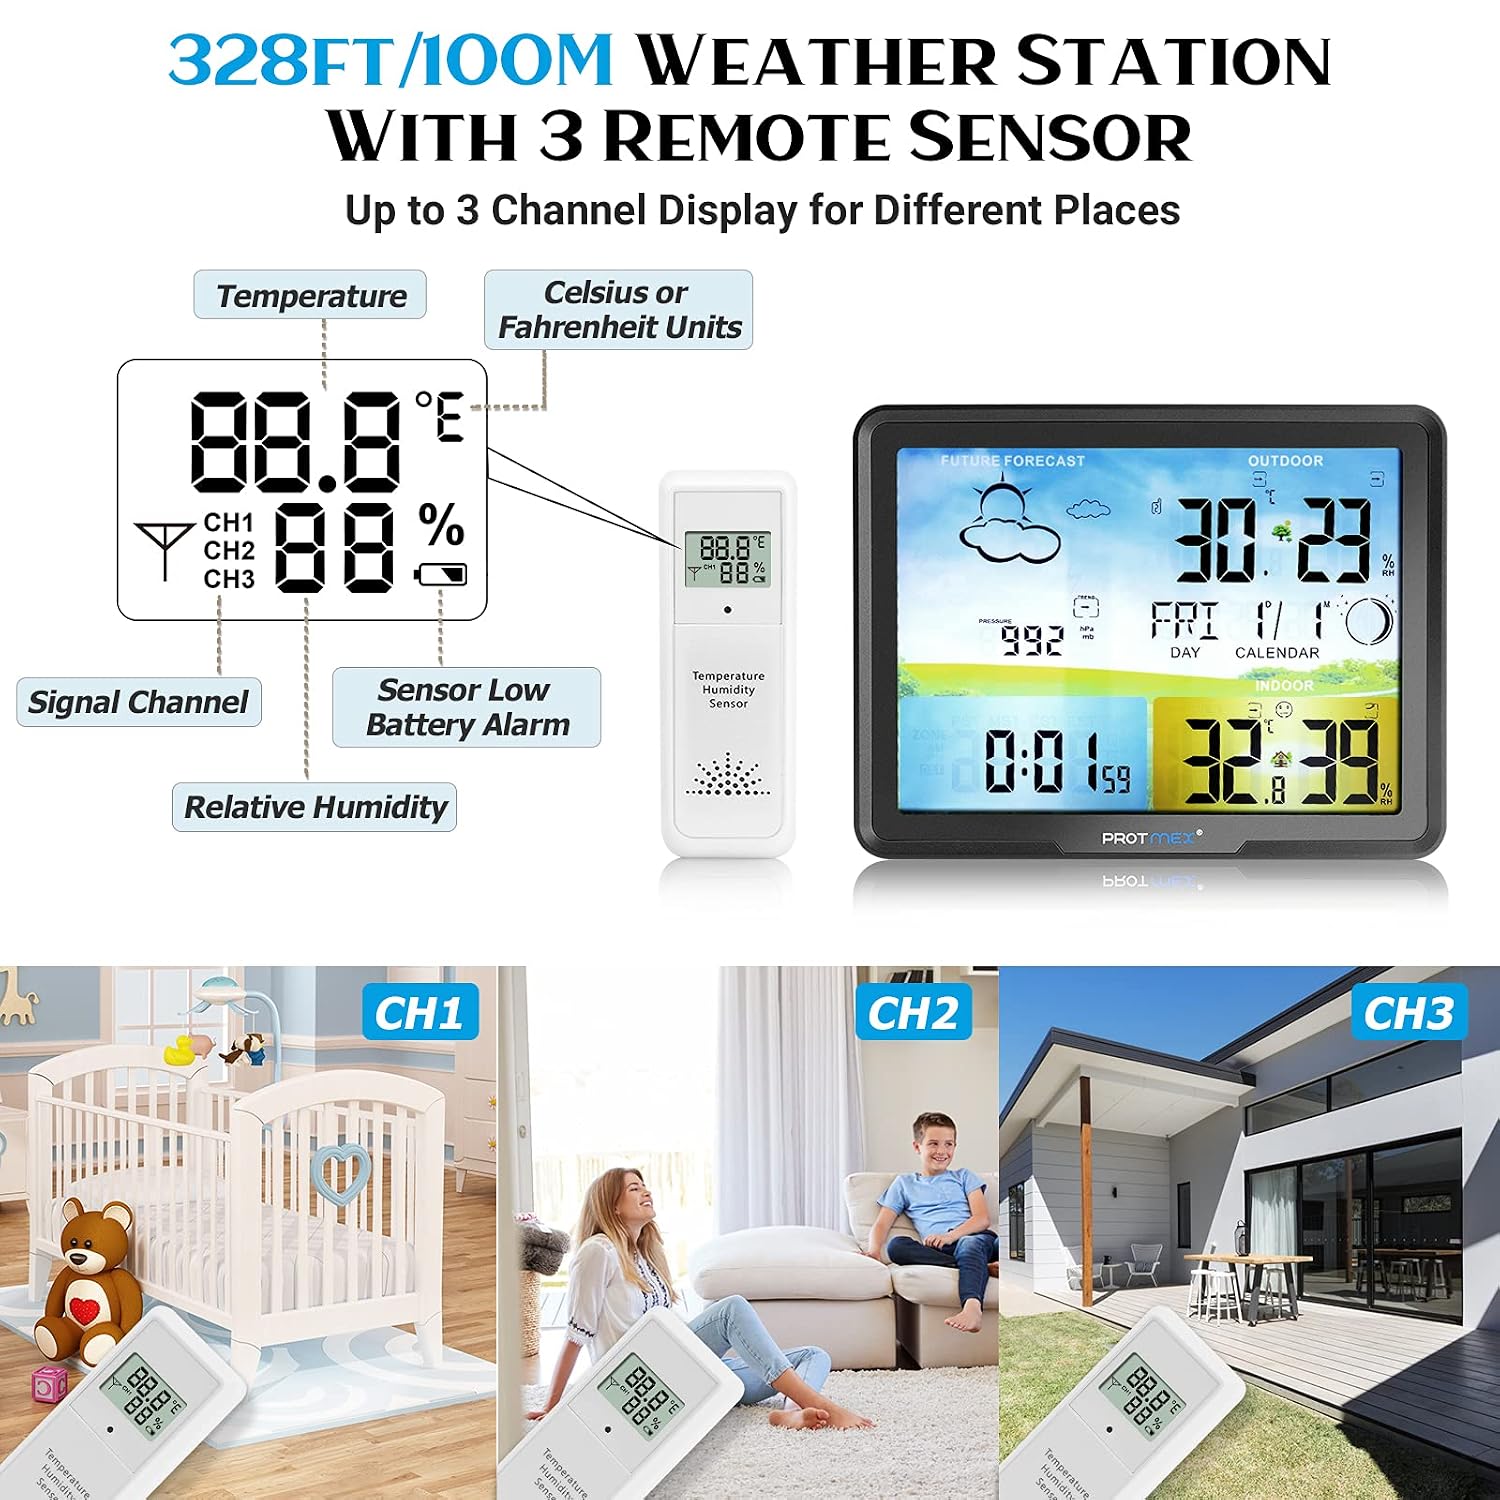
Figure 4.1: Example placements for the main unit and remote sensors.
5. Operating Instructions
5.1 Main Unit Controls
Refer to the 'Functional Overview' image for button locations.

Figure 5.1: Functional overview of the main weather station unit, showing buttons and ports.
- SNOOZE/LIGHT Button: Press to activate snooze during an alarm or to adjust backlight brightness when powered by adapter.
- TIME Button: Used to set time, date, and time zone.
- ALARM Button: Used to set and activate/deactivate alarms.
- ALERT Button: Used for setting temperature alerts.
- HI/DP Button: Displays historical high/low temperature and humidity, or dew point.
- ▲/RF Button: Manually search for remote sensor signals or adjust settings upwards.
- ▼/MEM Button: View minimum/maximum records or adjust settings downwards.
5.2 Setting Time and Date
Press and hold the TIME button to enter time setting mode. Use the ▲/RF and ▼/MEM buttons to adjust values, and press TIME again to confirm and move to the next setting (e.g., hour, minute, year, month, day, time zone).
5.3 Setting Alarms
Press and hold the ALARM button to enter alarm setting mode. Use ▲/RF and ▼/MEM to set the desired alarm time. Press ALARM to confirm. Press ALARM repeatedly to toggle between daily alarm and sleep alarm settings.
5.4 Displaying Multiple Sensors
The weather station can display data from up to three remote sensors. Use the ▲/RF button to cycle through the sensor channels (CH1, CH2, CH3) or to initiate a manual search for sensor signals if a sensor is not displaying data.
5.5 Temperature Unit Selection
A dedicated button (often labeled ℃/℉ or similar, or accessible via a combination of buttons) allows you to switch between Celsius (℃) and Fahrenheit (℉) temperature units.

Figure 5.2: Product dimensions and key display icons.
6. Maintenance
6.1 Battery Replacement
When the low power indicator appears on the display, replace the batteries in the main unit and/or the remote sensors promptly to ensure continuous operation and accurate readings. Always use fresh batteries of the specified type (AAA).
6.2 Cleaning
Wipe the weather station and sensors with a soft, dry cloth. Do not use abrasive cleaners or immerse the units in water.
6.3 Accuracy Notes
The temperature accuracy for both indoor and outdoor sensors is ±1℃. Humidity accuracy is ±5%. Air pressure accuracy is ±10 Mb.
7. Troubleshooting
- No Display/Blank Screen: Check battery installation and power adapter connection. Replace batteries if low power indicator was shown.
- Incorrect Time/Time Drifting: Ensure the weather station has completed its initial radio control time calibration. If the issue persists, manually set the time and date. Ensure the time zone is correctly configured.
- Remote Sensor Not Displaying Data:
- Check the batteries in the remote sensor and replace if necessary.
- Ensure the sensor is within the 50-100 meter transmission range of the main unit.
- Reduce obstacles between the sensor and the main unit (e.g., thick walls, electronic devices).
- Press the ▲/RF button on the main unit to manually search for the sensor signal.
- Ensure the sensor channel (CH1, CH2, CH3) is correctly selected on the main unit if you are trying to view a specific sensor.
- Inaccurate Readings: Ensure sensors are not exposed to direct sunlight, heat sources, or extreme moisture, which can affect accuracy. Allow time for sensors to stabilize after placement.
- Weather Forecast Inconsistent: The weather forecast is based on atmospheric pressure changes over time and is an estimation for the next 6-24 hours. It may not always perfectly match local conditions.
8. Specifications
| Feature | Specification |
|---|---|
| Model Number | Protmex-20C-N1 |
| Brand | Protmex |
| ASIN | B0BFHY796Y |
| GTIN/UPC | 701375702352 |
| Main Unit Dimensions | Approx. 6.7 x 5.2 x 0.6 inches (17 x 13.2 x 1.5 cm) |
| Remote Sensor Dimensions | Approx. 1.7 x 5.0 x 0.6 inches (4.3 x 12.7 x 1.5 cm) |
| Power Source (Main Unit) | Power Adapter (included) or 3 x AAA Batteries (included) |
| Power Source (Remote Sensor) | 2 x AAA Batteries (not always included) |
| Display Type | LCD with LED Backlight |
| Wireless Transmission Range | 50-100 meters (164-328 feet) in open air |
| Temperature Accuracy | ±1℃ |
| Humidity Accuracy | ±5% |
| Air Pressure Accuracy | ±10 Mb |
9. Warranty and Support
For warranty information and customer support, please refer to the documentation provided with your purchase or contact the retailer/manufacturer directly. Keep your purchase receipt as proof of purchase.


