1. Introduction
The ASUS ROG STRIX X670E-A GAMING WIFI motherboard is engineered to deliver exceptional performance and style for high-end AMD Ryzen™ 9000, 8000, and 7000 Series processors. Its design features a black PCB with contrasting white accents and silver heatsinks, highlighting its premium power delivery capabilities. This motherboard incorporates exclusive ROG overclocking utilities, supports PCIe 5.0, and is compatible with DDR5 memory, providing a robust foundation for a tailored gaming and high-performance computing experience.
2. What's in the Box
Upon opening the package, you will find the following components:

Image: The image displays the ASUS ROG Strix X670E-A Gaming WiFi motherboard alongside its packaging and included accessories. These accessories typically include the WiFi 6E antenna, user manual, ROG Strix stickers, a thank you card, SATA cables, and a spare M.2 thermal pad, all essential for setup and customization.
- ASUS ROG Strix X670E-A Gaming WiFi Motherboard
- WiFi 6E Antenna
- User Manual
- ROG Strix Stickers & Thank You Card
- SATA Cables
- Spare M.2 Thermal Pad
3. Key Features
- AMD Socket AM5 (LGA 1718): Designed for AMD Ryzen 7000 Series Desktop Processors, ensuring compatibility with the latest generation of AMD CPUs.
- Robust Power Solution: Features 16+2 teamed power stages with 8+8 pin ProCool II power connectors, high-quality alloy chokes, and durable capacitors to support multi-core processors and stable power delivery.
- Optimized Thermal Design: Equipped with massive VRM heatsinks, an integrated aluminum I/O cover, a high-conductivity thermal pad, four onboard M.2 heatsinks, and one M.2 backplate for the M.2_1 slot, ensuring efficient heat dissipation.
- Overclocking Technologies: Includes Dynamic OC Switcher, Ryzen Core Flex, and PBO Enhancement for advanced performance tuning. Bundled with a 60-day free trial of AIDA64 Extreme and an intuitive UEFI BIOS dashboard for comprehensive system control.
- High-Performance Networking: Integrated Onboard WiFi 6E, Intel 2.5 Gb Ethernet, and ASUS LANGuard provide fast and reliable network connectivity for gaming and data transfer.
4. Setup Guide
4.1. Pre-Installation Checklist
- Ensure you have all necessary components: CPU, RAM, storage (M.2 SSDs recommended), power supply, graphics card (if not using integrated graphics), and a compatible PC case.
- Gather tools: Phillips head screwdriver, anti-static wrist strap (recommended).
- Read the full manual before beginning installation.
4.2. Motherboard Overview: Built for Speed and Expansion
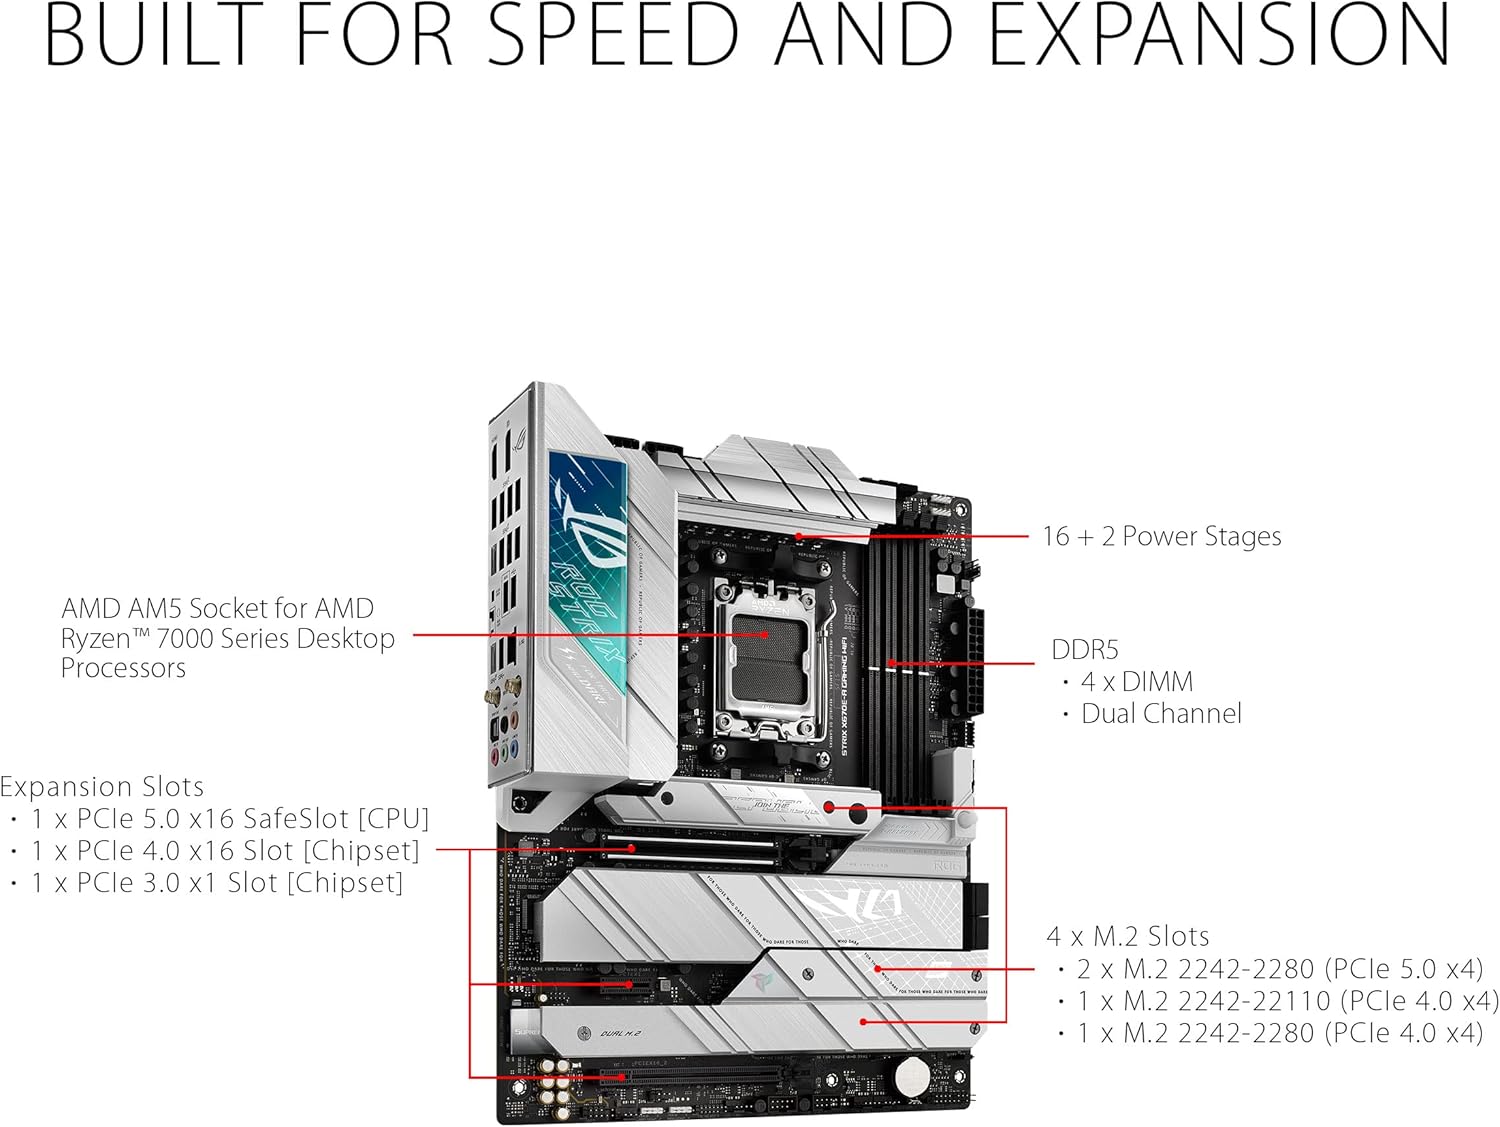
Image: This diagram illustrates the layout of the ASUS ROG Strix X670E-A Gaming WiFi motherboard, emphasizing its core components for performance and expandability. It points out the AMD AM5 Socket for Ryzen 7000 Series processors, the robust 16+2 power stages, four DDR5 DIMM slots for dual-channel memory, and multiple M.2 slots (PCIe 5.0 and 4.0) for high-speed storage. Additionally, it highlights the PCIe 5.0 x16 SafeSlot for the CPU and PCIe 4.0 x16 and x1 slots for chipset-based expansion.
Familiarize yourself with the motherboard's layout, including the CPU socket, DDR5 memory slots, PCIe 5.0 and 4.0 expansion slots, and the four M.2 slots for high-speed storage. The 16+2 power stages ensure stable power delivery for demanding components.
4.3. CPU Installation
- Carefully open the CPU socket lever.
- Align the CPU with the socket, ensuring the triangle marker on the CPU matches the one on the socket.
- Gently place the CPU into the socket. Do not force it.
- Close the CPU socket lever to secure the CPU.
4.4. Memory (RAM) Installation
- Open the clips on both ends of the DDR5 DIMM slots.
- Align the notch on the memory module with the notch in the DIMM slot.
- Press down firmly on both ends of the memory module until the clips snap into place.
- For optimal performance, install memory modules in the recommended dual-channel configuration (refer to your specific memory kit's instructions or the motherboard manual for slot priority).
4.5. Storage (M.2 SSD) Installation

Image: This image demonstrates the process of installing an M.2 Solid State Drive onto the motherboard. It shows the M.2 slot, often covered by a heatsink, and the necessary steps to remove the heatsink, insert the M.2 drive, and then re-secure the heatsink for optimal thermal performance.
- Locate the M.2 slots. Some slots may be covered by heatsinks.
- Unscrew and remove the M.2 heatsink (if present).
- Insert the M.2 SSD into the slot at a slight angle.
- Gently push down the M.2 SSD and secure it with the provided screw or Q-Latch mechanism.
- Reattach the M.2 heatsink, ensuring proper contact with the thermal pad.
4.6. Graphics Card (GPU) Installation
- Locate the primary PCIe 5.0 x16 slot (usually the top one).
- Open the retention clip at the end of the slot.
- Align your graphics card with the slot and press down firmly until it clicks into place.
- Secure the graphics card to your PC case with screws.
4.7. Power Supply Connections
- Connect the 24-pin ATX power connector from your power supply to the motherboard.
- Connect the 8+8 pin ProCool II CPU power connectors to the motherboard.
- Connect SATA power cables to your SATA storage devices (if any).
4.8. Front Panel & Peripheral Connections
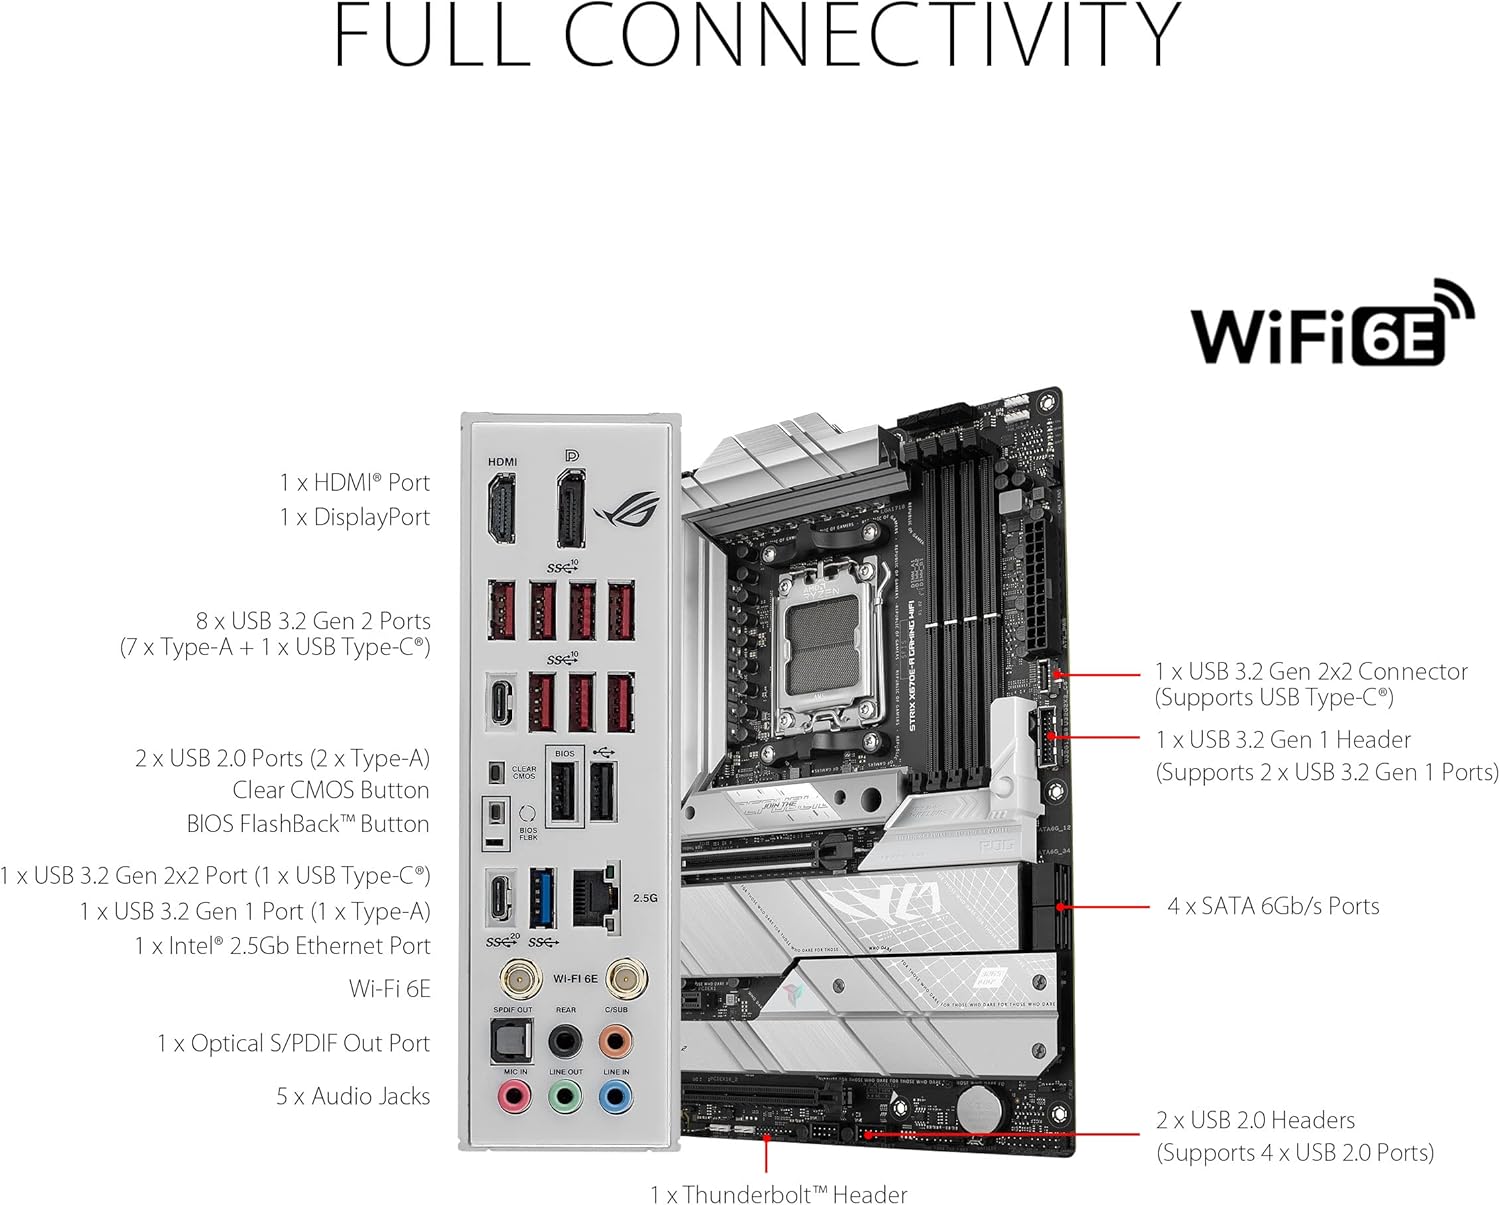
Image: This image provides a detailed view of the rear I/O panel of the ASUS ROG Strix X670E-A Gaming WiFi motherboard, illustrating its comprehensive connectivity options. It highlights multiple USB ports, including USB 3.2 Gen 2x2 (Type-C), USB 3.2 Gen 2 (Type-A and Type-C), and USB 2.0. Display outputs include HDMI and DisplayPort. Networking is handled by an Intel 2.5 Gb Ethernet port and WiFi 6E antenna connectors. Audio connectivity is provided by an optical S/PDIF out port and five audio jacks. Internal headers for additional USB 3.2 Gen 2x2, USB 3.2 Gen 1, and USB 2.0 are also indicated.
- Connect your case's front panel connectors (power button, reset button, HDD LED, power LED) to the appropriate headers on the motherboard.
- Connect USB 2.0, USB 3.2 Gen 1, and USB 3.2 Gen 2x2 front panel headers.
- Connect the audio front panel header.
- Install the WiFi 6E antenna to the rear I/O panel connectors.
5. Operating Instructions
5.1. First Boot and BIOS Setup
- After assembling your PC, connect a monitor, keyboard, and mouse.
- Power on your system. Press the DEL or F2 key repeatedly during startup to enter the UEFI BIOS.
- In the BIOS, set the correct date and time, enable XMP/EXPO for your DDR5 memory (if applicable), and configure boot order.
- Save changes and exit the BIOS. Your system will restart.
5.2. Operating System Installation
Insert your operating system installation media (USB drive or DVD) and follow the on-screen prompts to install your preferred OS.
5.3. Driver Installation
After OS installation, install the latest drivers for your motherboard chipset, audio, LAN, WiFi, and any other components. Drivers can be found on the ASUS support website for your specific model.
5.4. Thermal Control

Image: This image focuses on the thermal management features of the ASUS ROG Strix X670E-A Gaming WiFi motherboard. It clearly labels the VRM Heatsinks, three M.2 Heatsinks, and the Chipset Heatsink, all designed to dissipate heat from critical components. Additionally, it indicates the AIO Pump Header for liquid cooling solutions and five 4-pin PWM Chassis Fan Headers, providing extensive control over system cooling.
The motherboard features extensive thermal solutions including VRM heatsinks, M.2 heatsinks, and a chipset heatsink. Utilize the 5x 4-pin PWM Chassis Fan Headers and the AIO Pump Header to manage your system's cooling effectively. Fan curves can be adjusted in the UEFI BIOS or through ASUS software like Armoury Crate.
5.5. Audio Visual Experience

Image: This image highlights the audio and visual customization capabilities of the ASUS ROG Strix X670E-A Gaming WiFi motherboard. It points out the SupremeFX ALC4080 CODEC paired with a Savitech SV3H712 AMP, detailing features like impedance sensing, high SNR playback and recording, and SupremeFX shielding. Software enhancements like Sonic Studio III, Sonic Radar III, DTS Sound Unbound, and Two-Way AI Noise Cancellation are also noted. For visual customization, it shows the Aura Lighting zones and the presence of three 3-pin Addressable Gen 2 RGB Headers and one 4-pin Aura RGB Header for connecting RGB devices.
Experience high-fidelity audio with the SupremeFX ALC4080 CODEC and Savitech SV3H712 AMP. Customize your system's aesthetics using Aura Lighting and connect compatible RGB devices to the onboard 3-pin Addressable Gen 2 RGB Headers and 4-pin Aura RGB Header.
6. Technical Specifications
| Feature | Specification |
|---|---|
| Brand | ASUS |
| Series | ROG STRIX X670E-A GAMING WIFI |
| Item Model Number | ROG STRIX X670E-A GAMING WIFI |
| Hardware Platform | PC |
| CPU Socket | LGA 1718 |
| Compatible Processors | AMD 7000 Series Desktop Processors (Ryzen 9000, 8000, 7000) |
| Chipset Type | AMD X670 |
| RAM Memory Technology | DDR5 |
| Memory Speed | Up to 6400 MHz (OC) |
| Memory Storage Capacity | 64 GB (Max supported) |
| Wireless Type | 802.11a/b/g/n/ac, 802.11ax (WiFi 6E) |
| Ethernet | Intel 2.5 Gb Ethernet |
| USB Ports | USB 3.2 Gen 2x2, USB 3.2 Gen 2, USB 2.0 |
| Product Dimensions (LxWxH) | 10.8 x 2.8 x 13.3 inches |
| Item Weight | 4.9 pounds |
| Color | BLACK (with white accents) |
| Voltage | 12 Volts |
7. Troubleshooting
7.1. No Power / No Boot
- Check Power Connections: Ensure the 24-pin ATX and 8+8 pin CPU power connectors are securely seated on the motherboard.
- Power Supply Test: Verify your power supply is functioning correctly.
- Front Panel Connections: Double-check that the power button header is correctly connected.
- Minimal Boot: Remove all non-essential components (GPU, extra storage, etc.) and try booting with only CPU, one RAM stick, and necessary power connections.
7.2. No Display
- Monitor Connection: Ensure your monitor is connected to the graphics card (or motherboard if using integrated graphics) and is powered on.
- Graphics Card Seating: Reseat the graphics card firmly in its PCIe slot.
- RAM Seating: Reseat all RAM modules. Incorrectly seated RAM is a common cause of no display.
- BIOS Reset: Clear the CMOS by removing the CMOS battery for 5-10 minutes or using the Clear CMOS button/jumper (refer to motherboard manual).
7.3. Instability / Crashes
- BIOS Update: Ensure your BIOS is updated to the latest stable version.
- Driver Issues: Install the latest drivers for all components from the ASUS support website.
- Overclocking: If you have overclocked your CPU or RAM, revert to default settings to check for stability.
- Thermal Throttling: Monitor CPU and GPU temperatures. Ensure adequate cooling and proper application of thermal paste.
7.4. Network Connectivity Issues (WiFi/LAN)
- Driver Installation: Ensure WiFi and LAN drivers are correctly installed.
- Antenna Connection: For WiFi, ensure the antenna is securely connected to the rear I/O ports.
- Cable Check: For LAN, verify the Ethernet cable is properly connected to both the motherboard and your router/modem.
- Router/Modem Restart: Restart your network equipment.
8. Maintenance
- Dust Removal: Regularly clean dust from your PC case and motherboard components using compressed air. Ensure the system is powered off and unplugged before cleaning.
- BIOS Updates: Periodically check the ASUS support website for BIOS updates. Updates can improve stability, performance, and add support for new hardware.
- Driver Updates: Keep your chipset, audio, LAN, and other drivers updated to ensure optimal performance and compatibility.
- Cable Management: Ensure cables inside your PC case are neatly managed to improve airflow and prevent obstruction.
- Thermal Paste: If you replace your CPU cooler, reapply thermal paste to the CPU.
9. Warranty & Support
This ASUS ROG Strix X670E-A Gaming WiFi motherboard comes with a manufacturer's warranty. Please refer to the warranty card included in your product packaging for specific terms, conditions, and duration. For technical support, driver downloads, and further assistance, please visit the official ASUS support website:
When contacting support, please have your product model number (ROG STRIX X670E-A GAMING WIFI) and serial number ready.


