
PCsensor 3 Key Mini Keypad
PCsensor 3-Key Mini Keypad User Manual
Model: 3 Key Mini Keypad
Brand: PCsensor
Introduction
This manual provides detailed instructions for the setup, operation, and maintenance of your PCsensor 3-Key Mini Keypad. This wireless mechanical gaming keyboard is designed for customized hotkey programming, offering flexibility and enhanced control for various applications.

Image: The PCsensor 3-Key Mini Keypad in white, showcasing its three mechanical keys with red RGB backlighting. The compact design highlights its portability and functionality.
What's in the Box
Verify that all items are present in the package:
- PCsensor 3-Key Mini Keypad (White-Bluetooth model)
- USB Type-C to USB-A Charging Cable
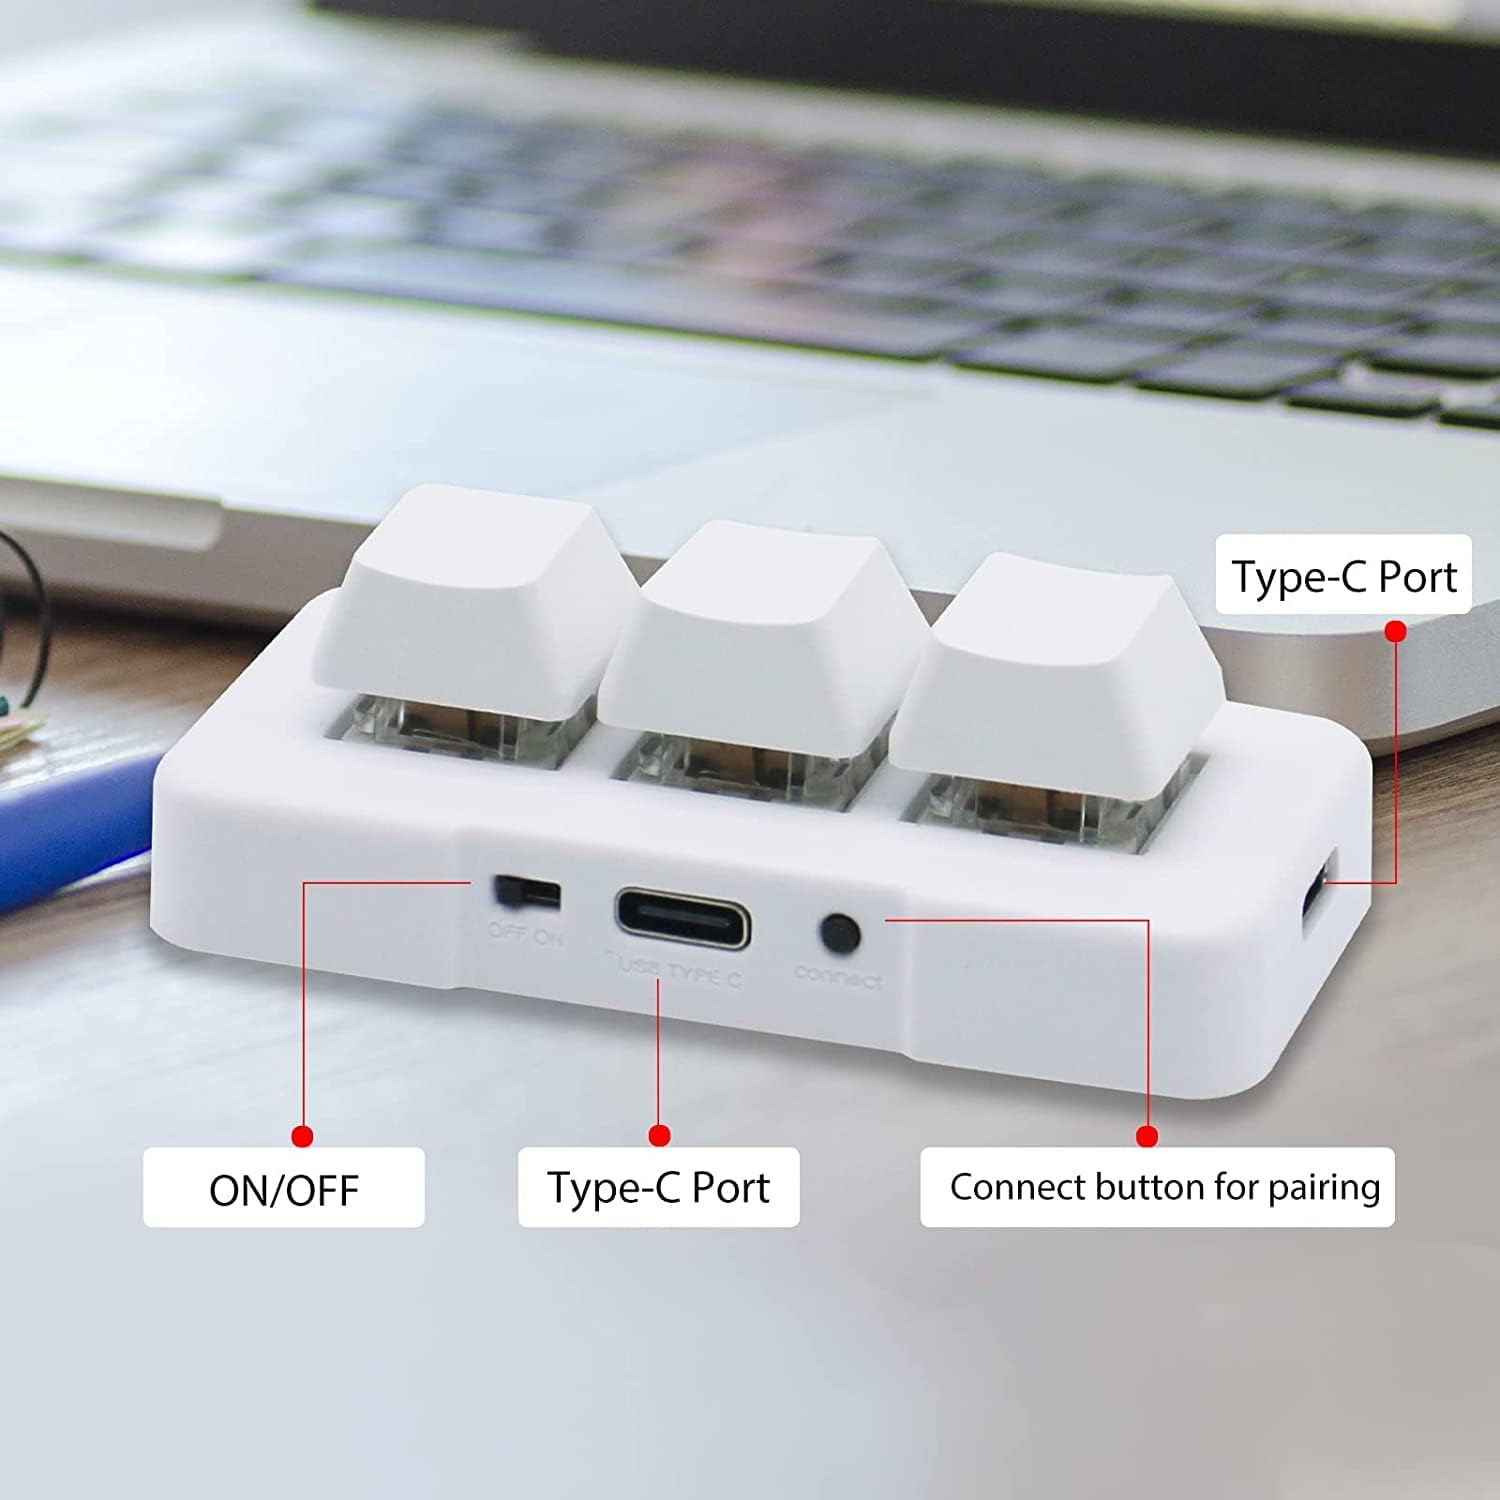
Image: A diagram illustrating the dimensions of the 3-Key Mini Keypad (approximately 3 inches long) and the included 59-inch (1500mm) USB Type-C charging cable.
Product Overview
Familiarize yourself with the components of your mini keypad:
- Mechanical Keys: Three programmable keys with durable mechanical switches.
- ON/OFF Switch: Located on the side for power control.
- USB Type-C Port: For wired connection and charging.
- Connect Button: Used for Bluetooth pairing.
- RGB LED Backlighting: Customizable lighting under each key.

Image: A close-up view of the white 3-Key Mini Keypad, clearly labeling the ON/OFF switch, USB Type-C port, and the small connect button for pairing.
Setup
Charging the Keypad
- Connect the provided USB Type-C cable to the keypad's Type-C port.
- Connect the other end of the cable to a USB power source (e.g., computer USB port, wall adapter).
- The keypad's LED light will indicate charging status. A full charge typically takes 2 hours and can provide up to 3 months of use. The LED will flash every 3 seconds when the battery is low.
Connectivity Options
The keypad supports both wired (USB) and wireless (Bluetooth) connections.
Wired Connection (USB Mode)
- Ensure the keypad is turned OFF using the ON/OFF switch.
- Connect the USB Type-C cable from the keypad to your computer's USB port.
- The keypad will automatically be recognized as a standard keyboard. In USB mode, the key backlighting will typically display a blue light.
Wireless Connection (Bluetooth Mode)
- Turn the keypad ON using the ON/OFF switch.
- Long press the "connect" button on the side of the keypad until the LED light starts flashing rapidly, indicating pairing mode.
- On your device (computer, smartphone, tablet), navigate to Bluetooth settings and search for new devices.
- Select "3 Key Mini Keypad" or a similar name from the list of available devices to pair.
- Once successfully paired, the LED light will stop flashing and remain solid, typically displaying a red light in wireless mode.

Image: The 3-Key Mini Keypad illustrating the different LED colors for connectivity modes: blue light indicates USB mode, and red light indicates wireless (Bluetooth) mode.
Note: For initial setup and programming, it is recommended to connect the keypad to a Windows system first. Once programmed, it can be freely used with Windows, Linux, Mac OS, Android, and iOS systems.
Operating Instructions
Key Programming
The 3-Key Mini Keypad is fully programmable, allowing you to assign custom hotkeys, shortcuts, or macros to each of its three keys. Programming is done via dedicated software.
- Download the official programming software from the PCsensor website. (Refer to the product packaging or manufacturer's website for the download link).
- Install the software on your Windows computer.
- Connect the keypad to your computer via USB. Ensure the software recognizes the device.
- Within the software interface, select the key you wish to program.
- Assign the desired function (e.g., single key press, key combination, multimedia control, macro).
- Save the configuration to the keypad's onboard memory. The programmed functions will work across all compatible operating systems without needing the software running.

Image: A screenshot of the PCsensor programming software interface, showing options for customizing key functions and device settings. This software is essential for assigning specific commands to each key.

Image: A person interacting with the PCsensor programming software on a desktop computer, demonstrating the user interface for customizing the keypad's functions.
RGB LED Control
The keypad features RGB LED backlighting. The lighting can often be controlled through the programming software, allowing you to adjust colors, effects, or turn them off to conserve battery life.
Maintenance
To ensure the longevity and optimal performance of your keypad, follow these maintenance guidelines:
- Cleaning: Use a soft, dry cloth to wipe the surface of the keypad. For stubborn dirt, a slightly damp cloth with mild soap can be used, ensuring no liquid enters the device.
- Storage: Store the keypad in a cool, dry place away from direct sunlight and extreme temperatures.
- Battery Care: Avoid fully discharging the battery frequently. Charge the keypad regularly to maintain battery health.
- Avoid Liquids: Do not expose the keypad to water or other liquids.
- Handle with Care: Avoid dropping or subjecting the keypad to strong impacts.
Troubleshooting
If you encounter issues with your PCsensor 3-Key Mini Keypad, refer to the following common problems and solutions:
| Problem | Solution |
|---|---|
| Keypad not responding (Wired) |
|
| Keypad not connecting (Bluetooth) |
|
| Keys not performing programmed functions |
|
| Battery drains quickly |
|
Specifications
| Feature | Detail |
|---|---|
| Model Number | 3 Key Mini Keypad |
| Connectivity | Bluetooth, USB-C (Wired) |
| Number of Keys | 3 |
| Key Type | Mechanical |
| Backlighting | RGB LED |
| Wireless Distance | Up to 33 feet (10 meters) |
| Battery Type | 1 Lithium Ion (included) |
| Battery Life | Up to 3 months on a 2-hour charge (usage dependent) |
| Compatibility | Windows, Linux, Mac OS, Android, iOS |
| Dimensions | 3.11 x 2.2 x 1.54 inches |
| Item Weight | 2.82 ounces |
| Manufacturer | PCsensor |
Warranty and Support
PCsensor products are designed for durability and performance. For specific warranty information, please refer to the product packaging or the official PCsensor website.
For technical support, troubleshooting assistance, or inquiries regarding your 3-Key Mini Keypad, please visit the PCsensor Store on Amazon or contact PCsensor customer service directly.
A PDF version of the user manual is also available for download: User Manual (PDF)
Related documents3 Key Mini Keypad

Ask a question about this manual
Ask about setup, troubleshooting, compatibility, parts, safety, or missing instructions. Manuals+ will review the question and use this page’s manual context to help answer it.