1. Introduction
This manual provides detailed instructions for the installation, operation, and maintenance of your VIKNAN Android Car Radio Head Unit. Designed specifically for Acura TSX models from 2004 to 2008, this multimedia player enhances your driving experience with advanced features including GPS Navigation, Wireless Carplay, Android Auto, Bluetooth 5.0, Wi-Fi, and 4G network support. Please read this manual thoroughly before installation and use to ensure optimal performance and safety.
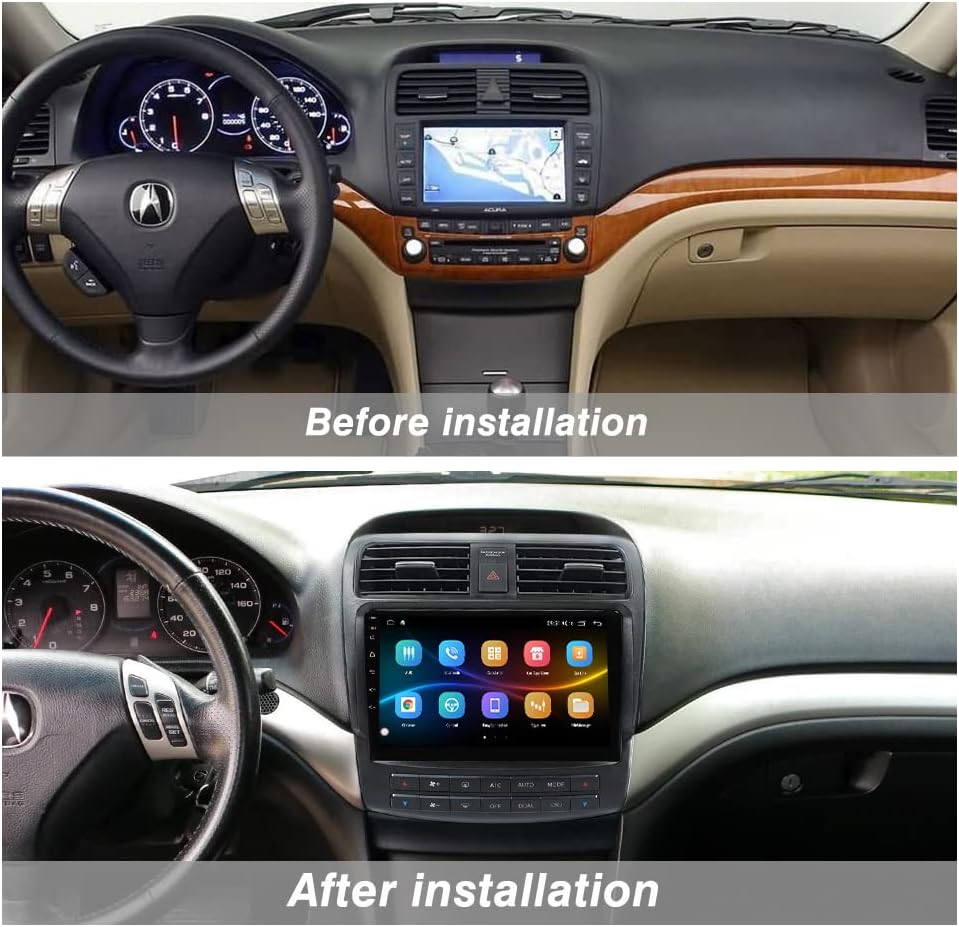
Figure 1: VIKNAN Android Car Radio installed in an Acura TSX dashboard, showing the modern touchscreen interface replacing the original unit.
Video 1: An overview of the VIKNAN Android Car Radio for Acura TSX, demonstrating its features and integration into the vehicle's interior.
2. Safety Information
- Always disconnect the vehicle's battery before performing any installation or wiring work to prevent electrical shock or damage.
- Professional installation is highly recommended. Improper installation can lead to damage to the unit, vehicle, or personal injury.
- Ensure all wiring connections are secure and properly insulated to prevent short circuits.
- Do not operate the device in a manner that distracts you from driving. Always prioritize road safety.
- Keep the unit away from water, moisture, and extreme temperatures.
3. What's in the Box
Verify that all components are present before beginning installation:
- VIKNAN Android Car Radio Head Unit (with integrated fascia)
- Main Power Wiring Harness (Plug and Play)
- GPS Antenna
- 4G Antenna
- USB Cables (4-pin and 6-pin)
- RCA Cable Group (for audio/video input/output)
- Rear View Camera Input Cable
- External Microphone
- Installation Tools (plastic pry tools)
- User Operation Manual (this document)

Figure 2: All components included with the VIKNAN Android Car Radio, laid out on a white surface.
4. Setup and Installation
The VIKNAN Android Car Radio is designed for a plug-and-play installation, minimizing the need for wire cutting. However, careful attention to connections is crucial.
4.1. Wiring Connections
Follow these steps to connect the various components to the head unit:
- Main Power Harness: Connect the main power harness to the corresponding port on the back of the head unit. This harness will then connect to your vehicle's factory wiring.
- GPS Antenna: Connect the GPS antenna to the dedicated GPS port on the head unit. Position the antenna in a location with a clear view of the sky for optimal signal reception.
- 4G Antenna: If using 4G connectivity, connect the 4G antenna to its designated port.
- USB Cables: Connect the provided 4-pin and 6-pin USB cables to the USB ports on the head unit. These can be routed to a convenient location in your vehicle for connecting USB devices.
- RCA Cable Group: Connect the multi-pin RCA cable group for various audio and video inputs/outputs (e.g., external amplifier, subwoofer, auxiliary input).
- Rear View Camera: Connect your rear view camera's video input to the designated RCA port on the head unit. Ensure the reverse trigger wire is correctly connected to enable automatic camera display when reversing.
- External Microphone: Plug in the external microphone for improved call quality during hands-free operation.
- Vehicle Air Conditioning System: Connect the appropriate plugs for the original vehicle's air conditioning system to ensure full functionality and display on the head unit.

Figure 3: Rear view of the VIKNAN Android Car Radio, highlighting the various connection ports for antennas, USB, and main harnesses.
Video 2: A detailed demonstration of the wiring connections for the Acura TSX Android radio, showing each plug and its corresponding port.
5. Operating Instructions
5.1. Basic Functions
- Power On/Off: The unit will typically power on automatically with the vehicle's ignition. To manually power off, press and hold the power button (if available) or use the software power option.
- Touchscreen: Navigate the interface by tapping, swiping, and pinching on the 9-inch HD IPS screen.
- Volume Control: Adjust volume using the physical buttons on the unit or the steering wheel controls.
5.2. Navigation (GPS)
The unit supports various GPS navigation applications. Ensure the GPS antenna is properly connected and positioned for accurate location tracking.
- Open your preferred navigation app (e.g., Google Maps).
- Enter your destination and follow the on-screen and voice guidance.
5.3. Wireless Carplay & Android Auto
Connect your smartphone wirelessly for seamless integration of your phone's features.
- Ensure Bluetooth is enabled on both your smartphone and the head unit.
- Open the 'Tlink5' application on the head unit.
- Follow the on-screen prompts to pair your phone via Bluetooth. Once paired, Carplay or Android Auto will launch automatically.
Video 3: A short demonstration on how to use Carplay with the Android Car Radio, showing the connection process and basic functionality.
5.4. Bluetooth 5.0
- Hands-Free Calling: Pair your phone via Bluetooth to make and receive calls directly from the head unit. Access your phone book and call history.
- Audio Streaming: Play music from your smartphone wirelessly through the car's speakers.
5.5. FM Radio
- Access the 'Radio' application.
- Use the touchscreen to scan for stations or manually tune to a specific frequency. Save your favorite stations for quick access.
5.6. Multimedia Playback
- Use the 'Music' or 'Video' applications to play media files from USB drives or internal storage.
- The built-in DSP (Digital Signal Processor) allows for advanced audio customization. Access the 'Equalizer' app to adjust sound settings, including bass, treble, and sound field.
5.7. Steering Wheel Control
The unit supports your vehicle's factory steering wheel controls. You may need to configure them:
- Go to 'Settings' and find the 'Steering Wheel Control' or 'SWC' option.
- Follow the on-screen instructions to map your steering wheel buttons to the desired functions on the head unit.
5.8. Internet Connectivity (Wi-Fi & 4G)
- Wi-Fi: Connect to a local Wi-Fi network by going to 'Settings' > 'Wi-Fi'.
- 4G Network: Insert a compatible 4G SIM card into the designated slot (if available on your model) to access the internet directly.
6. Maintenance
- Screen Cleaning: Use a soft, lint-free cloth to gently wipe the touchscreen. Avoid abrasive cleaners or harsh chemicals.
- Software Updates: Periodically check for software updates in the 'Settings' menu to ensure optimal performance and access to new features.
- General Care: Avoid exposing the unit to direct sunlight for extended periods or extreme temperatures.
7. Troubleshooting
If you encounter issues, refer to the following common problems and solutions:
- No Power: Check all power connections, including the main harness and vehicle's fuse box. Ensure the vehicle's battery is connected.
- No Sound: Verify speaker wiring connections. Check volume levels on the unit and ensure the mute function is not active. Inspect RCA connections if using external amplifiers.
- GPS Not Working: Ensure the GPS antenna is securely connected and placed in an unobstructed location. Check the settings within your navigation application.
- Carplay/Android Auto Connection Issues: Confirm Bluetooth is on and paired. Ensure the 'Tlink5' app is running. Try restarting both the phone and the head unit.
- HVAC Controls Not Displaying/Working: Double-check the specific connector for HVAC controls during installation. Refer to the wiring diagram.
- Fuzzy Audio/Static: Inspect all audio wiring for loose connections or interference. Adjust DSP settings.
- Screen Freezes/Unresponsive: Perform a soft reset by pressing the reset button (if available) or power cycling the unit.
8. Specifications
| Feature | Specification |
|---|---|
| Vehicle Compatibility | Acura TSX 2004-2008 |
| RAM | 4GB |
| ROM | 64GB |
| Screen Size | 9 Inch HD IPS |
| Operating System | Android |
| DSP | Built-in with 4*50W amplification |
| Bluetooth | 5.0 |
| Connectivity | Wi-Fi, 3G/4G Network (SIM card slot) |
| Special Features | Android Auto, Carplay, Touchscreen, GPS Navigation |
| Item Weight | 5.94 pounds |
| Product Dimensions | 10 x 10 x 15 inches |
9. Warranty and Support
Your VIKNAN Android Car Radio comes with a 1-year warranty from the date of purchase, covering manufacturing defects. Please retain your proof of purchase for warranty claims.
For technical assistance, troubleshooting, or warranty inquiries, please contact VIKNAN customer support. You can typically find contact information on the product packaging or the seller's website.