1. Important Safety Information
Before operating the HOMCOM A90-301 Recumbent Exercise Bike, please read and understand all instructions in this manual. Retain this manual for future reference.
- Consult a physician before starting any exercise program.
- Ensure all parts are securely assembled before each use.
- Place the exercise bike on a flat, stable surface.
- Keep children and pets away from the equipment during operation.
- Maximum user weight capacity: 110 kg (242 lbs).
- Wear appropriate exercise attire and footwear.
- Stop exercising immediately if you feel faint, dizzy, or experience pain.
2. Product Overview
The HOMCOM A90-301 is a high-performance recumbent exercise bike designed for home fitness. It features a magnetic resistance system, an LCD monitor, and adjustable components for a comfortable workout experience.
Key Features:
- 8-Level Magnetic Resistance: Adjust workout intensity from easy to challenging.
- LCD Monitor: Displays time, speed, calories burned, distance, and odometer.
- Heart Rate Grips: Integrated sensors for pulse monitoring.
- Adjustable Seat and Backrest: Customize for optimal comfort and posture.
- Padded Seat and Anti-slip Pedals: Ensures comfort and safety during exercise.
- Transport Wheels: For easy relocation and storage.
Component Identification:

Figure 2.1: Overview of the HOMCOM A90-301 Recumbent Exercise Bike.

Figure 2.2: Detailed view of key components including the phone holder, pulse sensor, and adjustable pedals.
3. Setup and Assembly
Assembly is required for this product. It is recommended that two adults perform the assembly. Ensure all parts are present before beginning.
Required Tools (Not Included):
- Adjustable wrench
- Phillips head screwdriver
Assembly Steps (General Guidance):
- Unpack Components: Carefully remove all parts from the packaging and lay them out on a clean, flat surface. Verify all components against the parts list (refer to your product's specific assembly diagram).
- Attach Stabilizer Bars: Secure the front and rear stabilizer bars to the main frame using the provided bolts and washers.
- Install Pedals: Attach the left and right pedals to their respective crank arms. Note that pedals are typically marked 'L' for left and 'R' for right, and the left pedal often has a reverse thread.
- Assemble Seat and Backrest: Mount the seat and backrest onto the seat post.
- Attach Seat Post to Frame: Insert the assembled seat post into the main frame and secure it.
- Install Handlebars and Console Post: Attach the console post to the main frame, then mount the handlebars.
- Connect LCD Monitor: Secure the LCD monitor to the console post and connect all necessary sensor wires. Insert batteries into the LCD monitor.
- Final Check: Ensure all bolts and nuts are tightened, and all connections are secure. Test the resistance and pedal movement.
4. Operating Instructions
4.1 Adjusting Seat and Backrest
The seat and backrest can be adjusted to accommodate different user heights and preferences, ensuring a comfortable and effective workout posture.
- Seat Adjustment: Locate the adjustment lever or knob beneath the seat. Pull or twist it to unlock the seat, then slide the seat forward or backward to the desired position. Release the lever/knob to lock the seat in place. The seat has a 21 cm adjustment range.
- Backrest Adjustment: The backrest can be adjusted to two different positions. Locate the adjustment mechanism behind the backrest and set it to your preferred angle.

Figure 4.1: Seat and backrest adjustment points.
4.2 Adjusting Resistance
The exercise bike features 8 levels of magnetic resistance, allowing you to vary the intensity of your workout.
- Resistance Knob: Locate the resistance knob on the front post of the bike.
- Increase Resistance: Turn the knob clockwise towards 'HIGH' to increase the pedaling difficulty.
- Decrease Resistance: Turn the knob counter-clockwise towards 'LOW' to decrease the pedaling difficulty.
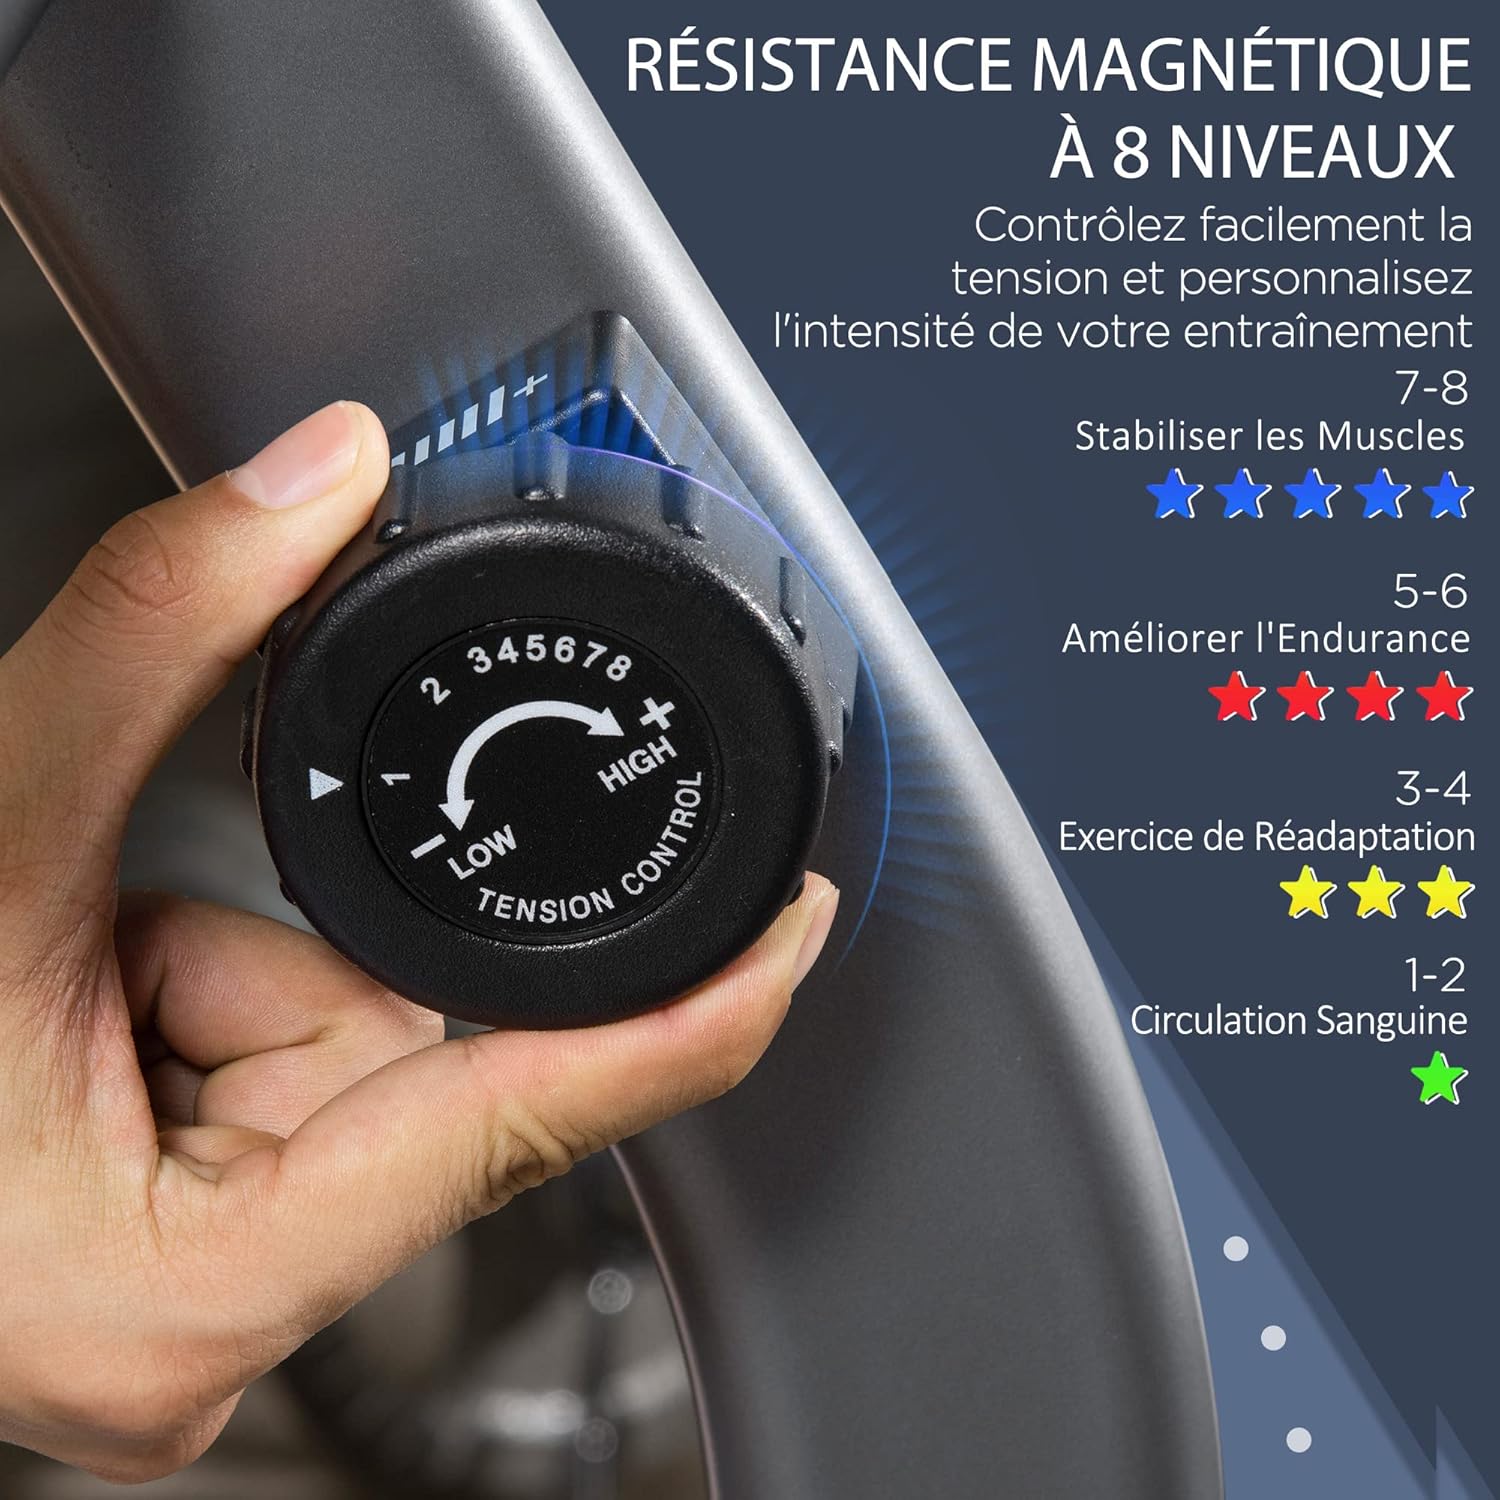
Figure 4.2: Resistance adjustment knob.
4.3 Using the LCD Monitor
The LCD monitor tracks your workout data. It is battery-powered.
- Power On/Off: The monitor automatically turns on when you start pedaling or press any button. It will turn off automatically after a period of inactivity.
- Functions: The monitor displays:
- TIME: Duration of your workout.
- SPEED: Current pedaling speed.
- CALORIES: Estimated calories burned.
- DISTANCE: Distance covered during the current workout.
- ODOMETER (ODO): Total accumulated distance.
- PULSE: Your heart rate when holding the pulse sensors.
- MODE Button: Press to cycle through the display functions or to select a specific function to be shown continuously.
- SET Button: Used to set target values for time, distance, or calories (if applicable to your model).
- RESET Button: Press and hold to clear all current workout data (Time, Speed, Calories, Distance). The Odometer value is typically not reset.
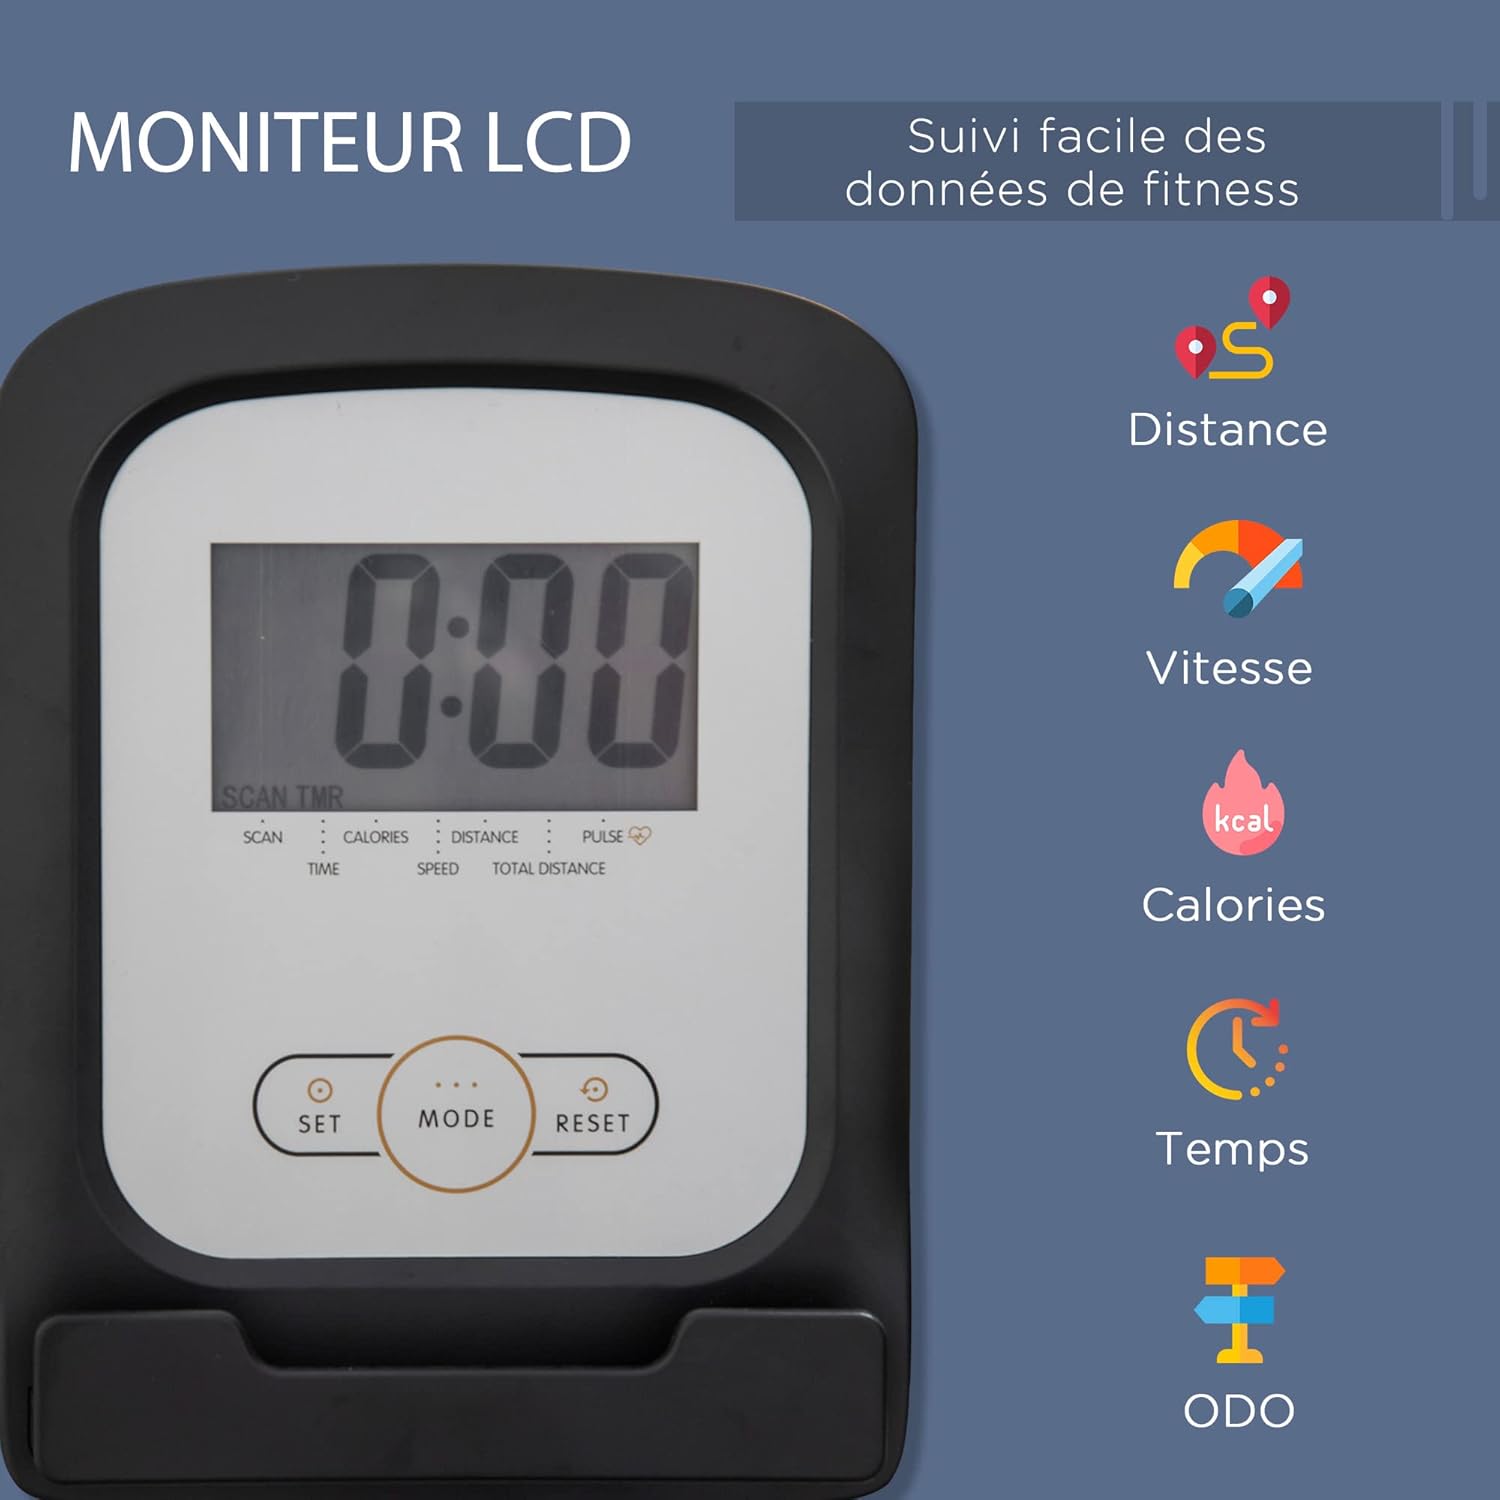
Figure 4.3: LCD Monitor and its functions.
4.4 Heart Rate Monitoring
Grip the pulse sensors on the handlebars firmly with both hands to display your heart rate on the LCD monitor. Ensure your hands are clean and dry for accurate readings.
5. Maintenance
Regular maintenance ensures the longevity and safe operation of your exercise bike.
- Cleaning: Wipe down the bike with a damp cloth after each use to remove sweat and dust. Avoid abrasive cleaners or solvents.
- Check Connections: Periodically inspect all bolts, nuts, and moving parts to ensure they are secure. Tighten any loose fasteners.
- Lubrication: Moving parts may require occasional lubrication. Refer to your specific product's assembly guide for recommended lubrication points and types.
- Battery Replacement: When the LCD display becomes dim or stops functioning, replace the batteries (typically AA or AAA, check the battery compartment for specifics).
- Storage: Store the bike in a dry, cool place away from direct sunlight and extreme temperatures. Use the integrated transport wheels to move the bike easily.
6. Troubleshooting
- LCD Display Not Working:
- Check if batteries are correctly installed.
- Replace batteries if they are old or depleted.
- Ensure all sensor wires are securely connected to the monitor.
- No Resistance Change:
- Verify the resistance cable is properly connected and not kinked.
- Ensure the resistance knob is turning freely and engaging the mechanism.
- Unusual Noise During Operation:
- Check all bolts and nuts for tightness.
- Inspect pedals and crank arms for any looseness or damage.
- Ensure the bike is on a level surface.
- Inaccurate Heart Rate Reading:
- Ensure both hands are firmly gripping the pulse sensors.
- Make sure hands are clean and dry.
- Avoid excessive movement while taking a reading.
7. Specifications
| Feature | Specification |
|---|---|
| Model Number | A90-301 |
| Brand | HOMCOM |
| Resistance Mechanism | Magnetic |
| Resistance Levels | 8 |
| Display Type | LCD |
| Display Functions | Time, Speed, Calories, Distance, Odometer, Pulse |
| Power Source (LCD) | Battery-powered |
| Material | Polyurethane (PU) for seat/backrest, Metal frame |
| Overall Dimensions (L x W x H) | 122-137 cm x 62 cm x 103 cm |
| Product Weight | 26 kg |
| Maximum User Weight | 110 kg |
| Recommended Use | Indoor |

Figure 7.1: Product dimensions.
8. Warranty and Support
For warranty information, product support, or to order replacement parts, please contact the retailer or manufacturer directly. Keep your purchase receipt as proof of purchase.
Manufacturer: HOMCOM


