
1. Introduction
Thank you for choosing the Galanz Microwave Oven, Model D90D25AP-H3. This appliance is designed for efficient and convenient cooking, reheating, and defrosting of various food items. With a 25-liter capacity and 900 watts of microwave power, it offers versatile cooking options including grill and combination modes. Please read this manual thoroughly before operating your new microwave oven to ensure safe and optimal performance. Keep this manual for future reference.
2. Important Safety Instructions
When using electrical appliances, basic safety precautions should be followed, including the following:
- Read all instructions before using the appliance.
- Do not operate the oven if the cord or plug is damaged, if it is not working properly, or if it has been damaged or dropped.
- Do not attempt to service or repair the oven yourself. Contact qualified service personnel for examination, repair, or adjustment.
- To reduce the risk of fire in the oven cavity:
- Do not overcook food.
- Remove wire twist-ties from paper or plastic bags before placing bags in oven.
- If materials inside the oven should ignite, keep oven door closed, turn oven off, and disconnect the power cord, or shut off power at the fuse or circuit breaker panel.
- Do not heat liquids or other foods in sealed containers since they are liable to explode.
- Do not use corrosive chemicals or vapors in this appliance.
- This appliance is designed for heating food. It is not designed for industrial or laboratory use.
- Do not use the microwave oven for drying clothes, newspapers, or other materials.
- Ensure the glass turntable and turntable ring are correctly placed before operation.
- Always supervise children when they are near the appliance.
3. Product Overview
The Galanz D90D25AP-H3 microwave oven features a sleek design with a mirror glass door and a user-friendly touch pad control panel. It offers a 25-liter capacity, 900W microwave power, and 1000W grill power, making it suitable for a variety of cooking needs.
3.1 Components
- Microwave Oven Unit
- Glass Turntable (265mm diameter)
- Turntable Ring
- Instruction Manual
3.2 Exterior View

This image displays the overall appearance of the microwave oven from the front, highlighting its compact design and the integrated control panel on the right side.

This image provides an angled perspective of the microwave, allowing a better view of its depth and the ventilation slots on the top and sides, which are crucial for proper heat dissipation.
3.3 Interior View
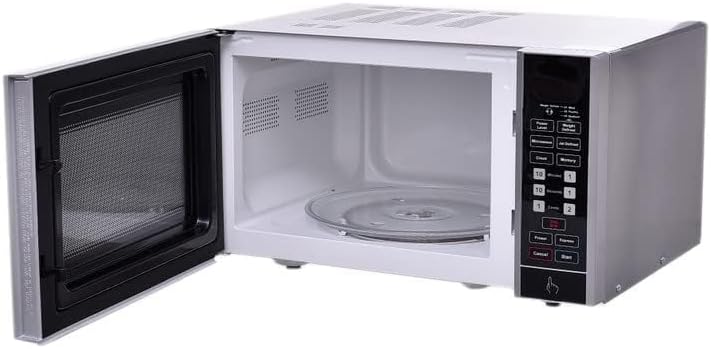
This image shows the inside of the microwave oven with the door open, clearly displaying the spacious 25-liter cavity and the removable 265mm diameter glass turntable, which ensures even cooking.
3.4 Control Panel
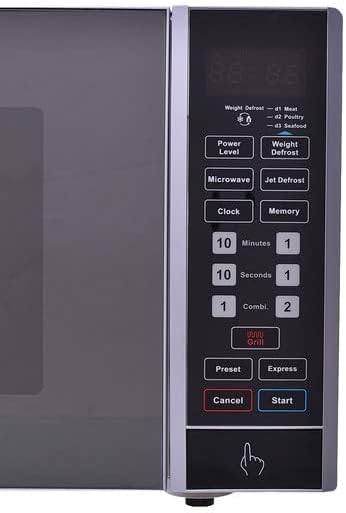
The control panel features a digital display and various touch buttons for setting cooking time, power levels, and special functions. Key buttons include: Power Level, Weight Defrost, Microwave, Jet Defrost, Clock, Memory, 10 Minutes, 10 Seconds, 1 Minute, 1 Second, Combi 1, Combi 2, Grill, Preset, Express, Cancel, and Start.
3.5 Rear View
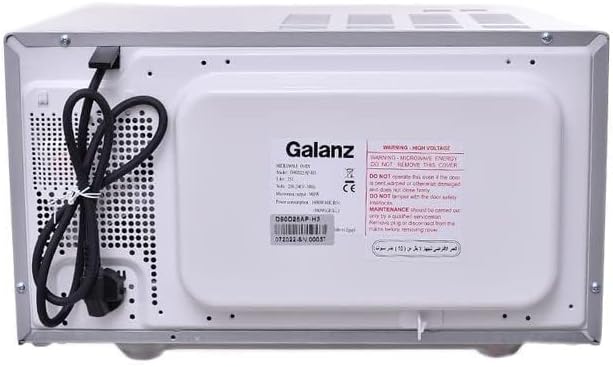
This image shows the back of the microwave oven, including the power cord connection point and the product information label with important warnings regarding high voltage and maintenance.
4. Setup and Installation
4.1 Placement
- Place the oven on a flat, stable surface that can support its weight and the heaviest food likely to be cooked in the oven.
- Ensure adequate ventilation. Leave a minimum of 10 cm (4 inches) clearance at the rear, 20 cm (8 inches) at the top, and 5 cm (2 inches) on each side.
- Do not block air vents. Blocking vents can damage the oven and lead to poor cooking results.
- Keep the oven away from heat sources and water.
4.2 Electrical Connection
- The oven operates on 230-240V/50Hz power.
- Ensure the electrical outlet is properly grounded.
- Do not use extension cords or adapters.
- Plug the power cord firmly into a dedicated wall outlet.
4.3 Turntable Assembly
- Place the turntable ring on the oven cavity floor.
- Place the glass turntable securely on top of the turntable ring, ensuring it sits properly on the center hub.
5. Operating Instructions
5.1 Setting the Clock
- Press the "Clock" button.
- Use the number pads (10 Minutes, 1 Minute, 10 Seconds, 1 Second) to enter the current time.
- Press the "Clock" button again to confirm.
5.2 Microwave Cooking
- Place food in a microwave-safe container on the glass turntable.
- Close the oven door.
- Press the "Microwave" button.
- Press the "Power Level" button repeatedly to select the desired power level (5 levels available).
- Use the number pads to enter the cooking time.
- Press "Start" to begin cooking.
5.3 Jet Defrost / Weight Defrost
This feature allows for quick and efficient defrosting based on time or weight.
- Jet Defrost: Press "Jet Defrost", then enter the defrosting time using the number pads, and press "Start".
- Weight Defrost: Press "Weight Defrost", then use the number pads to enter the weight of the food (e.g., for meat, poultry, seafood), and press "Start". The oven will automatically calculate the defrosting time.
5.4 Grill Cooking
The oven features a 1000W grill for browning and crisping food.
- Place food on a suitable grill rack (if provided, or a heat-resistant dish).
- Press the "Grill" button.
- Use the number pads to enter the grilling time.
- Press "Start" to begin grilling.
5.5 Combination Cooking
The oven offers 2 combination cooking levels, combining microwave and grill functions.
- Place food in a suitable container.
- Press "Combi 1" or "Combi 2" to select the desired combination mode.
- Use the number pads to enter the cooking time.
- Press "Start" to begin combination cooking.
5.6 Preset and Express Functions
- Preset: Allows you to program a delayed start time for cooking. Consult the full manual for detailed programming steps.
- Express: Provides quick start options for common cooking times (e.g., pressing "Express" and then "1 Minute" might start cooking for 1 minute at full power).
5.7 Cooking End Signal
The oven will emit an audible signal when the cooking cycle is complete.
6. Maintenance and Cleaning
Regular cleaning and proper maintenance will ensure the longevity and optimal performance of your microwave oven.
6.1 Cleaning the Oven Cavity
- Always unplug the oven before cleaning.
- Wipe the inside of the oven with a damp cloth after each use to prevent food splatters from drying.
- For stubborn stains, use a mild detergent or a microwave-safe cleaner. Do not use abrasive cleaners or scouring pads.
- Clean the door seals and surrounding areas to ensure a proper seal.
6.2 Cleaning the Glass Turntable and Ring
- The glass turntable and turntable ring can be removed for cleaning.
- Wash them in warm, soapy water or in the dishwasher.
- Ensure they are completely dry before placing them back in the oven.
6.3 Cleaning the Exterior
- Wipe the exterior surfaces with a soft, damp cloth.
- Avoid using harsh chemicals or abrasive materials that could damage the finish.
7. Troubleshooting
If you experience issues with your microwave oven, please refer to the following common problems and solutions before contacting service.
| Problem | Possible Cause | Solution |
|---|---|---|
| Oven will not start | Power cord not plugged in; Door not closed properly; Fuse blown or circuit breaker tripped. | Ensure plug is firmly in outlet; Close door securely; Check household fuse/circuit breaker. |
| Food not cooking evenly | Food not stirred or turned; Turntable not rotating; Incorrect power level/time. | Stir or turn food during cooking; Check turntable assembly; Adjust power level and time. |
| Light not working | Bulb burnt out. | Contact qualified service personnel for bulb replacement. |
| Excessive steam from door | Normal during cooking, especially high-moisture foods. | This is normal operation. Ensure proper ventilation. |
8. Specifications
| Feature | Detail |
|---|---|
| Brand | Galanz |
| Model | D90D25AP-H3 |
| Capacity | 25 Liters |
| Microwave Power Output | 900 Watts |
| Grill Power | 1000 Watts |
| Control Type | Touch Pad Control Panel |
| Microwave Power Levels | 5 Levels |
| Combination Cooking Levels | 2 Levels |
| Turntable Diameter | 265mm |
| Cavity Dimensions (H x W x D) | 220 x 340 x 344 mm |
| Product Dimensions (H x W x D) | 281 x 483 x 385 mm |
| Voltage | 230-240V/50Hz |
| Special Features | Jet Defrost/Weight Defrost, Preset and Express Function, Cooking End Signal |
| Material Type | Glass, Mirror |
| Item Weight | 15 Kilograms |
9. Warranty and Support
Galanz products are manufactured to high-quality standards. For warranty information, please refer to the warranty card included with your purchase or contact your local Galanz authorized service center. Keep your purchase receipt as proof of purchase.
For technical support, service inquiries, or to order replacement parts, please contact Galanz customer service through their official website or the contact information provided in your product packaging.


