
1. Introduction
This manual provides detailed instructions for the safe and effective use of your COSMOING Red Laser Light Combo MGL-033SR. This device integrates a high-output LED flashlight with a red laser sight, designed for compatibility with Picatinny rail mounts. It features magnetic charging and a durable aluminum construction.
Package Contents:
- 1x Laser Flashlight (with built-in rechargeable battery)
- 1x USB Charging Cable
- 1x Allen Wrench
- 1x Instruction Manual
2. Safety Information
WARNING: Read all safety warnings and instructions before using this product. Failure to follow the warnings and instructions may result in serious injury.
Laser Safety:
- This product contains a Class IIIA laser with an output of <5mW and a wavelength of 650nm (red).
- DO NOT stare directly into the laser beam.
- DO NOT point the laser at people or animals.
- Avoid direct eye exposure to the laser beam.
- Ensure the laser is off or covered when not in use.
Battery Safety:
- The device contains a built-in rechargeable Lithium Manganese Dioxide battery.
- Use only the provided USB charging cable.
- DO NOT attempt to disassemble, puncture, or modify the battery.
- Keep away from extreme temperatures and direct sunlight.
- Dispose of batteries according to local regulations.
3. Product Overview
Familiarize yourself with the components and controls of your laser light combo.

Figure 3.1: Front view with labeled components including Flashlight Slide Switch, Laser Switch, USB Charging, and Charging Indicator.
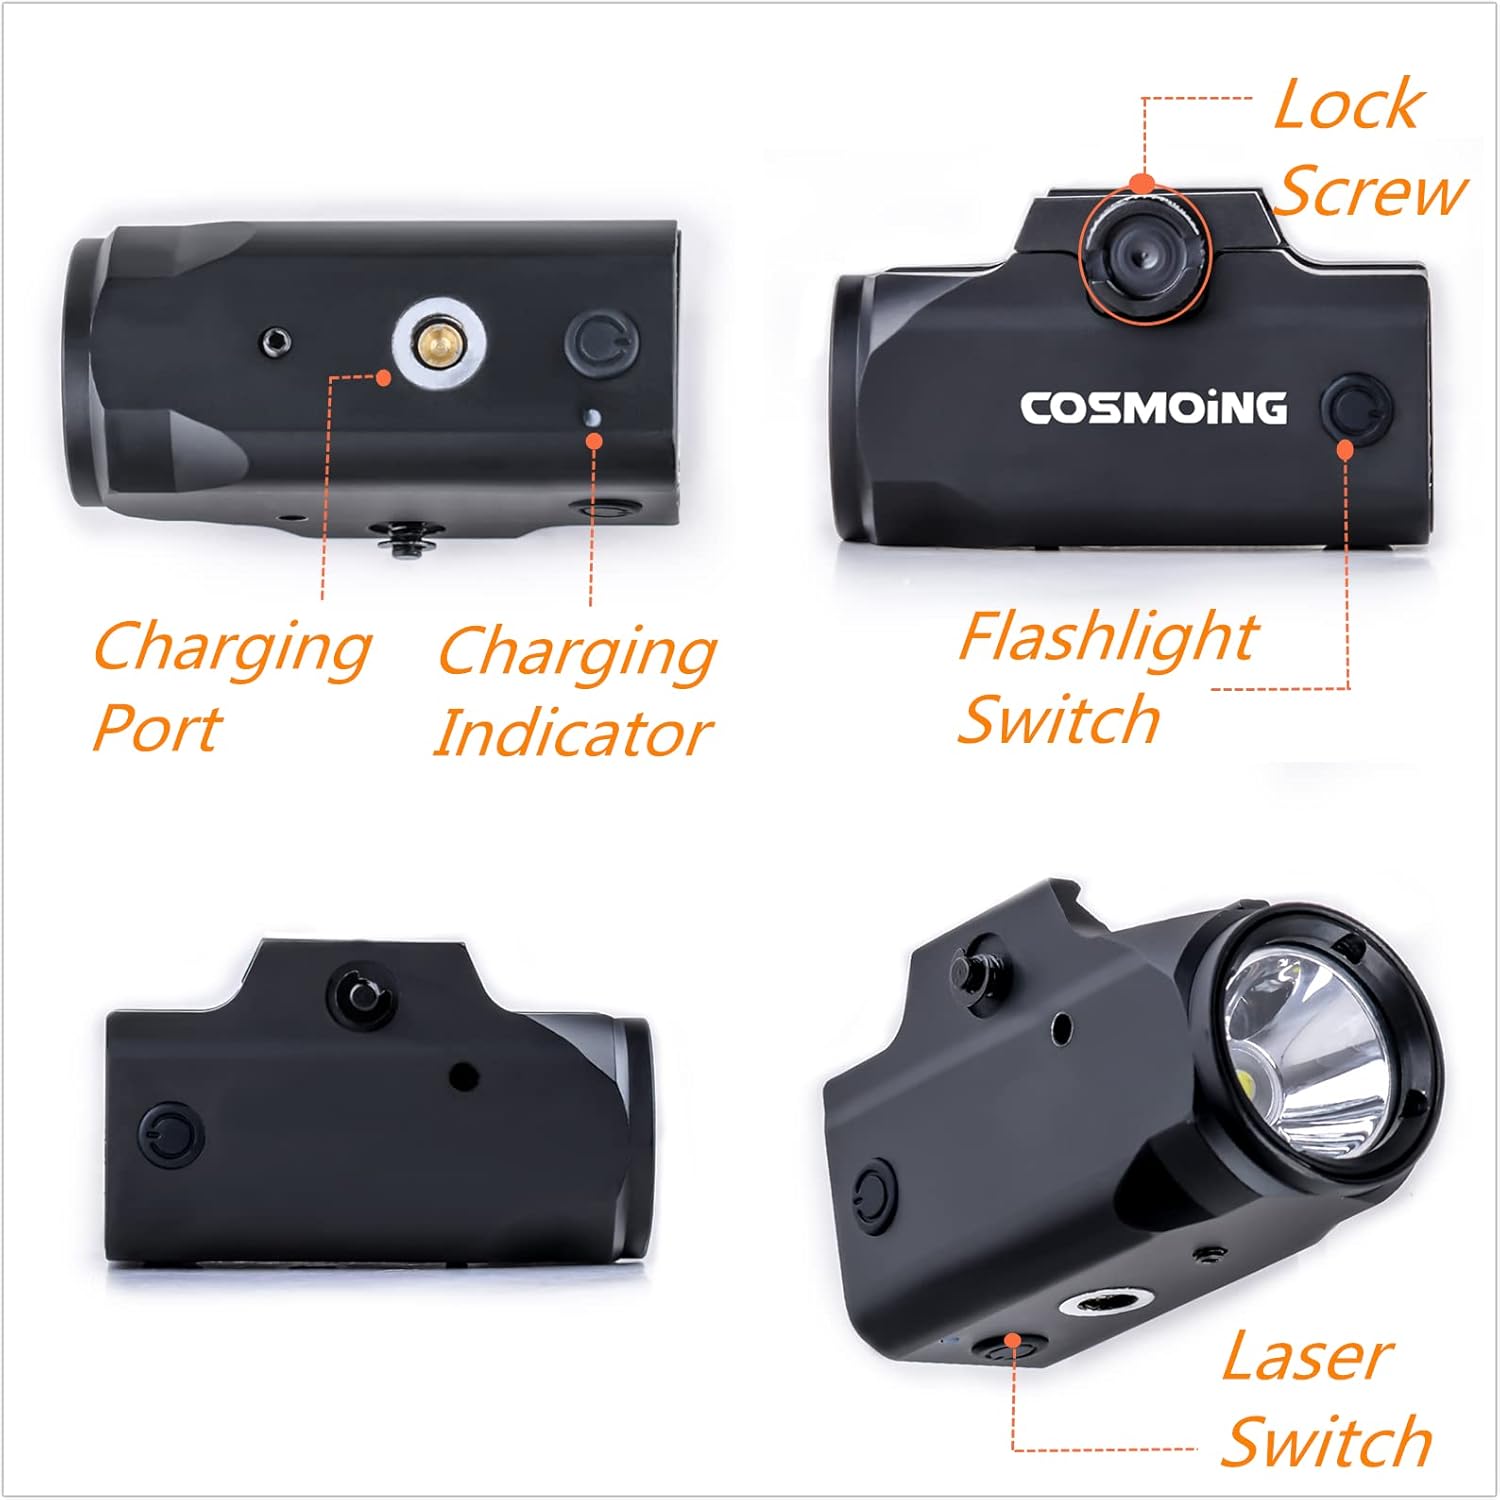
Figure 3.2: Multiple views highlighting the Charging Port, Charging Indicator, Lock Screw, Flashlight Switch, and Laser Switch.
Key Components:
- Flashlight: High-output LED (900 Lumens).
- Laser: Red laser sight (Class IIIA, <5mW, 650nm).
- Flashlight Switch: Activates flashlight modes (steady/strobe).
- Laser Switch: Activates the red laser.
- Charging Port: Magnetic USB port for recharging.
- Charging Indicator: Displays charging status.
- Lock Screw: Secures the device to the rail.
- Windage/Elevation Adjustment Screws: Used for laser calibration (located on the side/bottom, accessible with Allen wrench).
4. Setup
4.1 Charging the Device
- Locate the magnetic charging port on the device.
- Connect the provided USB charging cable to the magnetic port.
- Connect the other end of the USB cable to a standard USB power source (e.g., wall adapter, computer USB port).
- The charging indicator light will illuminate to show charging status. Once fully charged, the indicator light will change (refer to indicator behavior in specifications).
4.2 Mounting to a Picatinny Rail
This device is designed for standard 21mm Picatinny or Weaver rails. Ensure your rail space from slot to guard is less than 1.18 inches for proper fitment.

Figure 4.1: Rail compatibility guide. Ensure your rail meets the specified dimensions.
- Loosen the lock screw on the side of the laser light combo.
- Align the device's rail clamp with the Picatinny rail on your firearm.
- Slide the device onto the rail until it is in the desired position.
- Tighten the lock screw firmly to secure the device to the rail. Do not overtighten.
5. Operating Instructions
5.1 Flashlight Operation
The flashlight features steady and strobe modes.
- Press the Flashlight Switch once for steady light mode.
- Press the Flashlight Switch again to cycle to strobe mode.
- Press the Flashlight Switch a third time to turn off the flashlight.

Figure 5.1: The 900 lumen flashlight in operation, mounted on a pistol.
5.2 Laser Operation
- Press the Laser Switch once to turn on the red laser.
- Press the Laser Switch again to turn off the red laser.
5.3 Adjusting Windage and Elevation
The red laser can be adjusted for both windage (horizontal) and elevation (vertical) to zero-in with your firearm's point of impact.
- Using the provided Allen wrench, locate the small adjustment screws on the device. Typically, one screw controls windage and the other controls elevation.
- Turn the screws incrementally to move the laser dot.
- Windage Adjustment: Turning the screw clockwise or counter-clockwise will move the laser dot left or right.
- Elevation Adjustment: Turning the screw clockwise or counter-clockwise will move the laser dot up or down.
- Perform adjustments carefully and test after each adjustment until the laser is accurately aligned. The precise positioning ensures the laser will not loosen after calibration.
6. Maintenance
6.1 Cleaning
- Ensure the device is turned off before cleaning.
- Wipe the exterior of the device with a soft, dry cloth.
- For the lens and laser aperture, use a lens cleaning cloth or cotton swab with a small amount of lens cleaning solution. Avoid abrasive materials.
- DO NOT immerse the device in water or use harsh chemicals.
6.2 Battery Care and Storage
- Recharge the battery regularly, even if the device is not frequently used, to maintain battery health.
- Avoid completely draining the battery before recharging.
- Store the device in a cool, dry place away from direct sunlight and extreme temperatures.
- If storing for an extended period, ensure the battery is partially charged (around 50%) to prolong its lifespan.
7. Troubleshooting
Common Issues and Solutions:
- Device not turning on:
- Ensure the battery is fully charged. Connect to the USB charger and check the charging indicator.
- Verify that the switches are being pressed correctly.
- Flashlight is dim or laser is weak:
- The battery may be low. Recharge the device.
- Check for any obstructions on the flashlight lens or laser aperture and clean if necessary.
- Laser dot is not stable or moves after adjustment:
- Ensure the device is securely mounted to the Picatinny rail and the lock screw is tightened.
- Re-adjust windage and elevation carefully.
- Device not charging:
- Check if the USB cable is properly connected to both the device and the power source.
- Try a different USB power source or cable.
- Ensure the magnetic connection is clean and free of debris.
8. Specifications

Figure 8.1: Key performance specifications and dimensions of the device.
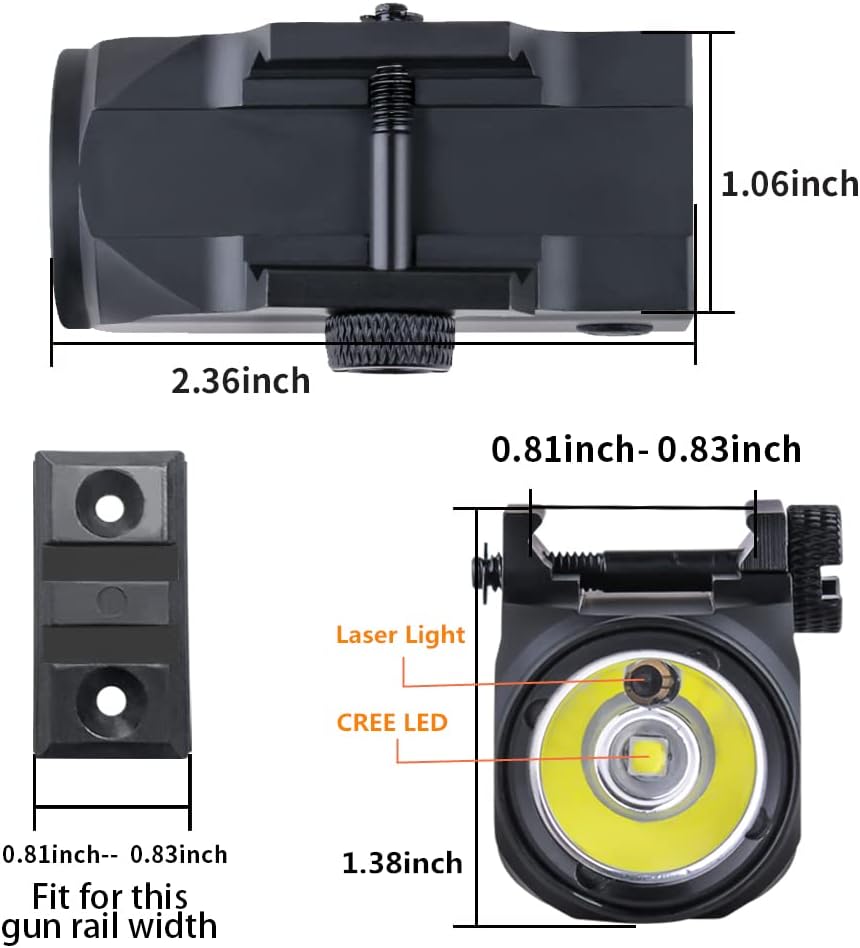
Figure 8.2: Detailed dimensions including length, height, and rail width.
| Feature | Specification |
|---|---|
| Model Number | MGL-033SR |
| Light Output (Flashlight) | 900 Lumens (Max) |
| Light Source Type | LED (XML2-U3) |
| Laser Type | Red Laser, Class IIIA, <5mW, 650nm |
| Beam Distance | Up to 500 meters |
| Runtime | Approximately 1 hour 30 minutes (90 minutes) |
| Power Source | Built-in Rechargeable Lithium Manganese Dioxide Battery |
| Charging Method | Magnetic USB Charging |
| Material | Anodized Aircraft-Grade Aluminum |
| Mounting Type | Picatinny Mount |
| Compatibility | Picatinny rails with slot to guard space < 1.18 inches |
| Weight | 0.19 lb (including batteries) |
| Length | 2.36 inches |
| Head Diameter | 1.06 inches |
9. Warranty and Support
For warranty information or technical support, please contact COSMOING customer service through the retailer where the product was purchased or visit the official COSMOING website. Please have your model number (MGL-033SR) and purchase details available when contacting support.