
Introduction
This manual provides detailed instructions for the installation, operation, and maintenance of your Prichor Universal Ceiling Fan Remote Control Kit. This kit is designed to provide convenient wireless control over your 3-speed ceiling fan and its lighting, including dimming functionality.
Safety Precautions
- WARNING: HIGH VOLTAGE! Disconnect power by removing fuse or switching off circuit breaker before installation or maintenance.
- Do not use with solid state fans.
- Electrical wiring must meet all local and national electrical code requirements.
- Supply for fan must be 110-120 volt, 60Hz.
- Maximum fan motor amps: 1.0.
- Maximum light watts: 300 dimmable LED or incandescent only.
- Otherwise power can cause serious injury or death.

Image: Important safety precautions and a detailed wiring diagram for the receiver installation.
Package Contents
Please verify that all items listed below are included in your package:
- 1 x Remote Control (Model: RC-53T)
- 1 x Receiver (Model: RC-18R)
- 1 x Wall Holder
- 6 x Wire Connectors
- 2 x Expansion Screws
- 1 x Instruction Manual

Image: A visual representation of all components included in the kit, such as the remote, receiver, wall holder, connectors, and screws.
Setup and Installation
Follow these steps carefully to install your new ceiling fan remote control kit. Ensure power is disconnected before beginning.
Step 1: Prepare for Installation
First, remove the fan canopy to access the wiring. You may need a screwdriver to loosen any screws holding it in place.

Image: A person removing the canopy cover of a ceiling fan to expose the internal wiring.
Video: This video demonstrates the complete installation process for the universal remote control kit. It shows how to remove the fan canopy, identify wires, set DIP switches, connect the receiver, and reattach the canopy.
Step 2: Remove Original Receiver (if applicable)
If your fan has an existing receiver, carefully disconnect and remove it. You will typically find three wires from the ceiling (live, neutral, ground) and three wires from the fan (fan motor, light, ground).
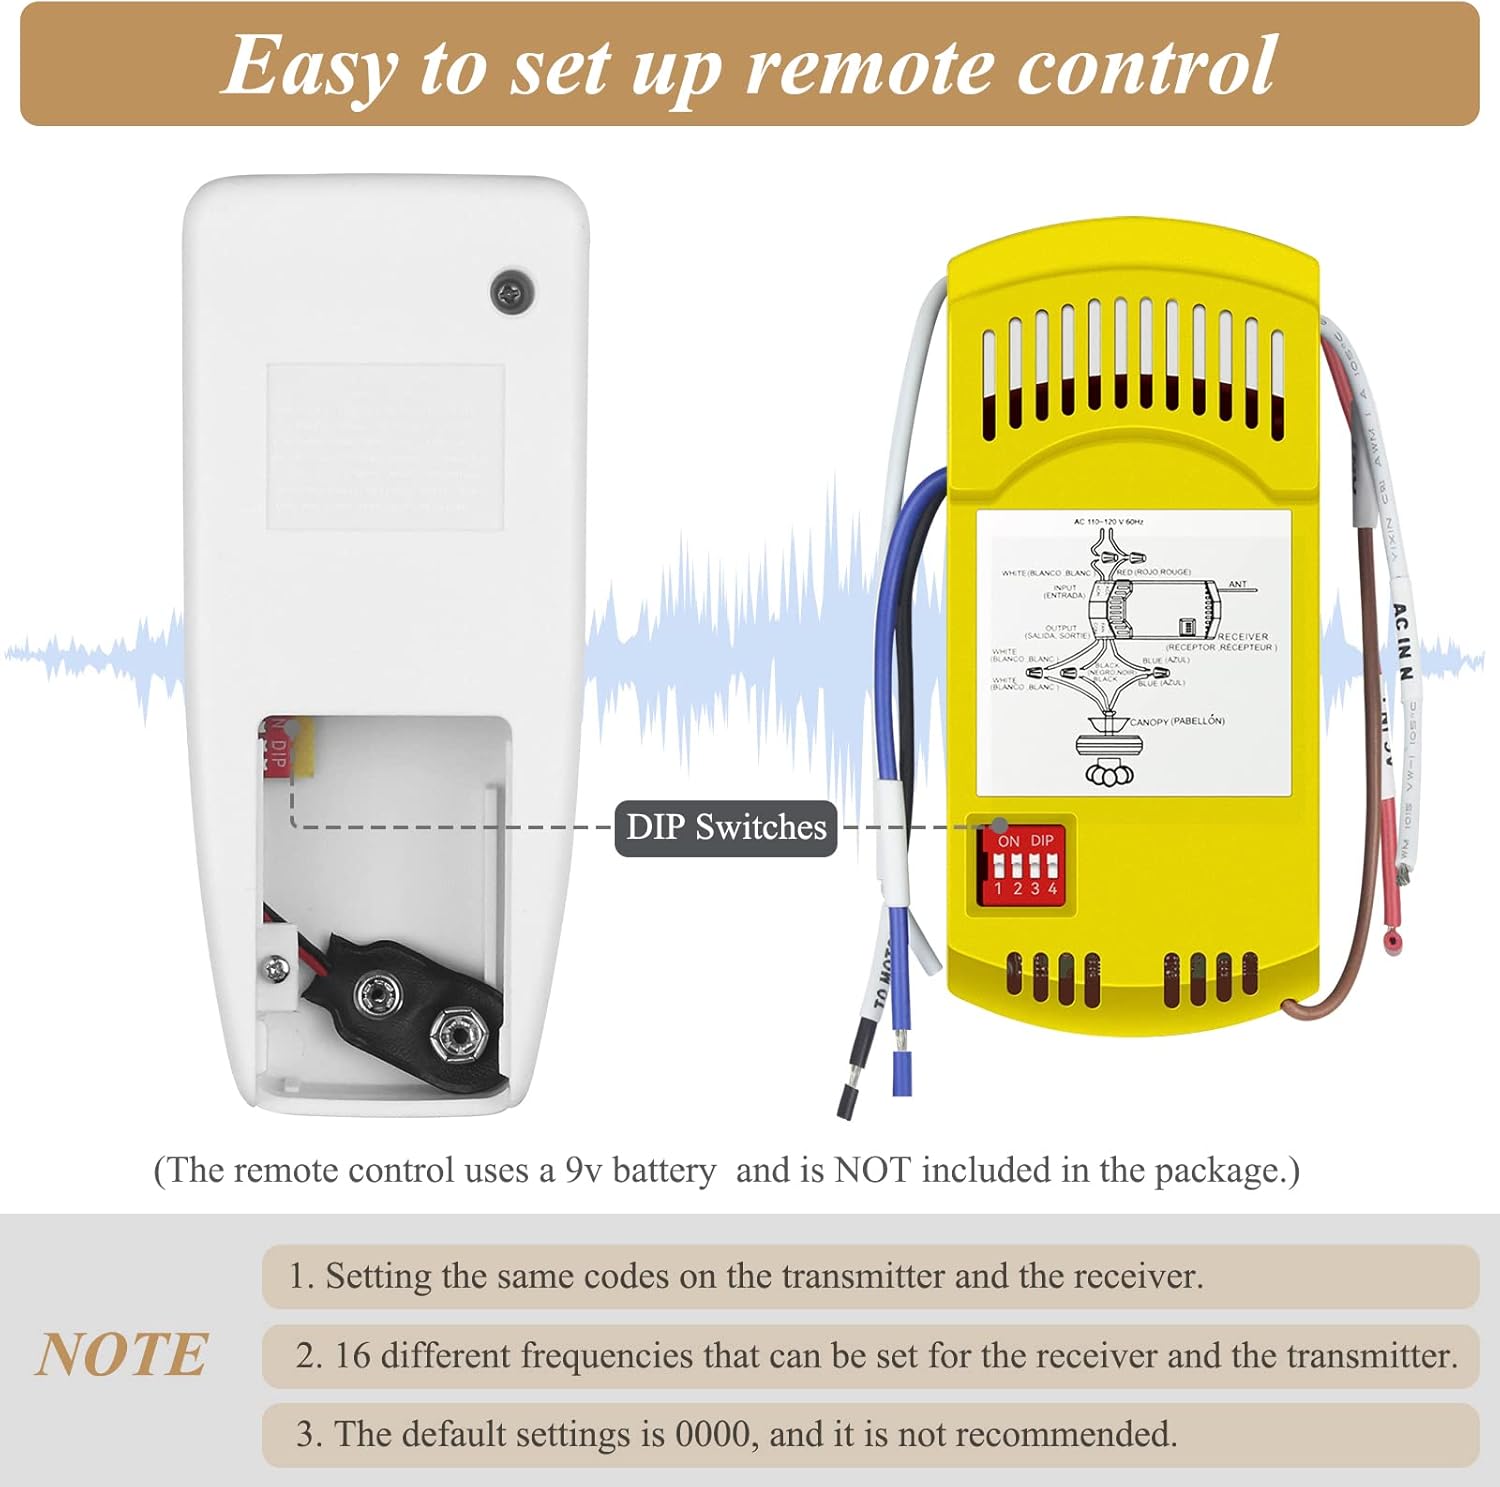
Image: Close-up view of electrical wires extending from both the ceiling and the fan, indicating different color codes for identification.
Step 3: Set DIP Switches
Locate the DIP switches on both the remote control and the receiver. These are usually found in the battery compartment of the remote and on the side of the receiver. Slide the switches on both units to the same non-default position. There are 16 different frequencies available to avoid interference. The default setting is 0000, which is not recommended.

Image: The remote control and receiver side-by-side, showing the location of the DIP switches on both units for frequency matching.
Step 4: Connect the New Receiver
Insert the new receiver into the fan's bracket. Follow the wiring diagram carefully:
- Connect the Red wire from the receiver to the Red/Black wire from the ceiling (Live).
- Connect the 2-wire end White wire from the receiver to the White wire from the ceiling (Neutral).
- Connect the 3-wire end White wire from the receiver to the White wire from the fan (Neutral).
- Connect the Blue wire from the receiver to the Blue wire from the fan (Light).
- Connect the Black wire from the receiver to the Black wire from the fan (Fan Motor).
- Finally, connect all green ground wires together (from ceiling, fan, and bracket).
Secure all connections with the provided wire connectors.

Image: A clear diagram illustrating how to connect the receiver's wires to the ceiling and fan wires, with color-coded connections.
Step 5: Reattach Fan Canopy
Carefully reattach the fan canopy, ensuring no wires are pinched. Restore power to the fan.
Operating Instructions
Your Prichor Universal Ceiling Fan Remote Control Kit provides easy control over your fan and light.
Remote Control Functions:
- HI: Sets fan speed to High.
- MED: Sets fan speed to Medium.
- LOW: Sets fan speed to Low.
- OFF: Turns the fan off.
- Light Button (Green Bulb Icon): Toggles the light ON/OFF. Press and hold to dim the light.
Note: This remote control does not have a reverse function for the fan.

Image: The white remote control with clearly labeled buttons for fan speed (HI, MED, LOW, OFF) and a green light button, shown next to the yellow receiver unit.
Compatibility
Fan Compatibility:
This remote control kit is compatible with all kinds of AC motors. It is not compatible with DC motors.
It is designed to be a universal replacement for many popular ceiling fan brands, including Harbor Breeze, Hunter, Hampton Bay, Litex, Home Decorators Collection, and Honeywell.
Light Bulb Compatibility:
The light dimming function is compatible with incandescent light bulbs and some dimmable LED lamps.
Most LED/CFL lights are non-dimmable. In such cases, the remote will only control the ON/OFF function of the light.

Image: Illustrations showing compatibility with Tungsten (incandescent), CFL, and LED bulbs, highlighting dimming functionality.
Maintenance
Cleaning:
Wipe the remote control and receiver with a soft, dry cloth. Do not use abrasive cleaners or solvents.
Battery Replacement:
The remote control requires one 9V battery (not included). Replace the battery when the indicator light on the remote dims or the remote's range decreases. Ensure correct polarity when inserting the new battery.
Troubleshooting
| Problem | Possible Cause | Solution |
|---|---|---|
| Fan/Light not responding to remote. | Incorrect DIP switch settings. | Ensure DIP switches on both remote and receiver are set to the same non-default position. |
| Fan/Light not responding to remote. | Low or dead battery in remote. | Replace the 9V battery in the remote control. |
| Fan/Light not responding to remote. | Power supply issue. | Check circuit breaker and wall switch to ensure power is supplied to the fan. |
| Light does not dim. | Non-dimmable light bulbs. | Confirm that installed light bulbs are dimmable incandescent or dimmable LED. Most LED/CFL lights are non-dimmable. |
| Fan operates but light does not. | Loose wiring connection for light. | Disconnect power and check the wiring connection for the light (Blue wire from receiver to Blue wire from fan). |
| Fan does not operate but light does. | Loose wiring connection for fan. | Disconnect power and check the wiring connection for the fan (Black wire from receiver to Black wire from fan). |
Specifications
- Model: RC-53T (Remote) & RC-18R (Receiver)
- Product Dimensions: 4.92 x 2.17 x 0.98 inches (Remote & Receiver combined, approximate)
- Item Weight: 7.7 ounces
- Rated Power (Receiver): 240W (exceeds general carrying capacity)
- Fan Speed Control: 3-speed (HI, MED, LOW, OFF)
- Light Control: ON/OFF, Dimming (compatible with incandescent and some dimmable LED)
- Power Supply (Remote): 1 x 9V battery (not included)
- Frequency: 16 different frequencies (set via DIP switches)
- Compatibility: Universal for 3-speed AC motor ceiling fans (e.g., Harbor Breeze, Hampton Bay, Hunter)
Image: A diagram showing the physical dimensions of both the remote control and the receiver unit.
Warranty and Support
For warranty information or technical support, please refer to the contact details provided on the product packaging or visit the official Prichor website.
You can also reach out to the seller through the Amazon platform for assistance.
Verified by Transparency: Each item has a unique code that we verify before shipping, ensuring product authenticity.