
1. Introduction
This manual provides comprehensive instructions for the Prichor RC-HD6R Ceiling Fan Remote Control. It covers installation, operation, maintenance, and troubleshooting to ensure proper functionality and longevity of your device. This remote is designed to replace specific original remote models for Hampton Bay and Hunter ceiling fans, offering control over fan speed, light dimming, and fan direction (reverse function).

Image: Front view of the Prichor RC-HD6R Ceiling Fan Remote Control, showing buttons for Light/Dimmer, LO, MED, HI, FAN OFF, and REVERSE.
2. Setup
2.1. Battery Installation
- Locate the battery compartment cover on the back of the remote control.
- Slide the cover downwards to open the compartment.
- Insert one (1) 9V battery, ensuring the polarity (+/-) matches the diagram inside the compartment.
- Slide the battery compartment cover back into place until it clicks securely.
2.2. DIP Switch Matching
For the remote control to communicate with your ceiling fan's receiver, the DIP switches on both the remote and the receiver must be set to the same code. The receiver is typically located within the ceiling fan's canopy and is not included with this remote control.
- Locate DIP Switches on Remote: Open the battery compartment of the new remote control. Inside, you will find a set of small switches, typically numbered (e.g., 1, 2, 3, 4).
- Locate DIP Switches on Receiver/Original Remote: Access the receiver unit in your ceiling fan (refer to your fan's manual for location, usually in the canopy) or check your original remote control for its DIP switch settings. Note the exact ON/OFF (or UP/DOWN) positions of these switches.
- Match Settings: Using a small tool (like a pen tip), adjust the DIP switches on your new Prichor remote control to exactly match the ON/OFF positions of the switches on your fan's receiver or original remote. Ensure all switches are set identically.
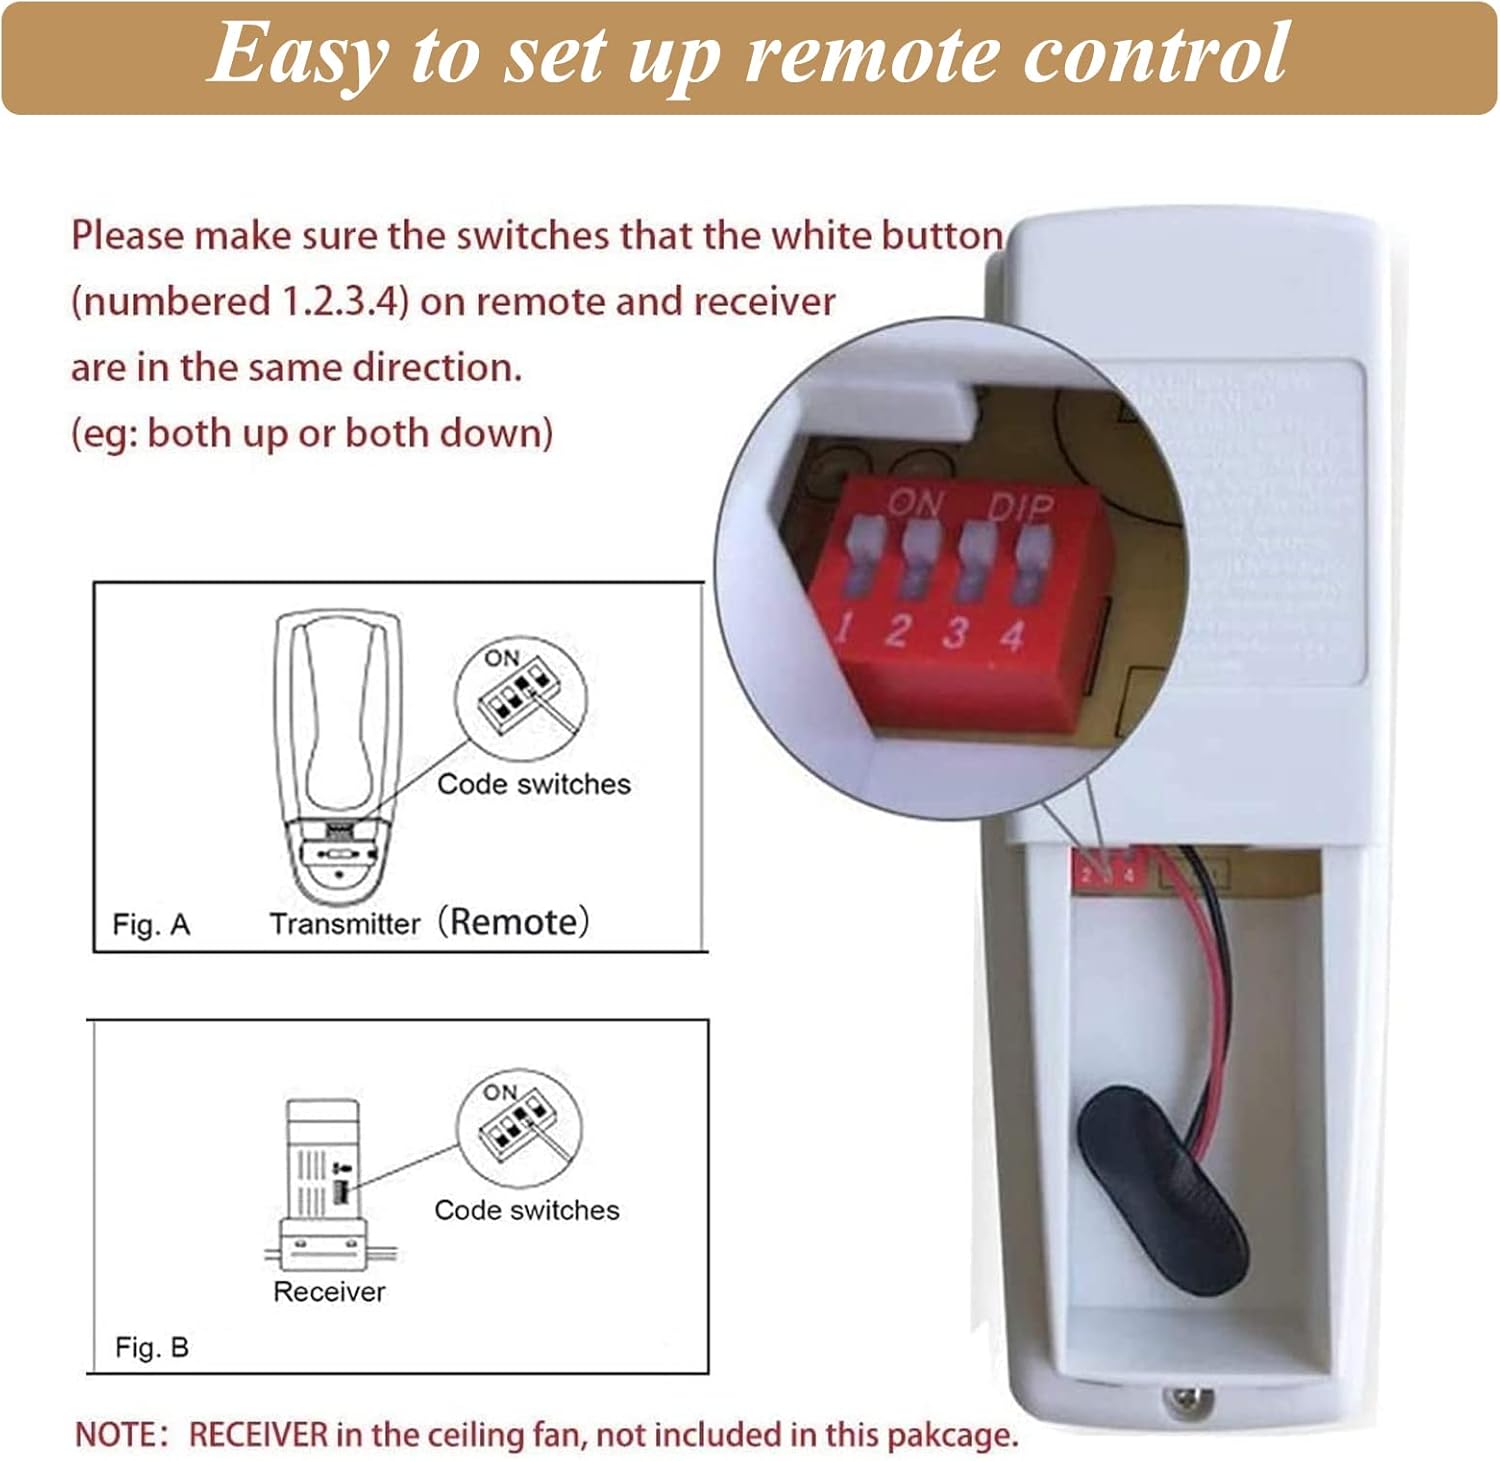
Image: Diagram illustrating the location of DIP switches inside the remote (transmitter) and the fan receiver, with an inset showing a close-up of the four red DIP switches set to 'ON'.

Image: A close-up view of the DIP switches located within the battery compartment of the remote control.
3. Operating Instructions
The Prichor RC-HD6R remote control provides intuitive control over your ceiling fan and its integrated light kit.

Image: A visual representation of the remote control's functions, showing how to control fan speed (HI, MED, LO, FAN OFF), light dimmer (ON/OFF), and fan reverse.
- Fan Speed Control:
- HI: Sets the fan to high speed.
- MED: Sets the fan to medium speed.
- LO: Sets the fan to low speed.
- FAN OFF: Turns the fan off.
- Light Control (LIGHT / DIMMER):
- Press the LIGHT / DIMMER button to turn the light ON or OFF.
- To dim the light, press and hold the LIGHT / DIMMER button. Release when the desired brightness is reached. (Note: Dimming function requires dimmable light bulbs.)
- Reverse Function (REVERSE):
- Press the REVERSE button to change the direction of the fan blades. This function is useful for seasonal air circulation (downward airflow for cooling in summer, upward airflow for heat distribution in winter).
- Ensure your ceiling fan's receiver supports the reverse function for this button to operate.
4. Compatibility
This remote control is specifically designed as a replacement for certain original remote models. It is not a universal remote for all ceiling fans.
4.1. Compatible Remote Models
This remote is a replacement for the following FCC ID/Model numbers, which typically operate at a frequency of 303.9MHz:
- UC7078T
- CHQ8BT7078T
- CHQ7078T
- UC7848T
- L3HMAY97FANHD
- RR7078TR
- L3H2003FANHD
- Fan-HD
- HD6 (with REVERSE Key)
Please verify the FCC ID/Model number on the back of your original remote control to ensure compatibility.

Image: An illustration showing where to find the FCC ID/Model number on the back of an original remote control to check for compatibility with the replacement remote.
4.2. Light Bulb Compatibility
The light dimmer function supports various bulb types, but optimal dimming performance is achieved with dimmable bulbs.
- Tungsten: Up to 500W Max
- CFL: Up to 150W Max (Dimming function supported)
- LED Bulb: Up to 150W Max (Dimming function supported)
Some LED and CFL lamps are not dimmable and will only support ON and OFF functionality.

Image: Visual guide showing compatibility with Tungsten, CFL, and LED bulbs, indicating dimming functionality for CFL and LED.
5. Maintenance
5.1. Battery Replacement
Replace the 9V battery when the remote's indicator light becomes dim or the remote's response becomes inconsistent. Follow the battery installation steps in Section 2.1.
5.2. Cleaning
To clean the remote control, wipe it with a soft, dry cloth. Do not use abrasive cleaners, solvents, or immerse the remote in water.
6. Troubleshooting
- Remote not responding:
- Check if the 9V battery is installed correctly and has sufficient charge. Replace if necessary.
- Verify that the DIP switches on the remote control exactly match those on the ceiling fan's receiver.
- Ensure the remote is within operational range of the fan's receiver.
- Fan not responding to speed changes:
- Confirm the fan's power supply is active.
- Re-check DIP switch settings.
- Light not dimming:
- Ensure that the installed light bulbs are dimmable. Non-dimmable bulbs will only turn ON/OFF.
- Reverse function not working:
- Confirm that your ceiling fan's receiver unit supports the reverse function. Not all receivers have this capability.
7. Specifications
| Feature | Detail |
|---|---|
| Product Dimensions | 5.51 x 1.97 x 1.18 inches |
| Item Weight | 2.88 ounces |
| Batteries Required | 1 x 9V battery |
| Special Features | 3-speed fan control, Universal compatibility (for specified models), Light dimmer, Reverse function |
| Color | White |
| Max Number of Supported Devices | 1 (Ceiling Fan) |
| Compatible Devices | Ceiling Fan |
| Operating Frequency | 303.9MHz |
8. Warranty and Support
For any questions, technical assistance, or warranty inquiries regarding your Prichor RC-HD6R Ceiling Fan Remote Control, please contact the manufacturer directly. Refer to the product packaging or the Prichor brand store on Amazon for contact information.

Image: Contents of the product packaging, including the remote control, instruction manual, two expansion screws, and a wall holder.