
CP PLUS CP-E25A
CP PLUS 2MP PT Wi-Fi Camera User Manual
Model: CP-E25A
1. Introduction
The CP PLUS 2MP PT Wi-Fi Camera (Model CP-E25A) is a versatile and compact surveillance device designed for both indoor and outdoor use. It offers high-definition video capture, pan and tilt functionality for wide area coverage, and seamless integration with smart home ecosystems like Amazon Alexa and Google Assistant. This manual provides detailed instructions for setting up, operating, and maintaining your camera.
Key Features:
- 2MP CMOS Image Sensor (11.43 cm) for clear video quality.
- 4mm Lens with Wi-Fi support for flexible placement and connectivity.
- Infrared (IR) distance of 10 meters for effective night vision.
- Supports up to 128GB SD Card for local storage of recordings.
- Compatible with Amazon Alexa and Google Assistant for voice control and smart home integration.
- Pan and Tilt (PT) functionality for remote adjustment of viewing angle.
2. Package Contents
Please check the package contents carefully. If any items are missing or damaged, contact your retailer or CP PLUS customer support.
- CP PLUS 2MP PT Wi-Fi Camera (CP-E25A)
- Power Adapter
3. Product Overview
Camera Components:

Figure 3.1: Front view of the CP PLUS 2MP PT Wi-Fi Camera, showing the lens and the CP PLUS logo on the base.
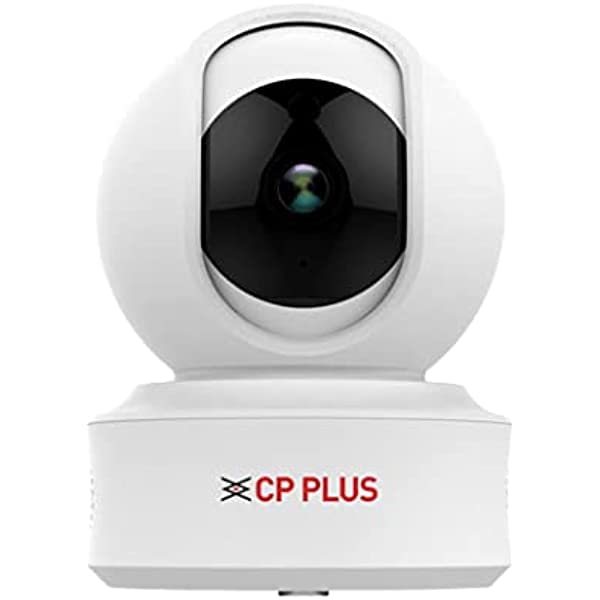
Figure 3.2: Angled view of the CP PLUS 2MP PT Wi-Fi Camera, highlighting its compact design.
The CP-E25A camera features a spherical top housing the lens, which can pan and tilt. The base contains the necessary electronics and connectivity ports. Key components include:
- Camera Lens: Captures video footage.
- Infrared (IR) LEDs: Provide illumination for night vision (located around the lens, implied by IR distance spec).
- Microphone: For audio input and two-way communication.
- Speaker: For audio output and two-way communication.
- SD Card Slot: For local storage of recordings (supports up to 128GB).
- Reset Button: Used to restore factory settings.
- Power Port: For connecting the power adapter.
4. Setup
4.1. Powering On
- Unpack the camera and all accessories from the box.
- Connect the provided power adapter to the camera's power port.
- Plug the power adapter into a wall outlet. The camera will power on and initiate its self-test sequence.
- Wait for the camera's indicator light to flash, indicating it is ready for setup.
4.2. App Installation and Wi-Fi Connection
- Download the official CP PLUS mobile application from your device's app store (e.g., Google Play Store for Android or Apple App Store for iOS).
- Open the app and create a new account or log in if you already have one.
- Follow the in-app instructions to add a new device. Select "Add Camera" or a similar option.
- Ensure your mobile device is connected to a 2.4GHz Wi-Fi network. The camera supports 2.4GHz Wi-Fi only.
- Scan the QR code on the camera (usually on the bottom or back) or manually enter the device ID.
- Enter your Wi-Fi network password when prompted by the app.
- The app will guide you through the connection process. This may involve placing your phone's screen in front of the camera lens for QR code scanning or playing an audio tone for pairing.
- Once connected, the camera's indicator light will turn solid, and you will receive a confirmation in the app.
- You can now rename your camera and begin using it.
4.3. MicroSD Card Installation (Optional)
To enable local video recording, install a MicroSD card (up to 128GB, Class 10 or higher recommended).
- Power off the camera by unplugging the power adapter.
- Locate the MicroSD card slot (often under the lens assembly, requiring the lens to be tilted up).
- Gently insert the MicroSD card into the slot until it clicks into place.
- Plug the power adapter back in to power on the camera.
- Format the MicroSD card via the camera settings in the mobile app for optimal performance.
5. Operating Instructions
5.1. Live View
Open the CP PLUS app and select your camera from the device list to access the live video feed. You can view real-time footage from anywhere with an internet connection.
5.2. Pan and Tilt Control
On the live view screen, use the directional controls (usually a joystick or arrow buttons) within the app to remotely adjust the camera's horizontal (pan) and vertical (tilt) viewing angles. This allows you to monitor different areas without physically moving the camera.
5.3. Recording and Playback
- Manual Recording: Tap the record button in the app's live view to start and stop manual video recording. These recordings are typically saved to your phone or the camera's SD card.
- Continuous Recording: If an SD card is installed and formatted, you can enable continuous recording in the camera settings.
- Event Recording: Configure motion detection settings to automatically record when activity is detected.
- Playback: Access recorded footage through the "Playback" or "History" section in the app. You can browse by date and time, or filter by events.
5.4. Two-Way Audio
The camera supports two-way audio communication. Tap the microphone icon in the app's live view to speak through the camera's speaker, and listen to audio from the camera's microphone.
5.5. Motion Detection and Alerts
Enable motion detection in the app's settings to receive push notifications on your mobile device when movement is detected. You can adjust sensitivity levels and set detection zones to minimize false alarms.
5.6. Integration with Smart Assistants
The CP-E25A camera is compatible with Amazon Alexa and Google Assistant. Follow the instructions in your Alexa or Google Home app to link your CP PLUS account and enable voice commands for viewing your camera feed on compatible smart displays.
6. Maintenance
6.1. Cleaning
- Ensure the camera is powered off before cleaning.
- Use a soft, dry cloth to wipe the camera body.
- For the lens, use a lens cleaning cloth specifically designed for optics to avoid scratches. Do not use harsh chemicals or abrasive cleaners.
6.2. Storage
When not in use for extended periods, store the camera in a cool, dry place away from direct sunlight and extreme temperatures.
6.3. Firmware Updates
Periodically check the CP PLUS app for available firmware updates. Keeping your camera's firmware up-to-date ensures optimal performance, security, and access to new features.
7. Troubleshooting
| Problem | Possible Cause | Solution |
|---|---|---|
| Camera offline/Cannot connect to Wi-Fi | Incorrect Wi-Fi password; Camera too far from router; Router issues; 5GHz Wi-Fi network. | Ensure correct 2.4GHz Wi-Fi password. Move camera closer to router. Restart router. Reset camera and try setup again. |
| Poor video quality | Insufficient network bandwidth; Dirty lens. | Check Wi-Fi signal strength. Reduce video quality settings in app. Clean the camera lens. |
| No recording to SD card | SD card not inserted correctly; SD card not formatted; SD card full or faulty. | Reinsert SD card. Format SD card via app. Replace SD card if faulty. |
| Motion detection alerts not working | Motion detection disabled; App notifications blocked; Incorrect sensitivity settings. | Enable motion detection in app. Check phone notification settings. Adjust sensitivity. |
| Camera not responding to pan/tilt controls | Network connectivity issues; Camera frozen. | Check network connection. Restart camera by unplugging and replugging power. |
8. Specifications
| Model Number | CP-E25A |
| Image Sensor | 1/4.5” 2MP CMOS |
| Lens | 4mm |
| IR Distance | 10 Meters |
| Connectivity | Wi-Fi (2.4GHz) |
| Storage | MicroSD Card (up to 128GB) |
| Smart Assistant Compatibility | Amazon Alexa, Google Assistant |
| Indoor/Outdoor Usage | Outdoor, Indoor |
| Dimensions (LxWxH) | 20 x 12 x 20 Centimeters |
| Item Weight | 280 g |
| Included Components | Adapter |
9. Warranty and Support
For warranty information, please refer to the warranty card included with your product or visit the official CP PLUS website. If you encounter any issues or require technical assistance, please contact CP PLUS customer support through their official channels. Keep your purchase receipt and product model number (CP-E25A) handy when contacting support.
Related documentsCP-E25A


Ask a question about this manual
Ask about setup, troubleshooting, compatibility, parts, safety, or missing instructions. Manuals+ will review the question and use this page’s manual context to help answer it.