1. Product Overview
This instruction manual provides detailed guidance for assembling and operating the BANDAI SMP [SHOKUGAN Modeling Project] Super Robot War OG R-1 & R-Gun model kit. This kit allows you to construct highly detailed representations of the R-1 and R-Gun units from the Super Robot War OG series, featuring transformation capabilities.
The R-1 unit can transform into its R-Wing flight mode. The R-Gun unit can transform into its Metal Geno Cider Mode (Gun Mode). Additionally, these units are designed for future combination with separately sold premium Bandai limited edition parts to form the Super Robot SRX (with R-1, R-2 Powered, and R-3 Powered) and R-Gun Powered (with Tenka Invincible Option Parts Set).

Figure 1.1: The R-1 unit in its standard robot configuration.
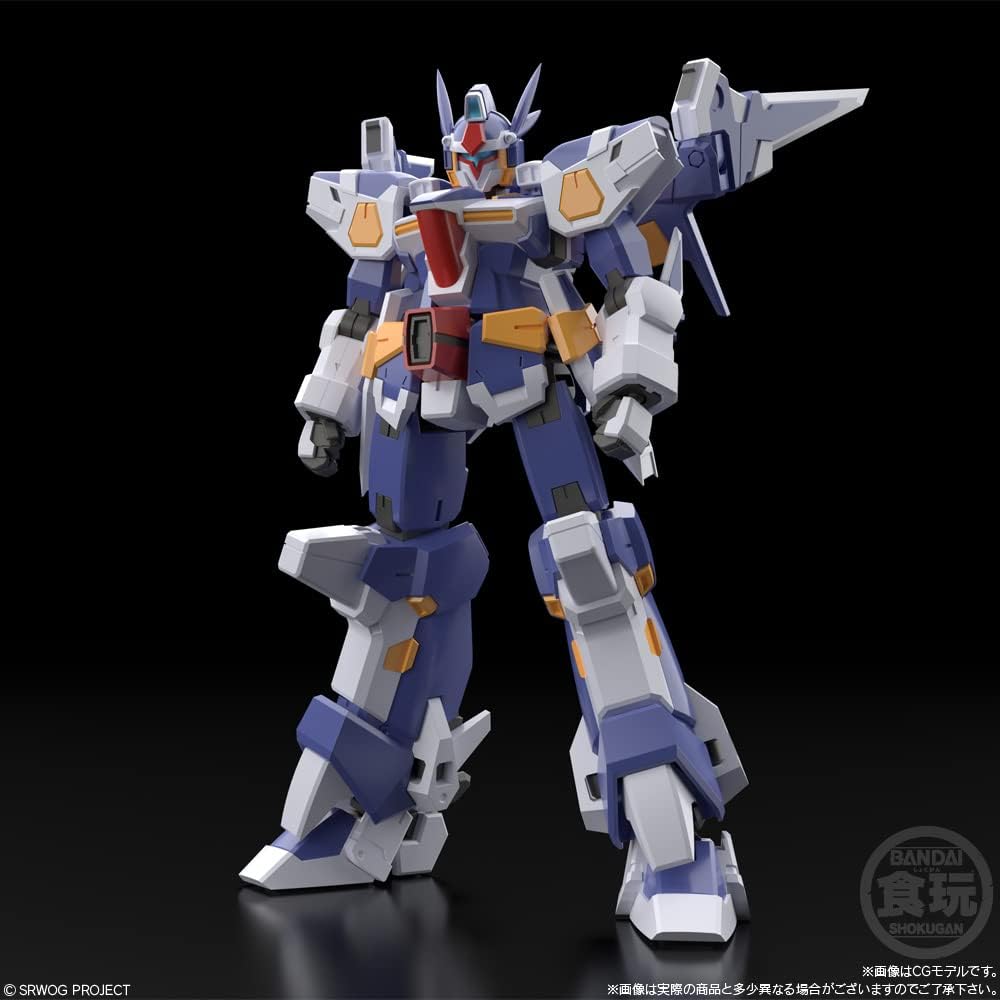
Figure 1.2: The R-Gun unit in its standard robot configuration.
2. Setup and Assembly
Before beginning assembly, ensure all parts are present and undamaged. Refer to the included assembly diagrams for detailed step-by-step instructions. A small chewing gum is included in the package; please discard or consume it before assembly.
2.1 Unpacking and Part Identification
- Carefully open the packaging and remove all runners (plastic frames with parts).
- Identify each runner by its letter designation (e.g., A, B, C) and cross-reference with the parts list in the manual.
- Use a hobby knife or nippers to carefully detach parts from the runners. Avoid twisting or pulling, which can damage the parts.
2.2 Assembly Steps
Follow the numerical sequence provided in the included assembly manual. Pay close attention to part orientation and connection points. Some parts may require gentle force to snap into place. If a part does not fit, do not force it; re-check the diagram and part orientation.

Figure 2.1: R-1 unit showcasing its articulation and detailed design from multiple views.

Figure 2.2: R-Gun unit showcasing its articulation and detailed design from multiple views.
3. Operating Instructions
3.1 R-1 Transformation to R-Wing
The R-1 unit can transform into its R-Wing flight mode. Follow these steps:
- Detach any handheld weapons from the R-1 unit.
- Adjust the shoulder armor and backpack components as indicated in the transformation diagrams.
- Fold the legs and arms into their designated positions for flight mode.
- Ensure all parts are securely locked into place to maintain the R-Wing configuration.

Figure 3.1: The R-1 unit in its R-Wing flight mode.
3.2 R-Gun Transformation to Metal Geno Cider Mode
The R-Gun unit can transform into its Metal Geno Cider Mode (Gun Mode). Follow these steps:
- Adjust the R-Gun's limbs and body sections according to the transformation diagrams.
- Position the weapon components to form the gun configuration.
- Ensure all joints are aligned and secured for the Metal Geno Cider Mode.

Figure 3.2: The R-Gun unit in its Metal Geno Cider Mode (Gun Mode).
3.3 Combination with Optional Parts (Sold Separately)
The R-1 and R-Gun units are designed to combine with future, separately sold premium Bandai limited edition parts:
- SRX Combination: The R-1 unit can combine with the R-2 Powered and R-3 Powered (expected to be released soon) to form the Super Robot SRX. Refer to the instructions included with the R-2 Powered and R-3 Powered for detailed combination steps.
- R-Gun Powered: The R-Gun unit can be converted to R-Gun Powered by combining with the Tenka Invincible Option Parts Set (scheduled for release). Refer to the instructions included with the option parts set for detailed combination steps.
4. Maintenance
Proper maintenance will ensure the longevity and appearance of your model kit.
- Cleaning: Use a soft, dry cloth or a soft brush to gently remove dust. Avoid using harsh chemicals or abrasive materials, which can damage the plastic.
- Storage: Store the model in a cool, dry place away from direct sunlight and extreme temperatures. Prolonged exposure to sunlight can cause discoloration.
- Handling: Handle the model with care, especially during transformations or posing, to prevent stress on joints and delicate parts.
5. Troubleshooting
If you encounter any issues during assembly or operation, consider the following:
- Parts Not Fitting: Double-check the assembly diagrams to ensure correct part orientation. Some parts may have very specific alignment requirements. Do not force parts together, as this can cause breakage.
- Loose Joints: If joints become loose over time, a small amount of clear nail polish or hobby-grade joint tightener can be applied to the ball joint or peg, allowed to dry, and then reassembled.
- Missing or Damaged Parts: If you find any parts missing or damaged upon opening the kit, please contact BANDAI customer support with your proof of purchase and a description of the issue.
6. Specifications
| Feature | Detail |
|---|---|
| Product Dimensions | 5.91 x 15.75 x 11.81 inches |
| Item Weight | 1.47 pounds |
| ASIN | B0BBF6CDHK |
| Item Model Number | Bandai SMP R-1 |
| Manufacturer Recommended Age | 0 months and up (Note: Assembly requires adult supervision for younger users) |
| Release Date | January 31, 2023 |
| Manufacturer | BANDAI |
7. Warranty and Support
For any inquiries regarding product defects, missing parts, or assembly assistance, please contact BANDAI customer support. Keep your proof of purchase for any warranty claims or support requests.
For further information, please visit the official BANDAI website or contact their customer service department.


