1. Introduction
Thank you for choosing the Visual Beat 13.3" Portable USB Type-C Monitor. This manual provides essential information for setting up, operating, and maintaining your new portable display. Designed for versatility, this monitor offers a vibrant 1080P FHD IPS display with 100% DCI-P3 color coverage, making it ideal for work, entertainment, and gaming on the go.
2. What's in the Box
Please check the package contents to ensure all items are present:
- 13.3" Portable Monitor
- Smart Cover (doubles as a stand)
- USB-C to USB-C Cable
- USB-A to USB-C Power Cable
- Mini-HDMI to HDMI Cable
- User Manual (this document)

Image: Visual representation of the items included in the product packaging.
3. Product Features
- Abundant Connection Options: Equipped with mini-HDMI and USB-C ports for compatibility with laptops, PCs, mobile phones, tablets, PS3/4/5, XBOX ONE/S/X. Plug and play functionality.
- Vibrant Display: Features 16.7 million display colors and 100% DCI-P3 color gamut for accurate and realistic color reproduction.
- FHD IPS Panel: 1920x1080 resolution at 60Hz with a 1000:1 contrast ratio, providing excellent viewing angles and image clarity.
- High Brightness: IPS panel with 400 nits brightness for clear visibility, even in well-lit environments.
- Integrated Smart Cover: Lightweight plastic cover protects the monitor and folds into a multi-angle stand for convenient viewing.
- Thin & Lightweight Design: Weighing approximately 1.65 pounds (750g) and only 0.39 inches (10mm) thick, making it highly portable.
- VESA Mountable: Standard 75x75mm VESA design allows for mounting on a bracket or wall.
- Optically Bonded Tempered Glass Cover: Provides durability and protection for the screen.

Image: The Visual Beat portable monitor showcasing its display and smart cover in use.
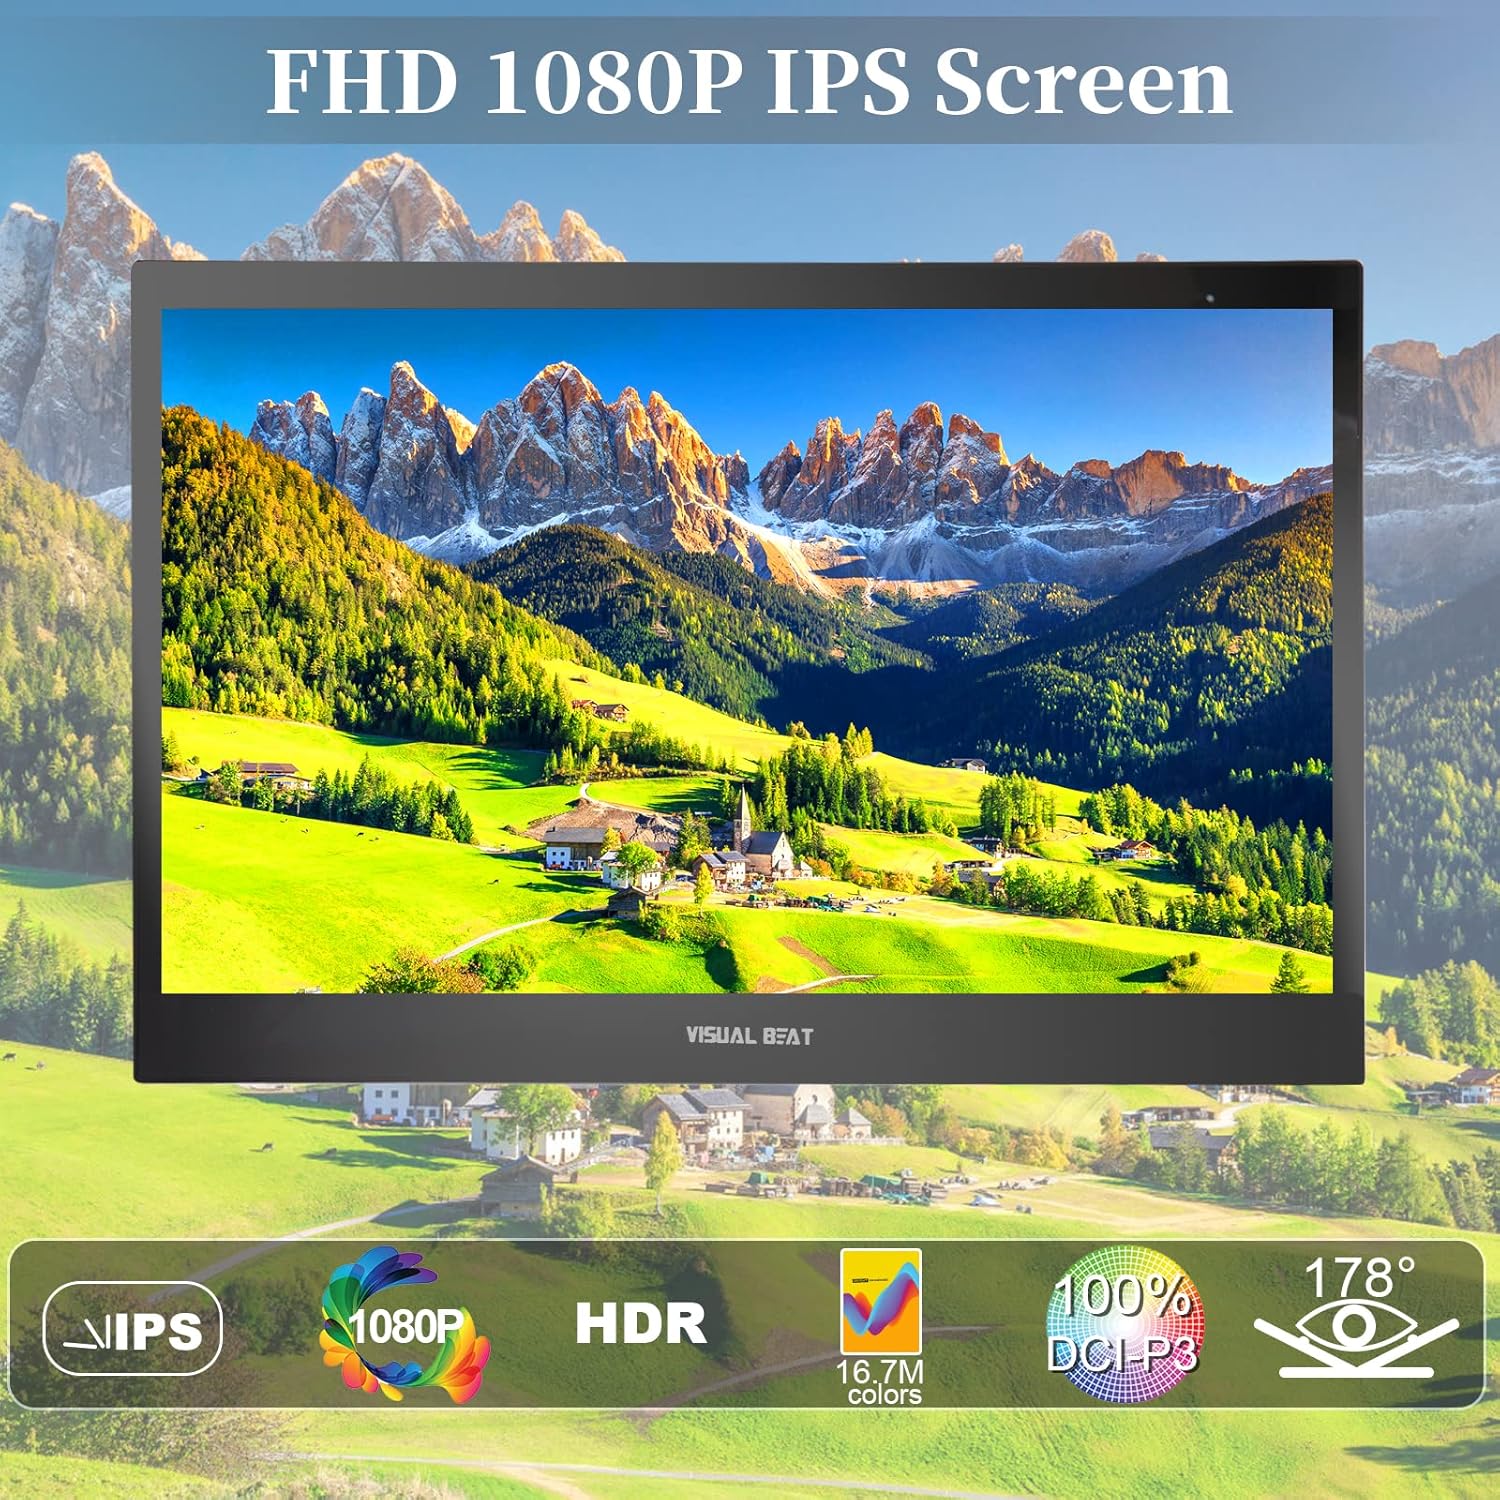
Image: Detailed view of the monitor's FHD 1080P IPS screen quality.

Image: Illustration highlighting the monitor's thin and lightweight design, and the protective smart cover.

Image: The monitor demonstrating its VESA mountable capability for flexible setup options.
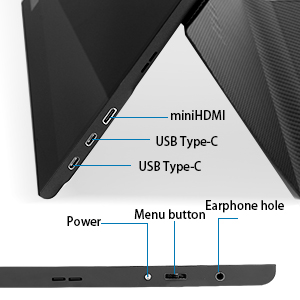
Image: A close-up diagram illustrating the input/output ports on the monitor.
4. Setup Guide
Follow these steps to set up your portable monitor:
- Unpack the Monitor: Carefully remove the monitor and all accessories from the packaging.
- Position the Smart Cover: Fold the smart cover into a triangular stand to support the monitor at your desired viewing angle.
- Connect to Power:
- If your device (e.g., laptop, smartphone) supports power delivery via USB-C, connect the monitor using the provided USB-C to USB-C cable. This single cable can transmit both video and power.
- If your device does not provide sufficient power, or if you are using the HDMI connection, connect the USB-A to USB-C power cable from a 5V/2A (or higher) USB power adapter (not included) or a powered USB port on your device to one of the monitor's USB-C ports.
- Connect to Video Source:
- USB-C Connection: Use the USB-C to USB-C cable to connect the monitor to a compatible USB-C port on your laptop, smartphone, or other device.
- HDMI Connection: Use the Mini-HDMI to HDMI cable to connect the monitor's Mini-HDMI port to the HDMI port on your device (e.g., PC, game console). Remember to also connect the USB-A to USB-C power cable for power.
- Power On: Press the Power button on the monitor to turn it on. The monitor should automatically detect the input signal.

Image: Example of connecting the portable monitor to a smartphone for plug-and-play functionality.

Image: The monitor connected to a gaming console, demonstrating its compatibility.
5. Operating Instructions
Your Visual Beat portable monitor is designed for intuitive use. Here are the basic operating functions:
5.1 Power On/Off
Press the Power button located on the side of the monitor to turn it on or off.
5.2 Menu Navigation
Use the Menu button and the Power button (often doubles as a navigation/selection button) to access and navigate the On-Screen Display (OSD) menu. Specific button functions may vary slightly, refer to the on-screen prompts.
- Brightness/Contrast: Adjust display brightness and contrast levels to your preference.
- Input Source: Manually select between USB-C and Mini-HDMI input if auto-detection fails or you wish to switch sources.
- Color Settings: Fine-tune color temperature, hue, and saturation.
- Aspect Ratio: Adjust the display aspect ratio (e.g., 16:9).
- Volume: Control the volume of the integrated dual speakers.
5.3 Display Modes
When connected to a compatible device, you can configure the display mode:
- Mirror Mode: Duplicates your primary screen's content on the portable monitor.
- Extend Mode: Extends your desktop workspace, allowing you to drag windows between your primary screen and the portable monitor.
- Portrait Mode: Rotate the monitor to a vertical orientation for tasks like coding, document viewing, or social media browsing. Ensure your device's display settings are also adjusted for portrait mode.

Image: Illustration of the monitor's versatile display modes: mirror, extend, and portrait.

Image: The monitor being used for screen sharing and collaboration in a group setting.
6. Maintenance
Proper care will extend the life of your portable monitor:
- Cleaning the Screen: Use a soft, lint-free cloth slightly dampened with water or a non-abrasive screen cleaner. Do not spray cleaner directly onto the screen.
- Cleaning the Casing: Wipe the monitor casing with a soft, dry cloth. Avoid harsh chemicals or abrasive materials.
- Storage: When not in use, store the monitor in its smart cover in a cool, dry place away from direct sunlight and extreme temperatures.
- Handling: Always handle the monitor by its edges. Avoid applying pressure to the screen.
7. Troubleshooting
If you encounter issues with your monitor, refer to the following common problems and solutions:
| Problem | Possible Cause | Solution |
|---|---|---|
| No display/"No Signal" message | Incorrect input source selected; Loose cable connection; Insufficient power; Device not outputting signal. | Check all cable connections (USB-C, HDMI, power). Ensure the monitor is receiving sufficient power. Manually select the correct input source via the OSD menu. Restart your connected device. |
| Monitor not powering on | No power supply; Faulty power cable/adapter. | Ensure the power cable is securely connected to a working power source. Try a different USB power adapter (5V/2A or higher) or USB port. |
| Flickering or unstable display | Loose cable; Interference; Graphics driver issue. | Check cable connections. Ensure the cable is the one supplied with the monitor. Update graphics drivers on your connected device. |
| No sound from speakers | Volume too low; Muted; Audio output not set to monitor. | Increase volume via monitor OSD or connected device. Check audio output settings on your device to ensure sound is routed to the monitor. |
| Image is blurry or distorted | Incorrect resolution; Cable quality. | Set the display resolution on your connected device to 1920x1080. Ensure you are using the provided cables. |

Image: Visual comparison demonstrating the benefit of flicker-free display technology.
8. Technical Specifications
| Specification | Value |
|---|---|
| Screen Size | 13.3 Inches |
| Resolution | 1920 x 1080 Pixels (FHD 1080p) |
| Panel Type | IPS |
| Aspect Ratio | 16:9 |
| Image Brightness | 400 Candela (nits) |
| Contrast Ratio | 1000:1 |
| Color Gamut | 100% DCI-P3 |
| Total USB Ports | 2 (USB Type-C) |
| Video Input | USB Type-C, Mini-HDMI |
| Audio Output | 3.5mm Earphone Hole, Dual Speakers |
| Voltage | 5 Volts |
| Product Dimensions | 12.24 x 7.95 x 0.39 inches (31.1 x 20.2 x 1 cm) |
| Item Weight | 1.65 pounds (0.75 kg) |
| Model Number | R13PM01 |
9. Warranty and Support
The Visual Beat 13.3" Portable USB Type-C Monitor comes with a standard manufacturer's warranty. Please refer to the warranty card included in your product packaging for specific terms and conditions, including the warranty period and coverage details.
For technical support, troubleshooting assistance beyond this manual, or warranty claims, please contact Visual Beat customer service through the official channels provided at the time of purchase or on the manufacturer's website. Keep your purchase receipt as proof of purchase for warranty purposes.


