
1. Introduction
Thank you for purchasing the COOLHOOD 15.6 Inch FHD Touchscreen Monitor. This manual provides essential information for setting up, operating, and maintaining your monitor. Please read it thoroughly before use to ensure proper functionality and to prevent damage.
This monitor features a Full HD (1920x1080) IPS panel with HDR technology, offering a 178° wide viewing angle and vivid image reproduction. It supports 10-point multi-touch input and offers versatile connectivity options including HDMI, VGA, and DVI. The monitor is VESA mountable and includes built-in speakers for a complete multimedia experience.
2. Safety Information
- Do not expose the monitor to rain, moisture, or extreme temperatures.
- Avoid placing the monitor near heat sources or in direct sunlight.
- Use only the provided power adapter and cables.
- Do not attempt to disassemble or repair the monitor yourself. Refer all servicing to qualified personnel.
- Clean the screen with a soft, lint-free cloth. Avoid using harsh chemicals or abrasive cleaners.
- Ensure proper ventilation around the monitor to prevent overheating.
3. Package Contents
Verify that all items listed below are included in your package:
- COOLHOOD 15.6 Inch FHD Touchscreen Monitor
- Smart Cover / Portable Stand
- HDMI Cable
- VGA Cable
- USB Touch Cable
- DC-12V Power Adapter
- Wall Mount Bracket (VESA 75x75mm)
- Remote Control

4. Product Overview
4.1 Monitor Ports and Controls
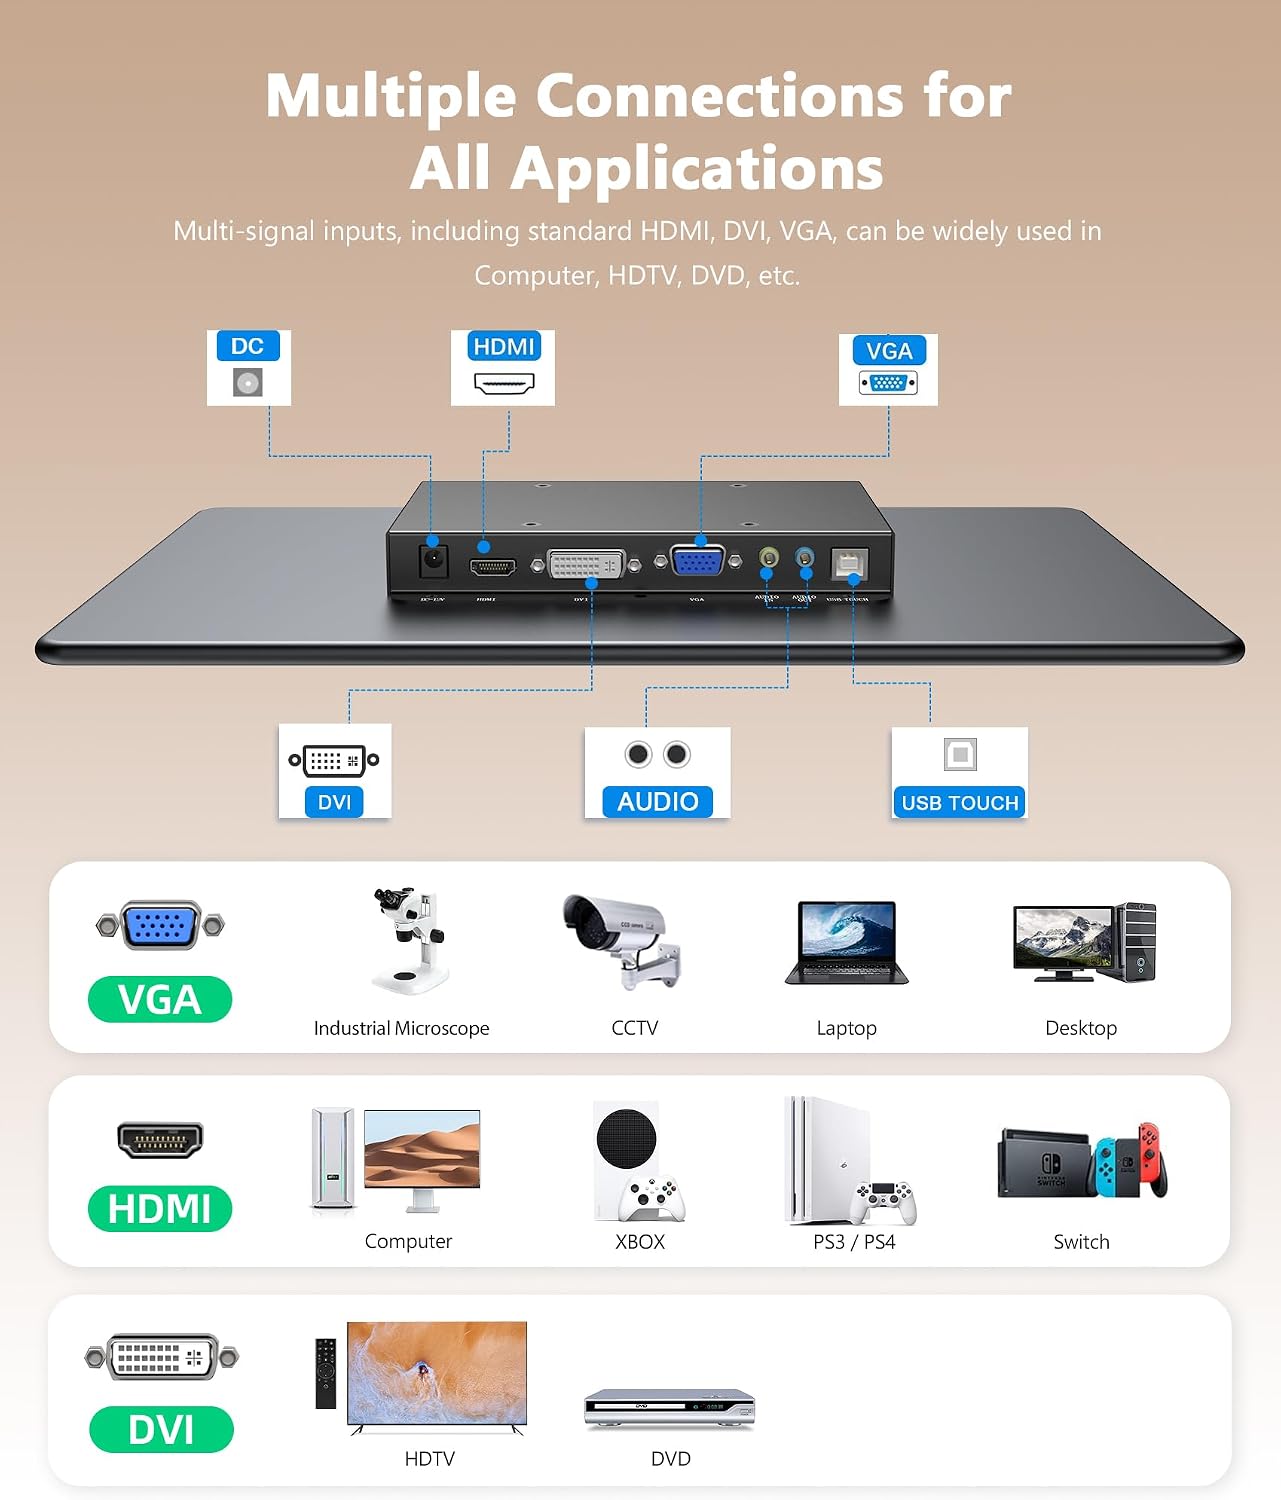
Familiarize yourself with the various ports and controls on your monitor:
- DC-12V Input: For connecting the power adapter.
- HDMI Input: For digital video and audio input.
- VGA Input: For analog video input.
- DVI Input: For digital video input.
- USB Touch Port: For enabling touchscreen functionality when connected to a computer.
- Audio In: For analog audio input.
- Audio Out: For connecting external speakers or headphones.

4.2 Remote Control Functions
The included remote control allows for convenient adjustment of monitor settings:
- Power: Turns the monitor on or off.
- Mute: Mutes or unmutes audio.
- Display/Info: Displays current input information.
- Menu: Accesses the On-Screen Display (OSD) menu.
- Input: Selects the input source.
- OK: Confirms selection in the OSD menu.
- Direction Keys (Up/Down/Left/Right): Navigates the OSD menu.
- Exit: Exits the OSD menu.
- Volume +/-: Adjusts audio volume.
- Backlight +/-: Adjusts screen backlight brightness.
- Aspect Ratio: Changes the display aspect ratio.

5. Setup
5.1 Connecting the Monitor
Follow these steps to connect your monitor to a device:
- Power Connection: Connect the DC-12V power adapter to the monitor's DC-12V input port and then plug it into a power outlet.
- Video Connection: Choose one of the following options:
- HDMI: Connect an HDMI cable from your device to the monitor's HDMI port.
- VGA: Connect a VGA cable from your device to the monitor's VGA port.
- DVI: Connect a DVI cable from your device to the monitor's DVI port.
- Touchscreen Connection (Optional): If you require touchscreen functionality, connect the USB Touch cable from your computer's USB port to the monitor's USB Touch port.
- Audio Connection (Optional): If using analog audio input, connect an audio cable from your device's audio output to the monitor's Audio In port. For external speakers/headphones, connect them to the monitor's Audio Out port.

5.2 VESA Mounting
The monitor supports VESA 75x75mm mounting for wall mounts or monitor arms. Use the provided wall mount bracket and appropriate screws to secure the monitor.

5.3 Using the Smart Cover / Portable Stand
The included smart cover can be folded to act as a stand, providing multiple viewing angles for your monitor. Position the monitor in the grooves of the cover for stable support.
6. Operating Instructions
6.1 Power On/Off
Press the Power button on the remote control or the monitor's control panel to turn the monitor on or off.
6.2 Input Source Selection
Press the Input button on the remote control to cycle through available input sources (HDMI, VGA, DVI). Alternatively, use the OSD menu to select the desired input.
6.3 On-Screen Display (OSD) Menu
The OSD menu allows you to adjust various display settings:
- Press the Menu button on the remote control to open the OSD menu.
- Use the Direction Keys (Up/Down/Left/Right) to navigate through menu options.
- Press OK to select an option or enter a sub-menu.
- Use the Direction Keys to adjust values or select settings.
- Press OK to confirm changes.
- Press Exit to close the OSD menu.
Common OSD settings include:
- Brightness/Contrast: Adjusts the display's luminance and contrast levels.
- Color Settings: Adjusts color temperature, hue, and saturation.
- Aspect Ratio: Sets the display aspect ratio (e.g., 16:9, 4:3).
- HDR Mode: Enables or disables High Dynamic Range for enhanced visual quality.
- Blue Light Filter: Reduces blue light emission to minimize eye strain.
- Flicker-Free: Ensures a stable image without flickering.


6.4 Touchscreen Functionality
The monitor supports 10-point capacitive multi-touch. Ensure the USB Touch cable is connected to your computer for this feature to work. If the touch function fails after rebooting Windows 10 or 11, try removing and re-inserting the USB touch cable into your device.

6.5 Multiple Display Modes
The monitor can be used in various display modes to enhance productivity:
- Duplicated Mode: Mirrors the content of your primary display.
- Extended Mode: Extends your desktop workspace across multiple displays.
- Second Display Mode: Uses the monitor as the sole display.
- Portrait Mode: Rotates the display vertically, suitable for reading documents or web pages.

7. Maintenance
7.1 Cleaning the Monitor
To clean the monitor screen and casing:
- Turn off the monitor and unplug the power adapter.
- Gently wipe the screen with a soft, lint-free cloth. For stubborn marks, lightly dampen the cloth with water or a screen-specific cleaning solution (do not spray directly onto the screen).
- Wipe the casing with a soft, dry cloth.
- Ensure the monitor is completely dry before plugging it back in and turning it on.
7.2 General Care
- Avoid placing heavy objects on the monitor or its cables.
- When transporting the monitor, use the smart cover for protection.
- Store the monitor in a cool, dry place when not in use for extended periods.
8. Troubleshooting
If you encounter issues with your monitor, refer to the following troubleshooting guide:
| Problem | Possible Cause | Solution |
|---|---|---|
| No power | Power adapter not connected or faulty. | Ensure the power adapter is securely connected to the monitor and a working power outlet. Test the outlet with another device. |
| No signal | Incorrect input source selected or video cable not connected. | Press the Input button on the remote to select the correct source. Check that the video cable (HDMI, VGA, DVI) is securely connected to both the monitor and your device. |
| Touchscreen not responding | USB Touch cable not connected or driver issue. | Ensure the USB Touch cable is securely connected to both the monitor and your computer. If using Windows 10/11, try disconnecting and reconnecting the USB Touch cable. |
| Image is blurry or distorted | Incorrect resolution or cable issue. | Set your device's display resolution to 1920x1080. Check the video cable for damage or loose connections. |
| No audio from speakers | Volume too low, muted, or audio cable not connected. | Increase the volume using the remote or OSD menu. Check if the monitor is muted. Ensure audio cables are correctly connected if using Audio In. |
9. Specifications
| Feature | Specification |
|---|---|
| Model Number | DE173FHD2-CH |
| Screen Size | 15.6 Inches |
| Resolution | 1920 x 1080 (FHD 1080p) |
| Panel Type | IPS |
| Refresh Rate | 60Hz |
| Image Contrast Ratio | 2000:1 |
| Image Brightness | 400 cd/m² (estimated from '400 cm' in data) |
| Screen Surface Description | Glossy |
| Connectivity | HDMI, VGA, DVI, USB Touch, Audio In, Audio Out, DC-12V |
| Total USB Ports | 2 (likely referring to USB Touch and potentially another internal for touch controller) |
| VESA Mount | 75x75mm |
| Product Dimensions | 0.31 x 17.72 x 11.81 inches |
| Item Weight | 2.3 pounds |
10. Warranty and Support
10.1 Warranty Information
This COOLHOOD monitor comes with a 24-month warranty from the date of purchase. Please retain your proof of purchase for warranty claims. The warranty covers manufacturing defects under normal use.


10.2 Customer Support
For technical assistance, warranty claims, or any questions regarding your COOLHOOD monitor, please contact our customer support. We aim to provide 24-hour service.
Please refer to the contact information provided with your product packaging or visit the official COOLHOOD website for support details.