
Introduction
This manual provides detailed instructions for the Gammeefy Wireless Pro Controller, model NC100. Please read this manual thoroughly before use to ensure proper operation and to maximize your gaming experience. This controller is designed for use with Nintendo Switch, Switch Lite, Switch OLED, iOS (13.0 and above), Android, and Windows PC (7 and above).
1. Setup
1.1 Package Contents
- Gammeefy Wireless Pro Controller (NC100)
- USB-C Charging Cable
- User Manual
1.2 Initial Charging
Before first use, fully charge the controller. Connect the supplied USB-C cable to the controller's charging port and the other end to a USB power source (e.g., console, PC, or USB wall adapter). The controller has a 1000mAh battery capacity. A full charge typically takes approximately 3 hours and provides 12-15 hours of gameplay, depending on LED light usage and vibration intensity.

Image: The controller's battery capacity (1000mAh) and estimated play/charge times are highlighted.
1.3 Pairing with Devices
1.3.1 Nintendo Switch/Switch Lite/OLED
- From the Switch HOME Menu, select "Controllers" > "Change Grip/Order".
- On the controller, press and hold the SYNC button until the indicator lights begin to flash rapidly.
- Once connected, the player indicator light(s) on the controller will remain solid.
- Note: This controller does not support the "Wake Up" function for Switch 2 consoles and lacks a "C" dialog button. It supports "Wake Up" for Switch 1.
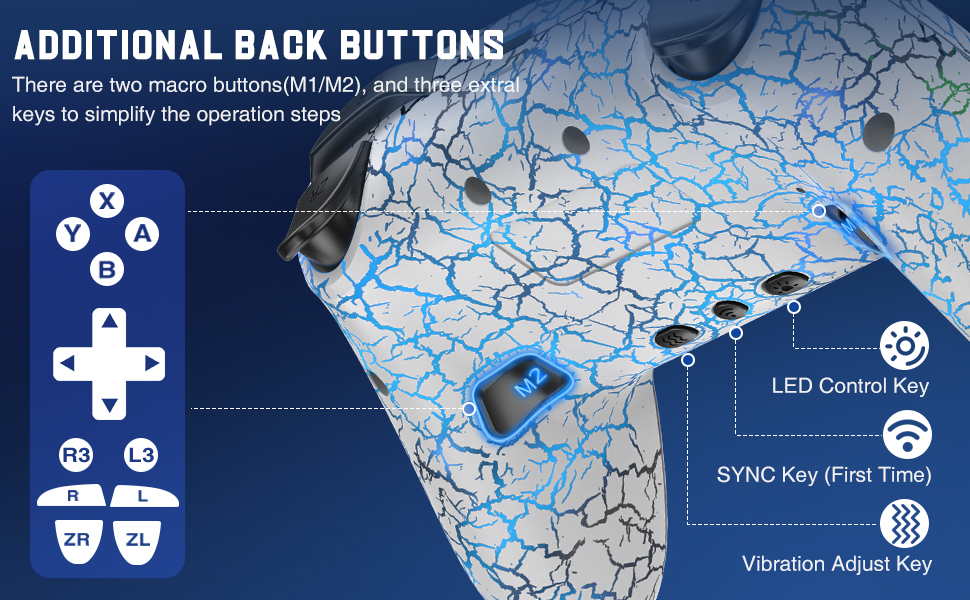
Image: A close-up of the controller's back, illustrating the SYNC button for initial connection, along with other control keys.
1.3.2 iOS (13.0 and above) / Android
- Enable Bluetooth on your iOS or Android device.
- On the controller, press and hold the SYNC button until the indicator lights begin to flash rapidly.
- Search for "Pro Controller" or similar in your device's Bluetooth settings and select to pair.
- The controller supports iOS MFI games and Android HID games.
1.3.3 Windows PC (7 and above)
- Wireless Connection (Bluetooth): If your PC has Bluetooth, follow the iOS/Android pairing steps. A Bluetooth receiver may be required for PCs without built-in Bluetooth.
- Wired Connection (USB): Connect the controller to your PC using the USB-C cable. The controller will be recognized as an X-Input device and supports Steam games.

Image: The controller displayed alongside various compatible devices, illustrating its multi-platform support.
2. Operating Instructions
2.1 Basic Controls
The Gammeefy Wireless Pro Controller features standard button layouts for intuitive gameplay:
- Left/Right Analog Sticks: For precise movement and camera control.
- D-Pad: Directional input.
- A/B/X/Y Buttons: Action buttons.
- L/R/ZL/ZR Buttons: Shoulder and trigger buttons.
- +/- Buttons: Start/Select functions.
- HOME Button: Returns to the console's home screen, also used for waking up the console (Switch 1 only).
- Screenshot Button: Captures screenshots.

Image: The main product image showing the controller's front face with all primary buttons and its unique cracked design.
2.2 Adjustable LED Lighting
The controller features adjustable LED lights with 9 color options (8 solid colors and rainbow mode) and 4 lighting modes. The unique cracked design enhances the visual effect of the lighting.
- Changing Colors: Press the dedicated LED Control Key (located on the back of the controller, refer to diagram in Setup section) to cycle through the 9 color options.
- Changing Modes: Press and hold the LED Control Key to switch between breathing light mode, constant light mode, flashing light mode, and off.
- Adjusting Brightness: Use the brightness adjustment buttons (refer to controller diagram for exact location) to set your preferred light intensity.
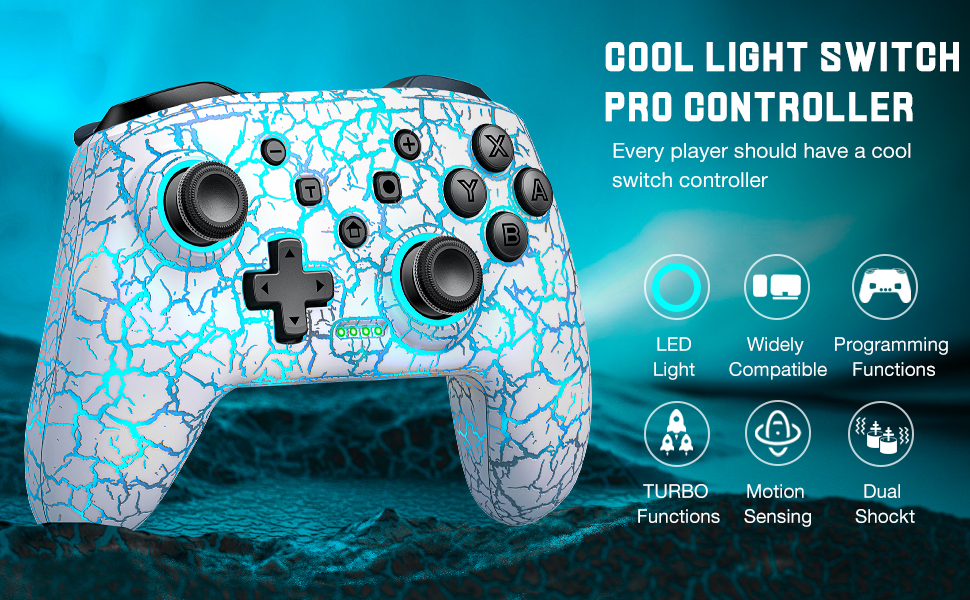
Image: An overview of the controller highlighting its LED lights, compatibility, programming, turbo, motion sensing, and dual shock features.
2.3 Programmable Back Buttons (M1/M2)
The controller includes two programmable back buttons, M1 and M2, which can be assigned to any of the 1-16 basic buttons (A, B, X, Y, L, R, ZL, ZR, D-pad directions, Left Stick, Right Stick, L3, R3). This allows for custom button mapping and macro functions.
- Entering Programming Mode: Press and hold the desired M1 or M2 button you wish to program, then press the SET button (refer to controller diagram). The indicator light will flash.
- Recording Input: Press the sequence of buttons you want to assign to M1/M2. The controller will record the button presses and their time intervals.
- Exiting Programming Mode: Press the M1 or M2 button again to save the programming. The indicator light will stop flashing.
- To clear a programmed button, repeat the programming steps without pressing any input buttons after entering programming mode, then press the M button again.

Image: A view of the controller's back, illustrating the M1 and M2 programmable buttons and the concept of assigning basic button functions to them.
2.4 Turbo Function
The Turbo function allows for rapid, repeated input of a button press. It can be set to auto or manual mode for A/B/X/Y/L/ZL/R/ZR keys.
- Activating Turbo: Press and hold the desired action button (e.g., A), then press the Turbo button (refer to controller diagram). The button will now have Turbo enabled.
- Adjusting Turbo Speed: While holding the Turbo button, move the right analog stick up or down to cycle through 3 speeds: 5 shots/s, 12 shots/s, or 20 shots/s.
- Deactivating Turbo: Repeat step 1 to turn off Turbo for a specific button. To clear all Turbo settings, press and hold the Turbo button for 5 seconds.
2.5 Vibration Function
The controller features dual vibration motors with 4 adjustable levels: None, Weak, Medium, and Strong. This provides haptic feedback for an immersive gaming experience.
- Adjusting Vibration Intensity: Press the Vibration Adjust Key (located on the back of the controller, refer to diagram in Setup section) to cycle through the vibration levels.

Image: The controller shown with visual cues for its 4-level vibration intensity and the functionality of its 6-axis gyro sensor in a racing game scenario.
2.6 6-Axis Gyro Sensor
The built-in 6-axis gyro sensor allows for precise motion control in compatible games, enhancing directional and view control through physical movement of the controller.
3. Maintenance
3.1 Battery Care
- To prolong battery life, avoid fully discharging the controller frequently.
- Charge the controller regularly, even if not in constant use.
- Store the controller in a cool, dry place away from extreme temperatures.
- If the controller will not be used for an extended period, charge it to approximately 50% before storage.
3.2 Cleaning
- Use a soft, dry cloth to wipe the controller's surface.
- For stubborn dirt, slightly dampen the cloth with water or a mild, non-abrasive cleaner.
- Avoid using harsh chemicals, solvents, or abrasive materials, as these can damage the controller's finish.
- Do not allow liquids to enter the controller's openings.
4. Troubleshooting
4.1 Controller Not Connecting/Pairing
- Ensure the controller is sufficiently charged.
- Verify that the device's Bluetooth is enabled and discoverable.
- For Switch, ensure you are in the "Change Grip/Order" menu.
- Try resetting the controller by inserting a thin object into the small reset hole on the back (if present, otherwise hold SYNC for 10 seconds).
- Remove previous pairings from your device's Bluetooth settings and attempt to pair again.
4.2 Input Lag or Unresponsive Buttons
- Ensure the controller is within range of the connected device.
- Check for interference from other wireless devices.
- If using a wired connection, ensure the USB-C cable is securely connected.
- Reset the controller.
- Update your device's operating system or console firmware if available.
4.3 LED Lights Not Working or Changing
- Ensure the controller is powered on.
- Press the LED Control Key to cycle through modes and colors.
- Check if the brightness is set to the lowest level or off.
4.4 Vibration Issues
- Press the Vibration Adjust Key to cycle through intensity levels.
- Some games may not support vibration or may have their own in-game vibration settings.
5. Specifications
| Model Number | NC100 |
| Connectivity | Wireless (Bluetooth), Wired (USB-C) |
| Compatibility | Nintendo Switch/Switch Lite/OLED, iOS (13.0+), Android, Windows PC (7+) |
| Battery Capacity | 1000mAh Lithium Ion |
| Charging Time | Approx. 3 hours |
| Play Time | Approx. 12-15 hours (varies with LED/vibration usage) |
| Dimensions | 6.5 x 4.72 x 2.6 inches |
| Weight | 10.55 ounces |
| Special Features | Adjustable LED lights (9 colors, 4 modes), Programmable M1/M2 back buttons, Turbo function (3 speeds), 4-level Dual Vibration, 6-Axis Gyro Sensor |
6. Warranty & Support
Gammeefy offers a 30-day free return policy and a one-year repair warranty for this product. For any issues or support inquiries, please contact Gammeefy customer service.
- Warranty Period: 1 Year (repair)
- Return Policy: 30 Days (free return)
- Customer Service: Gammeefy's professional After Sales team aims to respond within 24 hours on working days. Please refer to your purchase platform or Gammeefy's official website for contact details.