1. Introduction
The NineLeaf Bike Turn Signals (Model KS-SF31-02C) is a versatile 5-in-1 device designed to enhance cycling safety. It integrates a warning light, brake light, turn signal, electric bell, and anti-theft vibration alarm. Featuring 31 high-end LED lights, it provides up to 160 lumens of brightness for visibility in various conditions. This manual provides instructions for proper installation, operation, and maintenance of your device.
2. Package Contents
Please verify that all items are present in your package:
- Bike Taillight Unit
- Wireless Remote Control (Oval)
- Seat Post Mounting Bracket
- Handlebar Mounting Bracket for Remote
- USB-C Charging Cable
- Installation Hardware (screws, silicone rings)
- User Manual (this document)

Figure 2.1: Contents of the NineLeaf Bike Turn Signals package.
3. Specifications
| Feature | Specification |
|---|---|
| Model Name | KS-SF31-02C |
| Brightness | Up to 160 Lumens |
| Light Modes | 6 (Slow Flashing, Breathing, Fast Blinking, Steady Light, Emergency Light, OFF) |
| Alarm Volume | Up to 110dB |
| Alarm Sensitivity | 7 Levels Adjustable |
| Horn Sounds | 3 Types |
| Water Resistance | IP65 (Taillight), IP44 (Remote Control) |
| Power Source | Rechargeable Battery (USB-C) |
| Taillight Mount Compatibility | 0.98 to 1.38 inch seat posts |
| Remote Mount Compatibility | 0.78 to 0.94 inch handlebars |
| Material | Plastic |
| Item Weight | 0.26 Kilograms |
4. Installation
4.1. Taillight Installation
- Place the silicone ring onto the bike seat post at the desired height.
- Insert the taillight's mounting brackets into the silicone grooves. Align the nut and secure it with the provided screws.
- Slide the taillight unit into the bracket slot until it clicks securely into place.
Note: The taillight is designed to be difficult to remove after installation for anti-theft purposes. It is recommended to remove the bracket or use a power bank/long cable for charging if the taillight cannot be easily detached.
Figure 4.1: Taillight installation steps.
4.2. Remote Control Installation
Attach the remote control to your bike's handlebar using the provided handlebar mounting bracket. Ensure it is positioned within easy reach for safe operation while riding. The remote control is compatible with handlebars measuring 0.78 to 0.94 inches in diameter.
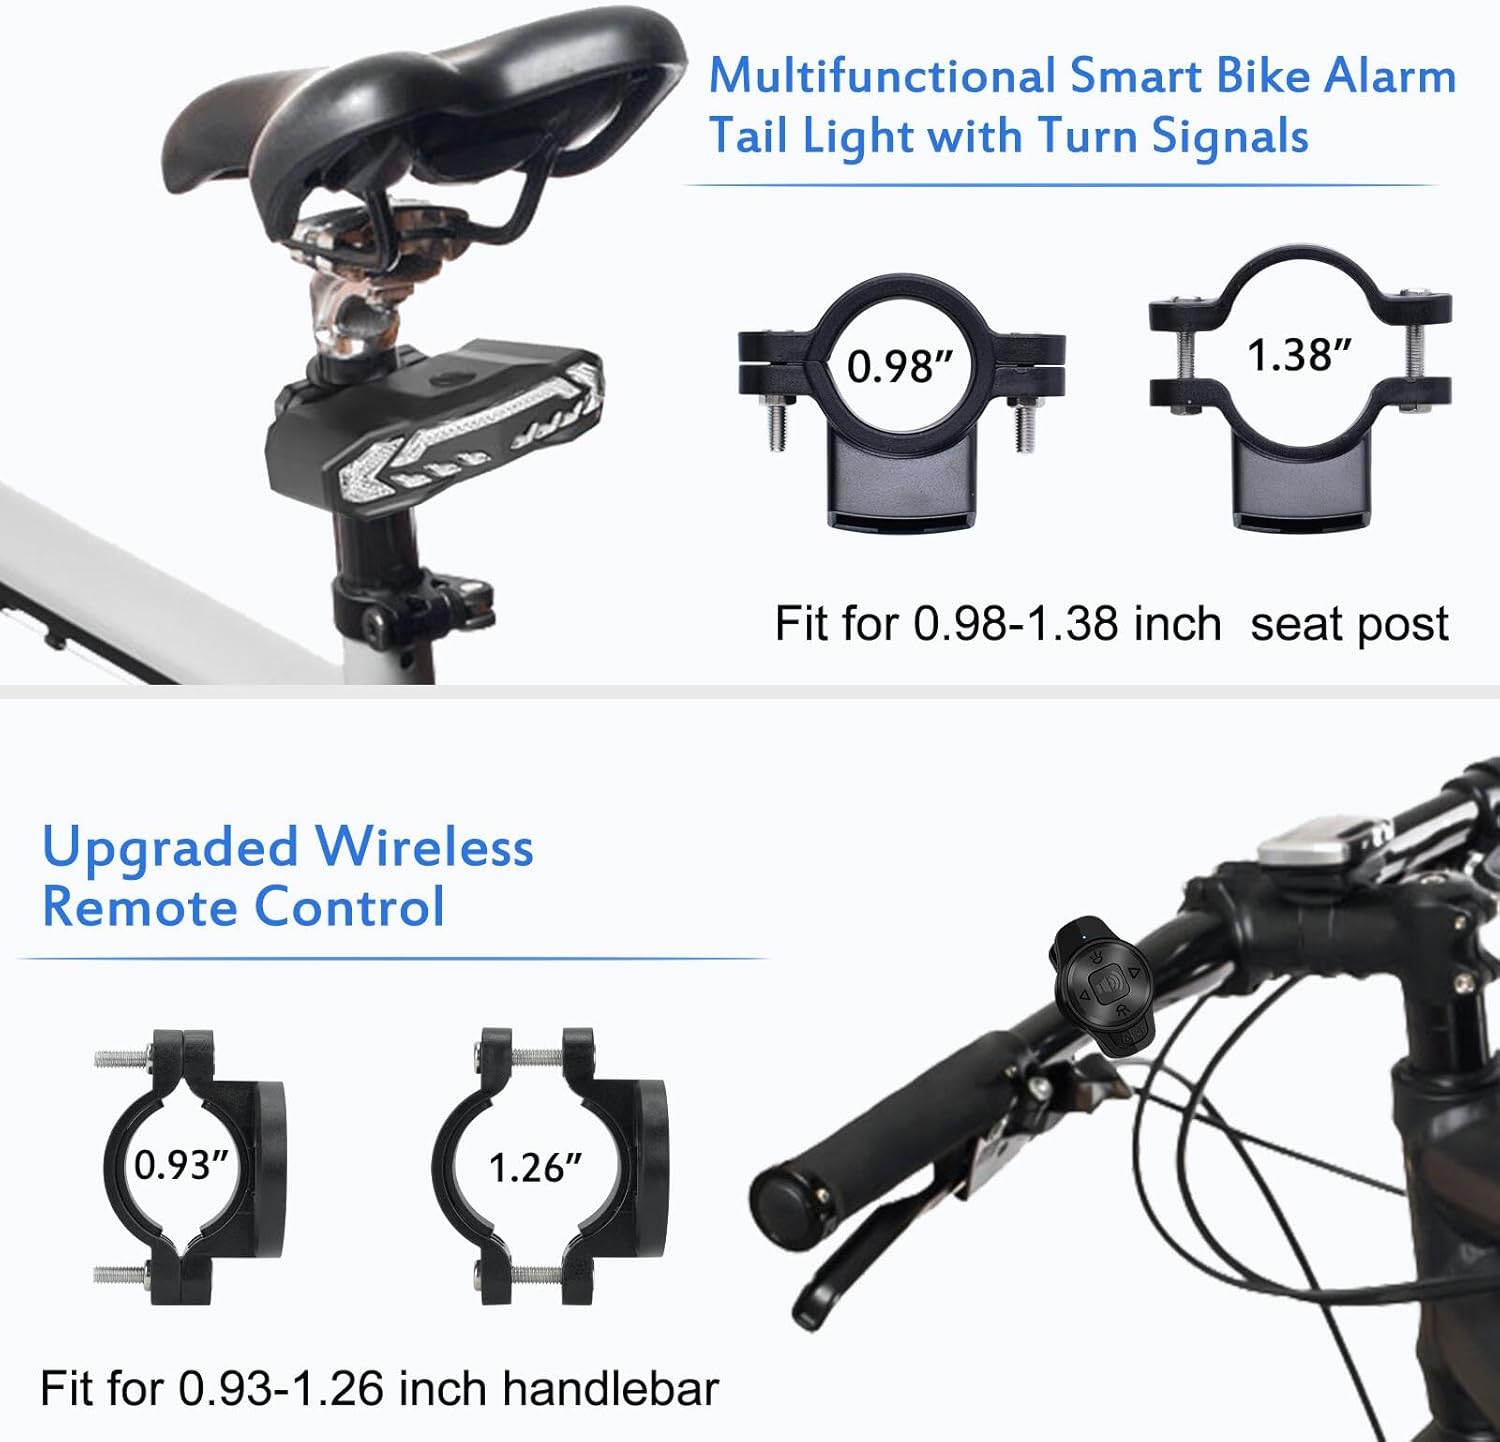
Figure 4.2: Remote control mounted on a handlebar.
5. Operation
5.1. Charging the Taillight
Before first use, fully charge the taillight. Connect the supplied USB-C cable to the taillight's charging port and to a USB power source (e.g., wall adapter, power bank, computer). The right turn signal lights will flash to indicate the charge level (1-4 flashes for 25% to 100% charge). A full charge typically provides up to 70 hours of work time.
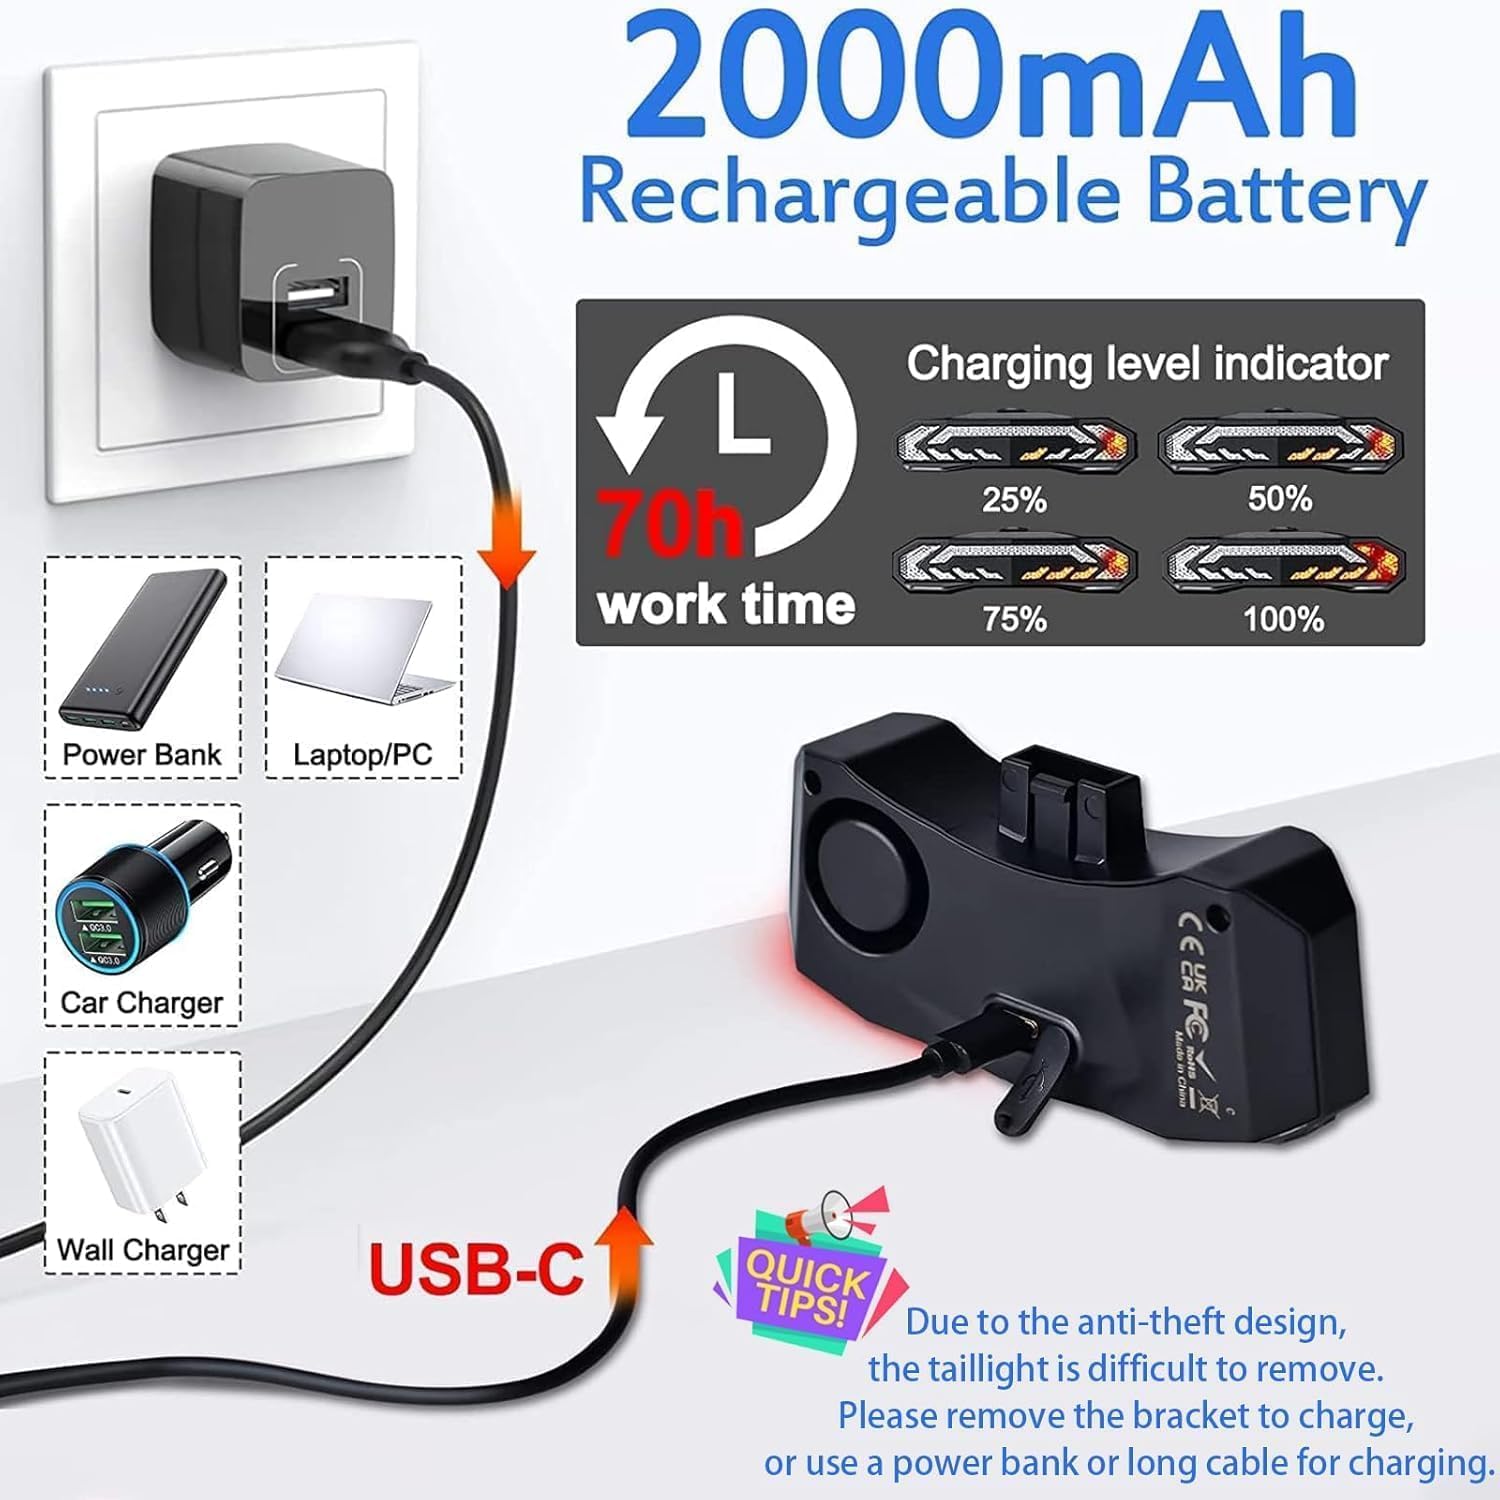
Figure 5.1: Taillight charging via USB-C.
5.2. Remote Control Functions
The oval-shaped remote control allows easy access to all functions. Refer to the diagram below for button identification:
- 1. Left Turn Light Button: Activates the left turn signal.
- 2. Electric Bell Button: Activates the bike horn.
- 3. Right Turn Light Button: Activates the right turn signal.
- 4. Headlight Button: (Reserved/Waiting for upgrading)
- 5. Light Mode Button: Cycles through the 6 light modes.
- 6. Arm Button: Activates the anti-theft alarm.
- 7. Disarm Button: Deactivates the anti-theft alarm.
- 8. Indicator Light: Shows remote status.

Figure 5.2: Remote control button layout and functions.
5.3. Light Modes
The taillight offers 6 lighting modes, selectable via the remote control's Light Mode Button (5):
- Slow Flashing: Red slow flashing light. This is an automatic mode; the light turns off after 30 seconds of inactivity in a dark environment and reactivates upon motion.
- Breathing: Red breathing light. This is an automatic mode; the light turns off after 30 seconds of inactivity in a dark environment and reactivates upon motion.
- Fast Blinking: Red fast blinking light. The light remains on until manually turned off.
- Steady Light: Red steady light. The light remains on until manually turned off.
- Emergency Light: Yellow flashing light. The light remains on until manually turned off.
- OFF: Turns the taillight off.

Figure 5.3: Available light modes.
5.4. Turn Signals
To indicate a turn, press the Left Turn Light Button (1) or Right Turn Light Button (3) on the remote control. The corresponding signal will flash with an audible clicking sound to alert others. The turn signal remains active for two minutes or until the button is pressed again to cancel.
5.5. Automatic Brake Light
The taillight features a smart brake sensor. When you brake or slow down, the light will automatically highlight brightly for 2 seconds to warn riders behind you.

Figure 5.4: Smart Brake and Turn Signal operation.
5.6. Electric Bell (Horn)
Press the Electric Bell Button (2) on the remote control to activate the 110dB horn. There are 3 selectable horn sounds. This function can be used to alert pedestrians or other cyclists.
5.7. Anti-Theft Vibration Alarm
To activate the anti-theft alarm, press the Arm Button (6) on the remote control. The alarm is triggered by vibration and emits a loud 110dB sound to deter thieves. It has 7 adjustable sensitivity levels and 3 volume levels. In vigilant mode, a first touch triggers a 2-second warning sound. A second touch within 2-12 seconds activates a continuous 30-second alarm with various sound effects.
To deactivate the alarm, press the Disarm Button (7) on the remote control.

Figure 5.5: Anti-theft alarm in action.
6. Maintenance
6.1. Cleaning
Wipe the taillight and remote control with a soft, damp cloth. Do not use abrasive cleaners or solvents, as these may damage the device's surface or internal components.
6.2. Waterproofing
The taillight is IP65 rated, protecting it from rain, dust, and snow. The remote control is IP44 rated. While designed to withstand various weather conditions, avoid submerging the device in water.
6.3. Battery Care
To prolong battery life, avoid fully discharging the battery frequently. Recharge the device regularly, especially if it will be stored for an extended period.
7. Troubleshooting
- Device not turning on: Ensure the battery is charged. Connect to a USB power source and check the charging indicator.
- Remote control not responding: Check if the remote control's battery needs replacement (if applicable, or if it's rechargeable, ensure it's charged). Ensure the remote is within range of the taillight.
- Turn signals not working: Verify the remote control is paired with the taillight. Re-pair if necessary (refer to manufacturer's specific pairing instructions if not automatically paired).
- Alarm triggering unexpectedly: Adjust the alarm sensitivity settings to a lower level.
- Brake light not activating: Ensure the taillight is securely mounted and the brake sensor is not obstructed.
8. Warranty and Support
NineLeaf products are designed for durability and performance. For specific warranty information, please refer to the product packaging or contact NineLeaf customer support directly. If you encounter any issues or have questions regarding your NineLeaf Bike Turn Signals, please visit the official NineLeaf store on Amazon or contact their customer service for assistance.
NineLeaf Store Link: Visit the NineLeaf Store


