
1. Introduction
This manual provides comprehensive instructions for the safe and efficient operation, setup, and maintenance of your Canglan Technology GK9-350 Industrial Portable Bag Closer Stitching Sewing Machine. Please read this manual thoroughly before using the machine to ensure proper function and longevity.
Product Overview
The GK9-350 is a high-speed, portable industrial bag closer designed for stitching various materials. Its robust construction and efficient motor make it suitable for heavy-duty tasks, offering reliability and ease of use.
- High-Speed Sewing: Capable of sewing up to 900 stitches per minute.
- Portable and Lightweight: Designed for easy transport and mobility.
- Heavy-Duty Construction: Built with high-quality materials for durability and handling thick fabrics.
- Versatile Application: Suitable for jute, cotton, canvas, paper, and net bags.
- Easy Maintenance: Simple procedures for cleaning and oiling to ensure smooth operation.
2. Safety Instructions
Always observe the following safety precautions to prevent injury and damage to the machine:
- Ensure the machine is unplugged before performing any maintenance, cleaning, or when not in use.
- Keep hands and fingers away from the needle and moving parts during operation.
- Do not operate the machine in wet conditions or near flammable materials.
- Use only the specified voltage (220V) for power supply.
- Keep the work area well-lit and clear of obstructions.
- Do not allow children or untrained individuals to operate the machine.
- Wear appropriate safety gear, such as safety glasses, if necessary.
- If any unusual noise or malfunction occurs, immediately turn off and unplug the machine.
3. Product Components and Package Contents
Familiarize yourself with the main components of your GK9-350 machine.

Figure 3.1: The Canglan Technology GK9-350 Industrial Portable Bag Closer Stitching Sewing Machine. This image displays the overall structure of the machine, highlighting its compact and handheld design, the red body, black handle, and the thread spool holder.
Package Contents:
The standard package includes the following items:
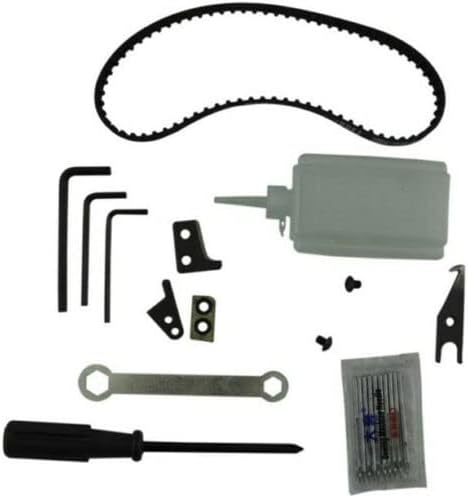
Figure 3.2: Included accessories and tools for the GK9-350 sewing machine. This image shows a drive belt, various Allen wrenches, a screwdriver, an oil bottle, spare blades, and a pack of needles, essential for maintenance and operation.
- GK9-350 Bag Closer Sewing Machine
- Power Cord
- Spare Needles
- Drive Belt
- Screwdriver
- Allen Wrenches
- Oil Bottle
- Spare Blades
- User Manual (this document)
4. Setup and Threading
4.1 Unpacking
- Carefully remove the machine and all accessories from the packaging.
- Inspect all components for any signs of damage. If damaged, contact customer support immediately.
- Retain the packaging for future storage or transport.
4.2 Power Connection
- Ensure the machine's power switch is in the "OFF" position.
- Connect the power cord to the machine's power input.
- Plug the power cord into a standard 220V electrical outlet.
4.3 Threading the Machine
Proper threading is crucial for consistent stitching. Follow these steps carefully:
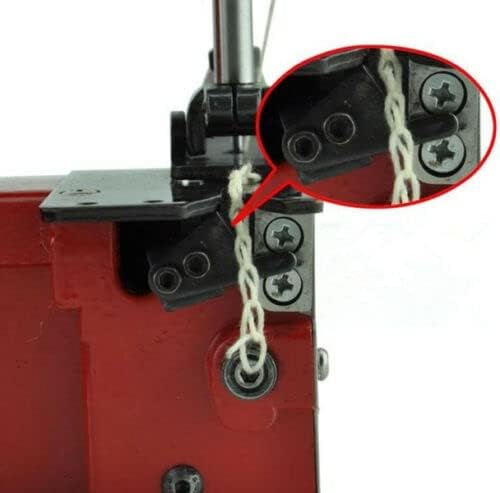
Figure 4.1: Close-up view illustrating the threading path for the GK9-350 sewing machine. The image highlights how the thread passes through tension discs and guides to form a secure chain stitch, with an inset showing the final stitch formation.
- Place the thread spool onto the spool pin located at the top of the machine.
- Guide the thread through the first thread guide.
- Pass the thread between the tension discs, ensuring it is seated correctly to apply proper tension.
- Continue guiding the thread through subsequent thread guides.
- Thread the needle from front to back.
- Pull a sufficient length of thread through the needle eye.
5. Operating Instructions
5.1 Basic Operation
- Hold the machine firmly by the handle.
- Position the material (e.g., bag opening) under the presser foot.
- Ensure the material is aligned for the desired stitch line.
- Press the power trigger to start the machine. The needle will begin to move.
- Guide the machine along the edge of the material, maintaining a steady pace.
- The machine will create a chain stitch, effectively closing the bag.
- To stop sewing, release the power trigger.
- After stitching, cut the thread chain, leaving a short tail to prevent unraveling.
5.2 Adjusting Stitch Length (if applicable)
Refer to the machine's specific controls for stitch length adjustment. (Note: Specific controls for stitch length adjustment are not detailed in the provided product description. If available on the physical machine, consult the markings or a more detailed diagram.)
5.3 Material Compatibility
The GK9-350 is designed to stitch a variety of materials, including:
- Jute bags
- Cotton bags
- Canvas bags
- Paper bags
- Net bags
6. Maintenance
Regular maintenance ensures the longevity and optimal performance of your GK9-350 machine.
6.1 Cleaning
- Always unplug the machine before cleaning.
- Use a soft brush or compressed air to remove lint and dust from the needle area, feed dogs, and other moving parts.
- Wipe the exterior of the machine with a soft, dry cloth. Do not use harsh chemicals or abrasive cleaners.
6.2 Oiling
- Always unplug the machine before oiling.
- Apply a few drops of sewing machine oil (provided in the oil bottle) to all moving metal parts, especially around the needle bar, looper, and feed mechanism.
- Operate the machine briefly after oiling to distribute the oil, then wipe off any excess.
- Regular oiling (e.g., after every 8-10 hours of operation) is recommended for smooth performance.
6.3 Needle Replacement
- Always unplug the machine before replacing the needle.
- Loosen the needle clamp screw using the appropriate tool.
- Remove the old needle.
- Insert a new needle, ensuring the flat side of the needle faces the correct direction (usually towards the back or side, consult machine markings).
- Push the needle up as far as it will go into the needle bar.
- Tighten the needle clamp screw securely.
6.4 Drive Belt Replacement
If the drive belt shows signs of wear or breakage, replace it using the following steps:
- Always unplug the machine.
- Locate the drive belt cover (if applicable) and remove it.
- Carefully remove the old drive belt from the pulleys.
- Install the new drive belt, ensuring it is properly seated on both pulleys.
- Replace the drive belt cover.
7. Troubleshooting
This section addresses common issues you might encounter with your GK9-350 machine.
| Problem | Possible Cause | Solution |
|---|---|---|
| Machine does not start | Not plugged in; Power switch off; Faulty power cord/outlet | Check power connection; Ensure switch is ON; Test outlet with another device; Replace power cord if damaged. |
| Skipped stitches | Incorrect needle insertion; Bent or dull needle; Incorrect threading; Insufficient thread tension | Re-insert needle correctly; Replace needle; Re-thread the machine; Adjust thread tension. |
| Thread breakage | High thread tension; Poor quality thread; Burrs on thread path; Damaged needle | Reduce thread tension; Use good quality thread; Inspect thread path for rough spots; Replace needle. |
| Machine runs slowly or jams | Lack of lubrication; Accumulation of lint/debris; Damaged motor/belt | Oil moving parts; Clean machine thoroughly; Inspect drive belt; Contact support if motor issue suspected. |
8. Technical Specifications
- Model: GK9-350
- Brand: Canglan Technology
- Voltage: 220V
- Motor Power: 190W
- Sewing Speed: 1500-1700 stitches/minute (Motor speed: 7000 RPM/min)
- Product Dimensions (D x W x H): 3.15" x 9.84" x 9.45" (8cm x 25cm x 24cm)
- Gross Weight: Approximately 3.5 kg
- Power Source: Corded Electric
- UPC: 767357548103
9. Warranty and Customer Support
Canglan Technology stands behind the quality of its products. For warranty information, technical support, or service inquiries, please refer to the warranty card included with your purchase or visit the official Canglan Technology store on Amazon:
Visit the Canglan Technology Store
When contacting support, please have your model number (GK9-350) and purchase details ready.