
1. Introduction
This manual provides comprehensive instructions for the installation, operation, and maintenance of your SagaSave Dual Flush and Fill Valve Kit. This kit is designed to replace existing flush and fill mechanisms in one-piece toilets, offering water-saving dual flush functionality and reliable performance. Please read this manual thoroughly before beginning installation or use.
2. Safety Information
- Always turn off the water supply to the toilet before attempting any installation or maintenance.
- Wear appropriate personal protective equipment, such as gloves and eye protection, during installation.
- Ensure all connections are secure to prevent leaks.
- If you are unsure about any step, consult a qualified plumber.
3. Product Overview
The SagaSave Dual Flush and Fill Valve Kit includes a fill valve, a dual flush valve, and a dual flush push button. These components work together to provide efficient water usage and reliable toilet operation.

Figure 3.1: Overview of the SagaSave Dual Flush and Fill Valve Kit, showing the fill valve, flush valve, and dual push button.
3.1 Compatibility
This kit is specifically designed for one-piece toilets. It is not suitable for split (two-piece) toilet designs. The fill valve features a standard 2 cm joint, and the flush valve seal size is applicable for 6.5 to 7.5 cm openings. Please measure your existing toilet components to ensure compatibility before installation.

Figure 3.2: Visual guide for toilet compatibility. The kit is suitable for one-piece toilets (left) and not for split toilets (right).
3.2 Key Components
- Fill Valve: Regulates water flow into the tank after flushing. Adjustable height from 20 cm to 27 cm, suitable for tank heights of 22 cm or more.
- Dual Flush Valve: Controls water release from the tank to the bowl. Features full and half flush options for water conservation.
- Dual Push Button: Activates the full or half flush. Designed for smooth operation and includes thick threading to prevent leaks.
- Seal Washers: Included for the inlet, outlet, and flush button to ensure a watertight seal.

Figure 3.3: Detailed view of the flush valve, labeling the Full/Half Flush Button, Half Flush Float, Full Flush Float, Flush Valve Body, Flush Valve Bottom, and Seal Washer.

Figure 3.4: The flush valve features an adjustable mechanism to customize its height and optimize water usage.
4. Setup and Installation
Follow these steps to install your SagaSave Dual Flush and Fill Valve Kit:
- Turn Off Water Supply: Locate the water shut-off valve for your toilet, usually on the wall behind or near the toilet, and turn it clockwise until the water flow stops. Flush the toilet to empty the tank.
- Remove Old Components: Disconnect the water supply line from the old fill valve. Unscrew and remove the old fill valve and flush valve from the toilet tank. Clean any residue from the tank openings.
- Install New Fill Valve: Insert the new fill valve into the tank's inlet hole. Secure it with the provided nut and washer from underneath the tank. Ensure the washer creates a tight seal.
- Install New Flush Valve: Place the new dual flush valve into the large opening at the bottom of the tank. Secure it with the large nut and seal washer from underneath the tank. Ensure a firm, leak-proof connection.
- Adjust Fill Valve Height: The fill valve height is adjustable from 20 cm to 27 cm. Adjust it to fit your tank, ensuring it is at least 22 cm high.
- Adjust Flush Valve Height: The flush valve has a 12 cm screw rod that can be cut to your specific tank height if necessary.
- Connect Water Supply: Reconnect the water supply line to the new fill valve. Hand-tighten, then use a wrench for a final quarter turn, being careful not to overtighten.
- Install Dual Push Button: Insert the dual push button through the hole in the toilet tank lid. Secure it with the provided nut. The button's thick threading helps prevent leaks.
- Turn On Water Supply: Slowly turn the water supply valve counter-clockwise to restore water flow to the toilet. Check for any leaks around the fill valve, flush valve, and supply line connections.
- Test Flush: Allow the tank to fill completely, then test both the half flush and full flush functions.

Figure 4.1: The flush button and the outlet are designed with seal washers to prevent water leakage and ensure a secure fit.

Figure 4.2: The dual flush button assembly and the two mounting screws for securing it to the toilet tank lid.
5. Operating Instructions
The SagaSave Dual Flush and Fill Valve Kit features a water-saving dual flush mechanism:
- Half Flush: Press the smaller button (or the smaller section of the button) for a reduced water flush, ideal for liquid waste.
- Full Flush: Press the larger button (or the larger section of the button) for a complete water flush, suitable for solid waste.
The flush valve includes floats for both full and half flush to control the water volume effectively.

Figure 5.1: Adjustment points for both full flush and half flush water volumes, allowing for customization of water usage.
6. Maintenance
Regular maintenance ensures optimal performance and longevity of your toilet valve kit:
- Cleaning: Periodically clean the inside of the toilet tank and the valve components to prevent mineral buildup, which can affect performance. Use non-abrasive cleaners.
- Check for Leaks: Regularly inspect all connections and the base of the flush valve for any signs of water leakage. Address leaks promptly to prevent water waste and potential damage.
- Inspect Seals: Over time, rubber seals can degrade. If you notice persistent leaks or issues, inspect the seal washers on the fill valve, flush valve, and flush button for wear and replace if necessary.
7. Troubleshooting
Here are some common issues and their potential solutions:
| Problem | Possible Cause | Solution |
|---|---|---|
| Toilet runs continuously or refills slowly | Fill valve not sealing properly; water level too high; flush valve seal issue. | Adjust fill valve float to lower water level. Check for debris in fill valve. Inspect flush valve seal for damage or debris. |
| Weak or incomplete flush | Water level too low; flush valve not opening fully; clogged siphon jet. | Adjust fill valve to raise water level. Ensure flush button mechanism is not obstructed. Clean siphon jet holes in the toilet bowl. |
| Water leaks from tank base | Loose flush valve nut; damaged flush valve seal; improper installation. | Tighten flush valve nut (do not overtighten). Inspect and replace flush valve seal if damaged. Re-install flush valve carefully. |
| Flush button stuck or unresponsive | Button mechanism obstructed; misaligned button. | Check for debris around the button. Ensure the button is correctly aligned with the flush valve mechanism. |
8. Specifications
| Feature | Detail |
|---|---|
| Manufacturer | SagaSave |
| Model Number | DD01763_03 |
| Material | ABS |
| Color | White |
| Adjustable Fill Valve Height | 20 - 27 cm (suitable for tank height ≥ 22 cm) |
| Applicable Flush Valve Seal Size | 6.5 - 7.5 cm |
| Flush Valve Screw Rod Length | 12 cm (can be cut) |
| Flush Button Width | 7 cm |
| Flush Button Nut Width | 5.5 cm |
| Package Dimensions | 33 x 33 x 10 cm |
| Item Weight | 900 grams |
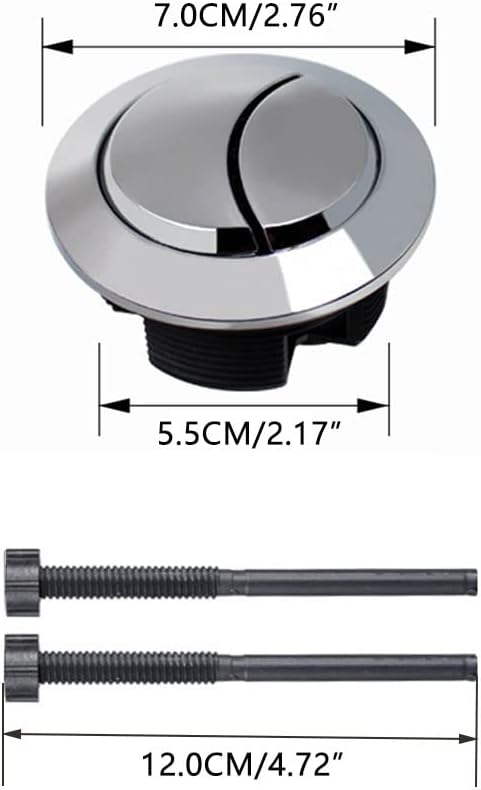
Figure 8.1: Detailed dimensions of the dual flush button (7.0 cm width, 5.5 cm nut width) and the 12.0 cm mounting screws.
9. Warranty and Support
Specific warranty information for the SagaSave DD01763_03 Dual Flush and Fill Valve Kit is not provided in this manual. For warranty details, spare parts availability, or technical support, please contact the seller or manufacturer directly through your purchase platform. Keep your proof of purchase for any warranty claims.