
1. Introduction
This manual provides essential information for the safe and effective use of your SAKAWA PRO Trac Multi-Tool Rotary Tiller. This high-quality professional rotary tiller features a robust and powerful design, ensuring long durability. It is specifically engineered for efficient soil preparation in orchards and gardens.
The rotary tiller is equipped with three sets of robust, large-diameter helical blades for thorough cultivation. Its quick connection system allows for attachment to the power tiller in seconds, secured by a simple lever. Depth control is fast and easily adjustable via a dedicated lever. This model offers an adjustable working width ranging from 40 to 70 cm and includes a protective housing that automatically adjusts to the working depth.
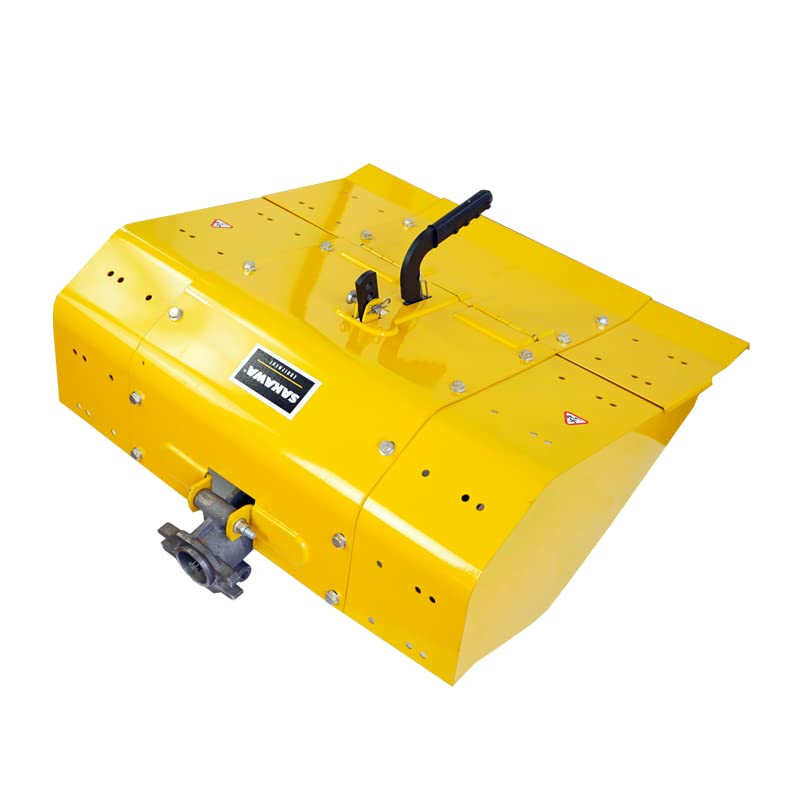
Figure 1: Overall view of the SAKAWA PRO Trac Multi-Tool Rotary Tiller.
2. Safety Information
Always read and understand all safety warnings and instructions before operating the rotary tiller. Failure to follow these instructions may result in serious injury or property damage.
- Depth Adjustment: Adjust the working depth carefully to prevent personal injury.
- Personal Protective Equipment: Always wear appropriate eye and ear protection during operation.
- Work Area Safety: Keep children and pets away from the work area at all times.
- Environmental Conditions: Do not operate the rotary tiller in adverse weather conditions or on wet surfaces.
- Machine Inspection: Before each use, inspect the machine for any loose parts, damage, or wear. Ensure all guards are in place and functioning correctly.
3. Setup and Assembly
The SAKAWA PRO Trac Multi-Tool Rotary Tiller is designed for quick and easy attachment to compatible power tillers.
3.1 Attaching the Rotary Tiller
- Ensure the power tiller is turned off and the engine is cool.
- Align the rotary tiller's connection mechanism with the power tiller's attachment point.
- Slide the rotary tiller onto the power tiller's shaft until it is fully seated.
- Secure the connection using the provided lever. Ensure the lever is firmly engaged to prevent accidental detachment during operation.

Figure 2: Close-up view of the quick connection mechanism for attaching to the power tiller.
3.2 Adjusting Working Depth
The working depth of the rotary tiller can be easily adjusted to suit your specific soil preparation needs.
- Locate the depth control lever on the rotary tiller.
- Move the lever to the desired position. A higher setting typically results in shallower cultivation, while a lower setting allows for deeper tilling.
- Always ensure the lever is securely locked in place before starting operation.

Figure 3: The lever for adjusting the working depth of the rotary tiller.
3.3 Adjusting Working Width
The rotary tiller's working width can be adjusted from 40 cm to 70 cm. Consult your power tiller's manual or the rotary tiller's specific instructions for detailed steps on how to modify the working width, which typically involves adjusting or removing outer blade sections.
4. Operating Instructions
Once the rotary tiller is securely attached and depth is set, you can begin soil preparation.
4.1 Pre-Operation Checklist
- Ensure all safety guards are in place.
- Check that all bolts and fasteners are tight.
- Verify that the working depth is set correctly for your task.
- Clear the work area of any debris, rocks, or obstacles that could damage the blades or cause kickback.
4.2 Starting and Tilling
- Start the power tiller engine according to its manufacturer's instructions.
- Engage the power take-off (PTO) or drive system for the rotary tiller.
- Slowly guide the power tiller forward, allowing the rotary tiller blades to penetrate the soil.
- Maintain a steady pace, allowing the blades to effectively break up and aerate the soil.
- For very hard or compacted soil, multiple passes at increasing depths may be necessary.

Figure 4: Underside view displaying the robust helical blades for soil cultivation.
4.3 Stopping Operation
- Disengage the rotary tiller's drive system.
- Turn off the power tiller engine.
- Wait for all moving parts to come to a complete stop before approaching the machine.
5. Maintenance
Regular maintenance ensures the longevity and optimal performance of your SAKAWA rotary tiller.
- Cleaning: After each use, clean soil, debris, and plant matter from the blades and protective housing. This prevents buildup and corrosion.
- Blade Inspection: Regularly inspect the blades for wear, damage, or bending. Replace worn or damaged blades promptly to maintain tilling efficiency and safety.
- Lubrication: Refer to your power tiller's manual for lubrication points and schedules, as the rotary tiller's drive system is typically integrated. Ensure all moving parts are adequately lubricated.
- Fastener Check: Periodically check all nuts, bolts, and fasteners for tightness. Tighten any loose components.
- Storage: Store the rotary tiller in a dry, protected area when not in use to prevent rust and damage.
6. Troubleshooting
This section addresses common issues you might encounter with your rotary tiller.
- Tiller Not Engaging:
Possible Cause: Improper attachment to the power tiller or PTO not engaged.
Solution: Ensure the rotary tiller is securely attached and the power tiller's PTO is correctly engaged. - Poor Tilling Performance:
Possible Cause: Worn blades, incorrect depth setting, or operating too fast.
Solution: Inspect and replace worn blades. Adjust the working depth. Reduce operating speed to allow blades to work effectively. - Excessive Vibration:
Possible Cause: Unbalanced blades, loose fasteners, or debris caught in blades.
Solution: Check blades for damage or excessive wear. Ensure all fasteners are tight. Clear any debris from the blade area (with the engine off and blades stopped). - Unusual Noises:
Possible Cause: Lack of lubrication, loose components, or internal damage.
Solution: Check lubrication points. Inspect for loose parts. If noises persist, discontinue use and contact customer support.
7. Specifications
| Feature | Specification |
|---|---|
| Brand | SAKAWA |
| Model Number | 8435717508044 |
| Color | Yellow |
| Power Source | Petrol Engine (via power tiller) |
| Material | Metal |
| Operating Mode | Electric (via power tiller's electrical system) |
| Country of Origin | Spain |
| Adjustable Working Width | 40 to 70 cm |
8. Warranty and Support
For warranty information, technical support, or spare parts, please contact your authorized SAKAWA dealer or the retailer from whom you purchased this product. Keep your purchase receipt as proof of purchase.