
1. Safety Information
Please read and follow all safety instructions before installing or using your PC case to prevent damage to the product or injury to yourself. Keep this manual for future reference.
- Always disconnect the power supply from the wall outlet before performing any installation or maintenance.
- Wear an anti-static wrist strap to prevent electrostatic discharge (ESD) damage to components.
- Handle tempered glass panels with care. They are fragile and can shatter if dropped or struck forcefully.
- Avoid placing the PC case in direct sunlight, near heat sources, or in areas with excessive dust or moisture.
- Ensure proper ventilation around the case to prevent overheating.
- Keep small parts and accessories out of reach of children.
2. Package Contents
Verify that all listed items are present in your package:
- MSI MPG GUNGNIR 111R Mid Tower Gaming PC Case
- 4 x 120mm ARGB Fans (pre-installed)
- Accessory Box (screws, cable ties, fan splitter, etc.)
- Quick Installation Guide
- European Union Regulatory Notices
3. Product Overview
The MSI MPG GUNGNIR 111R is a mid-tower gaming PC case designed for optimal performance and aesthetics. It features a durable construction with a tempered glass side panel to showcase your build.
3.1. Key Features
- Mid-Tower form factor supporting ATX, Micro-ATX, and Mini-ITX motherboards.
- Pre-installed with 4 x 120mm ARGB fans for efficient cooling and customizable lighting.
- 4mm thick tempered glass side panel for durability and clear component visibility.
- Front I/O panel with USB 3.2 Gen 2x2 Type-C for high-speed connectivity.
- Magnetic dust filter on the top panel for easy cleaning and improved airflow.
- Mystic Light RGB compatibility for synchronized lighting effects.
- Insta-Light Loop function for quick ARGB lighting control.
3.2. Case Exterior

3.3. Front I/O Panel
The top-front panel provides convenient access to essential ports and controls:

- Power Button: To power on/off the system.
- Reset Button: To restart the system.
- USB 3.2 Gen 2x2 Type-C: High-speed data transfer port.
- USB 3.2 Gen 1 Type-A (x2): Standard USB ports for peripherals.
- Mic in: Audio input for microphone.
- Audio out: Audio output for headphones or speakers.
- Insta-Light Loop: Button to cycle through ARGB lighting effects and color profiles.
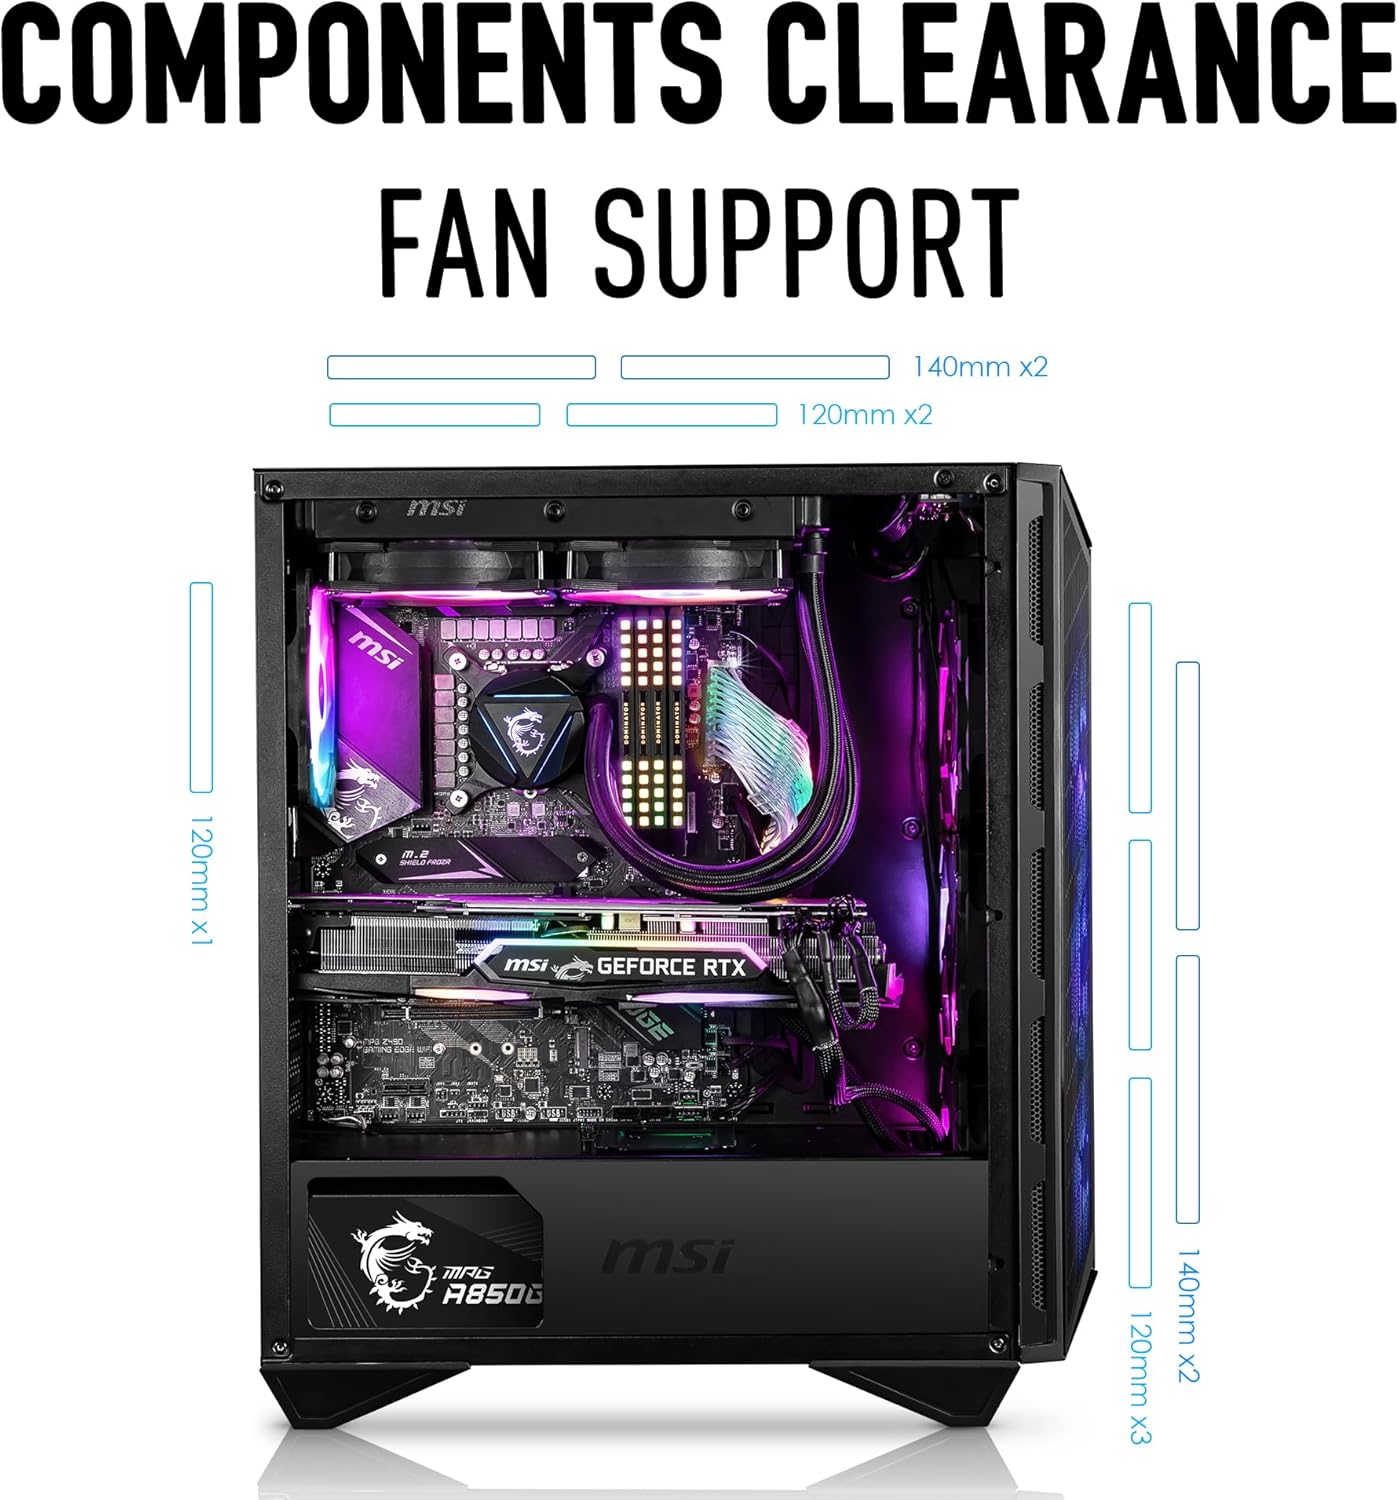
3.4. Cooling and Compatibility
The case offers extensive cooling options and broad component compatibility:


4. Specifications
| Feature | Detail |
|---|---|
| Brand | MSI |
| Model Name | MSI MPG GUNGNIR 111R |
| Case Type | Mid Tower |
| Motherboard Compatibility | ATX / Micro ATX / Mini ITX |
| Color | Black |
| Material | Tempered Glass |
| Item Weight | 11 pounds |
| Product Dimensions (LxWxH) | 21.65 x 11.22 x 20.08 inches |
| Number of USB 2.0 Ports | 2 |
| Number of USB 3.0 Ports | 1 (USB 3.2 Gen 2x2 Type-C) |
| Cooling Method | Air |
| Fan Size | 120 Millimeters (4 pre-installed ARGB fans) |
| Power Supply Mounting Type | Bottom Mount |
5. Setup and Installation
Follow these steps to install your PC components into the MSI MPG GUNGNIR 111R case.
5.1. Preparing the Case
- Place the case on a flat, stable surface.
- Remove the tempered glass side panel by unscrewing the thumbscrews at the rear of the case and carefully lifting the panel away.
- Remove the solid metal side panel by unscrewing the thumbscrews and sliding it off.
5.2. Motherboard Installation
The case comes with pre-mounted standoffs for ATX motherboards. For Micro-ATX or Mini-ITX, adjust standoffs as needed.
- Install the I/O shield (if not pre-attached to your motherboard) into the rear opening of the case.
- Carefully align your motherboard with the standoffs and gently lower it into place.
- Secure the motherboard with the provided screws.
5.3. Power Supply Unit (PSU) Installation
- Position the PSU in the dedicated compartment at the bottom rear of the case.
- Ensure the PSU fan faces downwards (if the case has a bottom vent) or upwards, depending on your cooling preference.
- Secure the PSU with screws from the rear of the case.
5.4. Storage Drive Installation
The case supports 3.5" HDDs and 2.5" SSDs. Use the provided screwless drive trays for easy installation.
- Locate the drive trays in the PSU shroud area or behind the motherboard tray.
- For 3.5" HDDs, flex the tray and insert the drive, aligning the pins with the screw holes.
- For 2.5" SSDs, secure the SSD to the tray with screws.
- Slide the filled trays back into their slots until they click into place.
5.5. Graphics Card (GPU) Installation
The case offers ample clearance for large graphics cards (up to 340mm length).
- Remove the necessary PCIe slot covers from the rear of the case.
- Insert your graphics card into the appropriate PCIe slot on the motherboard.
- Secure the graphics card to the case with screws.
5.6. Cable Management
Utilize the cable routing channels and Velcro straps behind the motherboard tray for a clean build and improved airflow.
- Connect all necessary power cables from the PSU to your components.
- Connect the front panel cables (USB, audio, power, reset, Insta-Light Loop) to their respective headers on the motherboard. The front panel header is conveniently grouped into a single block for easier connection.
- Route cables through the grommets and tie-down points.
- The pre-installed ARGB fans are connected to an LED controller board. Connect this controller to a SATA power connector from your PSU and an ARGB header on your motherboard (if available) for software control, or use the Insta-Light Loop button for manual control.
6. Operating Your PC Case Features
Once your system is assembled, you can utilize the case's features.
6.1. Power On/Off and Reset
- Press the Power Button on the front I/O panel to turn your system on or off.
- Press the Reset Button to restart your system.
6.2. ARGB Lighting Control (Mystic Light & Insta-Light Loop)
The pre-installed ARGB fans offer customizable lighting effects.

- Insta-Light Loop Button: Press this button on the front I/O panel to quickly cycle through various pre-programmed ARGB lighting effects and colors without needing software.
- MSI Mystic Light Software: For advanced customization and synchronization with other MSI Mystic Light compatible components, download and install the MSI Mystic Light software from the official MSI website. Connect the ARGB controller to your motherboard's ARGB header for software control.
7. Maintenance
Regular maintenance helps ensure optimal performance and longevity of your PC components.
- Dust Filters: The top panel features a magnetic dust filter. Regularly remove and clean it with water or a soft brush to prevent dust buildup and maintain good airflow.
- Interior Cleaning: Periodically open the side panels and use compressed air to remove dust from fans, heatsinks, and other components.
- Exterior Cleaning: Wipe the exterior surfaces with a soft, damp cloth. Avoid harsh chemicals or abrasive materials, especially on the tempered glass.
8. Troubleshooting
If you encounter issues with your PC case, refer to these common solutions:
- No Power:
- Ensure the PSU is properly connected to the wall outlet and switched on.
- Verify all power cables from the PSU are securely connected to the motherboard and components.
- Check that the front panel power button cable is correctly connected to the motherboard header.
- Fans Not Spinning / RGB Not Working:
- Confirm the ARGB fans are correctly connected to the LED controller board.
- Ensure the LED controller board is receiving SATA power from the PSU.
- If using software control, verify the ARGB controller is connected to the motherboard's ARGB header and the software is installed and running.
- Try using the Insta-Light Loop button to check if the fans respond to manual control.
- USB Ports Not Functioning:
- Check that the USB 3.2 Gen 2x2 Type-C and USB 3.2 Gen 1 Type-A cables from the front panel are securely connected to the corresponding headers on your motherboard.
- Audio Ports Not Functioning:
- Ensure the HD Audio cable from the front panel is correctly connected to the audio header on your motherboard.
9. Warranty and Support
MSI products are designed with quality and reliability in mind. For detailed warranty information, please refer to the warranty card included with your product or visit the official MSI website.
For technical support, driver downloads, or further assistance, please visit the MSI official website or contact MSI customer service.


