
1. Introduction
This manual provides essential instructions for the safe and effective use of your LeTkingok Heavy Duty Belt Sander Frame. Please read this manual thoroughly before assembly, operation, or maintenance to ensure proper function and to prevent injury.
1.1 Product Overview
The LeTkingok Heavy Duty Belt Sander Frame is a versatile adapter designed to convert a standard angle grinder into a belt sanding machine. It supports 730x50MM sanding belts and offers both vertical and horizontal grinding capabilities, along with multi-angle adjustment for various applications such as knife sharpening and general material finishing.
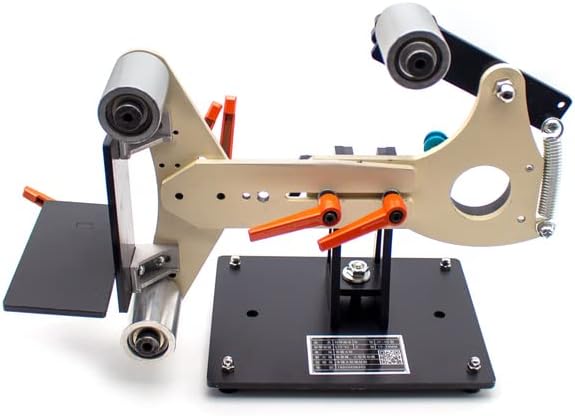
Figure 1: Front view of the LeTkingok Heavy Duty Belt Sander Frame, showcasing its robust metal construction and adjustable components.
1.2 What's in the Box
- 1 x Heavy Duty Belt Sander Frame
Note: The angle grinder and sanding belts are not included with this frame and must be purchased separately.
2. Specifications
| Product Name | Heavy Duty Belt Sander Frame |
| Brand | LeTkingok |
| Model Number | 96c0273f-a563-48eb-9397-3a6ca5987dfd |
| Spindle Diameter | 10MM |
| Mounting Bayonet Diameter | 42-43MM |
| Compatible Belt Size | 730x50MM |
| Frame Size (L x W x H) | 340x200x220MM |
| Weight | 4.1KG |
| Power Source | Adapter (requires external angle grinder) |
3. Safety Information
WARNING: Always follow basic safety precautions when using this product to reduce the risk of fire, electric shock, or personal injury.
- Read all instructions: Familiarize yourself with the operation and limitations of the product as well as the specific potential hazards.
- Wear appropriate personal protective equipment (PPE): Always wear safety glasses, hearing protection, and a dust mask. Gloves are recommended.
- Secure the workpiece: Ensure the material being sanded is firmly clamped or held to prevent movement during operation.
- Maintain a clean work area: Cluttered areas invite accidents. Ensure adequate lighting.
- Avoid accidental starting: Ensure the angle grinder is switched off before connecting or disconnecting the belt sander frame.
- Use the correct sanding belt: Ensure the belt size is 730x50MM and is appropriate for the material being sanded.
- Keep children and bystanders away: All visitors should be kept a safe distance from the work area.
- Do not force the tool: It will do the job better and more safely at the rate for which it was designed.
- Disconnect power: Always disconnect the angle grinder from the power source before making any adjustments, changing accessories, or performing maintenance.
4. Setup and Installation
Proper setup is crucial for safe and efficient operation. This frame is designed to be used with a compatible angle grinder (not included).
4.1 Attaching the Angle Grinder
- Ensure your angle grinder is unplugged from the power source.
- Remove any existing grinding disc, guard, or accessories from the angle grinder.
- Align the mounting bayonet of the belt sander frame with the spindle of your angle grinder. The frame is designed for angle grinders with a 42-43MM mounting bayonet diameter and a 10MM spindle diameter.
- Securely attach the angle grinder to the frame using the quick locking handle design. Ensure it is firmly seated and cannot wobble.

Figure 2: The belt sander frame with an angle grinder attached, demonstrating the complete assembly ready for belt installation.
4.2 Installing the Sanding Belt
- With the angle grinder still unplugged, loosen the tensioning mechanism on the belt sander frame.
- Carefully slide a 730x50MM sanding belt over the rollers, ensuring the directional arrow on the belt (if present) matches the direction of rotation.
- Apply tension to the belt using the tensioning lever or knob until the belt is taut and centered on the rollers.
- Manually rotate the belt a few times to check for proper tracking. Adjust tension or roller alignment if the belt drifts.
5. Operating Instructions
Once the frame and belt are properly installed, you can begin operation. Always ensure your work area is clear and you are wearing appropriate PPE.
5.1 Basic Operation
- Plug in the angle grinder to a suitable power outlet.
- Turn on the angle grinder. Allow the belt to reach full speed before contacting the workpiece.
- Gently bring the workpiece into contact with the moving sanding belt. Apply even, moderate pressure. Avoid excessive force, which can slow the belt, damage the motor, or cause uneven sanding.
- Move the workpiece smoothly across the belt to achieve a consistent finish.
- When finished, remove the workpiece from the belt, then turn off the angle grinder. Wait for the belt to come to a complete stop before leaving the machine unattended.
5.2 Vertical and Horizontal Grinding
The frame supports both vertical and horizontal grinding methods. Adjust the frame's orientation as needed for your specific task. Ensure all locking mechanisms are tightened before operation.
5.3 Multi-Angle Grinding
The design allows for multi-angle grinding. Utilize the adjustable components to set the desired angle for sharpening knives, shaping materials, or other precision tasks. Always secure the angle settings before starting the machine.

Figure 3: Side view of the belt sander frame, highlighting the various adjustment points for multi-angle grinding and belt tension.
5.4 Optional Sun Gear
If your model includes an optional sun gear, refer to its specific instructions for installation and use. This accessory can expand the functionality of the belt sander for specialized tasks.
6. Maintenance
Regular maintenance ensures the longevity and safe operation of your belt sander frame.
- Cleaning: After each use, disconnect the angle grinder from power and use a brush or compressed air to remove dust and debris from the frame, rollers, and belt.
- Belt Replacement: Replace sanding belts when they become worn or clogged. Follow the belt installation steps in Section 4.2.
- Inspection: Periodically inspect all fasteners, bolts, and moving parts for tightness and wear. Tighten any loose fasteners. Replace any worn or damaged components immediately.
- Lubrication: Moving parts and pivot points may benefit from occasional light lubrication. Consult the angle grinder's manual for its specific lubrication requirements.
7. Troubleshooting
This section addresses common issues you might encounter with the belt sander frame.
- Belt not tracking correctly: Ensure the belt is properly tensioned and centered on the rollers. Adjust the tracking mechanism if available. Check for worn rollers or an improperly installed belt.
- Excessive vibration: Ensure the angle grinder is securely attached to the frame. Check that the sanding belt is not damaged or unevenly worn. Verify all frame components are tightly secured.
- Poor sanding performance: The sanding belt may be worn out or clogged. Replace the belt. Ensure you are using the correct grit for your material.
- Angle grinder not fitting: Verify that your angle grinder's spindle diameter is 10MM and its mounting bayonet diameter is 42-43MM.
If you encounter issues not listed here or if troubleshooting steps do not resolve the problem, please contact customer support.
8. Warranty and Support
Warranty information for the LeTkingok Heavy Duty Belt Sander Frame is not provided within this manual. Please refer to the original purchase documentation or contact your retailer or the manufacturer directly for details regarding warranty coverage and customer support.
For technical assistance or inquiries, please visit the LeTkingok official website or contact their customer service department.