
1. Important Safety Information
Please read these instructions carefully before using your Asmuse 88-Key Digital Piano. Keep this manual for future reference.
- Power Supply: Use only the specified power adapter. Ensure the voltage matches the requirements of your region. Unplug the unit during lightning storms or when unused for long periods.
- Water and Moisture: Do not expose the instrument to rain, moisture, or excessive humidity. Do not place containers with liquids on the instrument.
- Heat Sources: Keep the instrument away from heat sources such as radiators, heat registers, stoves, or other apparatus that produce heat.
- Ventilation: Do not block any ventilation openings. Ensure proper airflow around the instrument.
- Cleaning: Clean only with a dry cloth. Avoid using chemical cleaners.
- Servicing: Do not attempt to service this product yourself. Refer all servicing to qualified service personnel.
2. Package Contents
Verify that all items are included in your package:
- Asmuse 88-Key Digital Piano
- Power Adapter
- Sustain Pedal
- Headphones
- Music Rest
- User Manual
- Cleaning Cloth

Image: The Asmuse 88-Key Digital Piano shown with its included accessories: headphones, user manual, cleaning cloth, power adapter, and sustain pedal. The piano dimensions are also indicated: 128.5cm length, 27.2cm width, and 10.2cm height.
3. Setup
3.1 Unpacking and Placement
- Carefully remove the digital piano and all accessories from the packaging.
- Place the piano on a stable, flat surface. Ensure there is adequate space for playing and connecting cables.
- Attach the music rest to the designated slot on the piano.
3.2 Connecting Power
- Locate the DC 12V input port on the rear panel of the piano.
- Connect the power adapter cable to the DC 12V input port.
- Plug the power adapter into a suitable electrical outlet.
3.3 Connecting Sustain Pedal and Headphones
- Connect the sustain pedal cable to the 'SUS' (Sustain) input port on the rear panel.
- Plug your headphones into the headphone jack (usually located on the front or side panel) for private practice.

Image: Close-up of the rear panel connections, including SUS (Sustain), Audio In, Audio Out, MIDI Out, MIDI In, MIDI USB, and DC 12V power input. These ports allow for connection to various external devices.
4. Operating Instructions
4.1 Power On/Off
Press the 'Power' button (usually located near the control panel) to turn the piano on or off. The LCD screen will illuminate upon power-on.
4.2 Volume Control
Adjust the master volume using the 'VOL' knob or buttons on the control panel.
4.3 Control Panel Overview

Image: A detailed view of the LCD screen and control panel, showing buttons for functions like Drum Units, Beat, Prev, Play/Pause, Next, Record, Replay, Integrate, Sync, Split, Dual, Tempo, Transpose, Tone, Rhythm, Demo, and Volume control.
- LCD Screen: Displays current settings, such as tone number, tempo, and other parameters.
- Tone Selection: Use the 'TONE' button and navigation controls (Prev/Next) to select different instrument sounds.
- Rhythm Selection: Use the 'RHYTHM' button and navigation controls to select various rhythm patterns.
- Tempo Adjustment: Use the 'TEMPO' button and navigation controls to adjust the speed of rhythms or metronome.
- Metronome: Activate the metronome function to assist with timing.
- Transpose: Use the 'TRANS' button to shift the pitch of the entire keyboard up or down.
- Split Mode: Divides the keyboard into two sections, allowing two different tones to be played simultaneously by each hand.
- Dual Mode: Layers two different tones across the entire keyboard.
- Recording Function: Press 'RECORD' to begin recording your performance. Press 'REPLAY' to listen back.
- Synchrony Chord: Engages a feature for automatic chord accompaniment.
- Demo Songs: Press 'DEMO' to play pre-programmed demonstration songs.
4.4 Playing the Piano
The Asmuse 88-Key Digital Piano features semi-weighted keys designed to provide a realistic playing feel. Experiment with different tones and rhythms to explore its capabilities.

Image: A close-up of hands positioned on the black and white keys of the digital piano, illustrating the semi-weighted key action.
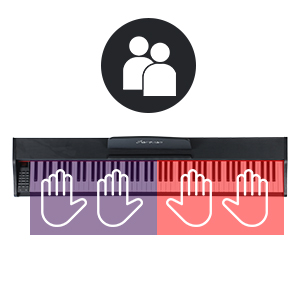
Image: A graphic representation of the keyboard split function, showing the keyboard divided into two sections for simultaneous play by two users or for different instrument sounds.
5. Maintenance
5.1 Cleaning
Wipe the surface of the piano with a soft, dry cloth. For stubborn dirt, slightly dampen the cloth with water and then wipe dry immediately. Do not use abrasive cleaners, waxes, or solvents.
5.2 Storage
When not in use, store the piano in a clean, dry environment away from direct sunlight and extreme temperatures. If storing for an extended period, disconnect the power adapter.
6. Troubleshooting
If you encounter any issues, please refer to the following troubleshooting guide before contacting customer support.
| Problem | Possible Cause | Solution |
|---|---|---|
| No sound |
|
|
| Keys not responding |
|
|
| Distorted sound |
|
|
| Recording not working |
|
|
7. Specifications
| Feature | Specification |
|---|---|
| Keys | 88 Semi-weighted keys |
| Functions | Metronome, Synchrony Chord, Recording, Split, Dual, Transpose, Tone, Rhythm, Demo |
| Display | LCD Screen |
| Connectivity | SUS (Sustain), Audio In, Audio Out, MIDI In, MIDI Out, MIDI USB, DC 12V |
| Dimensions (L x W x H) | 128.5 cm x 27.2 cm x 10.2 cm (approximately) |
| Power Supply | DC 12V (via included adapter) |
8. Warranty and Support
For warranty information and customer support, please refer to the warranty card included with your product or visit the official Asmuse website. Keep your proof of purchase for any warranty claims.
If you require further assistance or have questions not covered in this manual, please contact Asmuse customer service.