
Introduction
The LARIAU HCT-366 is an intelligent, rain-proof, and dust-proof automatic watering device designed to simplify your garden irrigation. Featuring a large display and a rain sensor, it offers precise and efficient watering for various plants and gardens. This manual provides detailed instructions for installation, operation, and maintenance to ensure optimal performance of your device.
Product Features
- Large Display: Features a large screen for clear visibility and convenient operation.
- Rain Sensor: Automatically pauses watering during rainfall, conserving water and preventing over-watering.
- Water Inlet Filter: An integrated filter screen effectively prevents impurities from entering the device.
- Child Lock Function: Prevents accidental button presses or unauthorized changes to settings.
- Programmable Schedules: Supports 6 groups of programmable timing settings, offering weekly or cyclical modes.
- Flexible Installation: Equipped with a twisted active joint for easy installation on faucets, even those close to a wall.
- Precise Timing: Irrigation duration can be set precisely from 1 second to 99 minutes and 59 seconds.
Package Contents
Please check the package to ensure all items are present:
- 1 x LARIAU HCT-366 Irrigation Timer
- 1 x Packaging Box
- 1 x Accessory Set (e.g., connectors, seals)
Setup
1. Battery Installation
The device requires two (2) AA alkaline batteries (not included). Ensure correct polarity when inserting the batteries into the compartment, typically located on the back or side of the unit. Close the battery compartment securely to maintain water resistance.
2. Device Installation
- Attach the LARIAU HCT-366 irrigation timer directly to your outdoor faucet. The twisted active joint allows for easy connection, even in tight spaces.
- Ensure the connection is tight to prevent leaks. Use the provided accessory set (e.g., rubber washers) to create a secure, watertight seal.
- Connect your garden hose or irrigation system to the outlet of the watering device.

Image: The LARIAU HCT-366 device connected to a standard outdoor faucet, demonstrating its compact design and easy installation.
3. Water Inlet Filter
The device includes a water inlet filter screen to prevent debris from entering and clogging the system. Ensure this filter is properly seated during installation. Regularly check and clean the filter to maintain optimal water flow.

Image: An illustrative diagram of the HCT-366 connected to a water source and distributing water through a drip irrigation system to multiple plants.
Operating Instructions
Display Overview

Image: A detailed view of the HCT-366's LCD screen, displaying various indicators such as current time, day of the week, battery status, rain sensor icon, and active program slots (P1-P6).
The large LCD screen provides all necessary information at a glance. Key indicators include:
- NOW: Current time.
- Days of the Week: Indicates active watering days (Su, Mo, Tu, We, Th, Fr, Sa).
- Battery Indicator: Shows remaining battery life.
- Rain Sensor Icon: Indicates if the rain sensor is active or has detected rain.
- Child Lock Icon: Shows if the child lock function is enabled.
- P1-P6: Program slots for setting irrigation schedules.
- START TIME: The programmed start time for watering.
- HOW LONG: The programmed duration for watering.
Setting Current Time and Day
- Press the "SET" button (or similar, typically indicated by a clock icon) to enter time setting mode.
- Use the "+" and "-" buttons to adjust the hour and minute.
- Press "OK" to confirm and move to the next setting (e.g., day of the week).
- Adjust the current day using "+" and "-", then press "OK" to save.
Programming Irrigation Schedules (P1-P6)
The device allows for up to 6 independent watering programs. Follow these steps to set a program:
- Press the "P" button (Program) to select a program slot (P1-P6). Use "+" or "-" to navigate between programs.
- Press "OK" to enter the settings for the selected program.
- Set Start Time: Use "+" and "-" to adjust the desired start time (hour and minute). Press "OK".
- Set Watering Duration: Use "+" and "-" to set the watering duration from 1 second to 99 minutes 59 seconds. Press "OK".
- Set Watering Frequency (Days):
- Weekly Mode: Select specific days of the week (Su, Mo, Tu, etc.) using "+" and "-". Press "OK" to toggle selection for each day.
- Cycle Mode: Some models may offer a cycle mode (e.g., every 2 days). Refer to the on-screen prompts to set the cycle interval.
- Press "OK" to save the program settings. Repeat for other programs (P2-P6) as needed.

Image: The HCT-366 display in programming mode, showing placeholders for setting start time and watering duration, along with day selection options.
Rain Sensor Function
The integrated rain sensor automatically detects rainfall. When rain is detected, the device will pause any scheduled watering programs to prevent over-watering. Watering will resume according to the schedule once the sensor is dry. This feature helps conserve water and protects your plants.
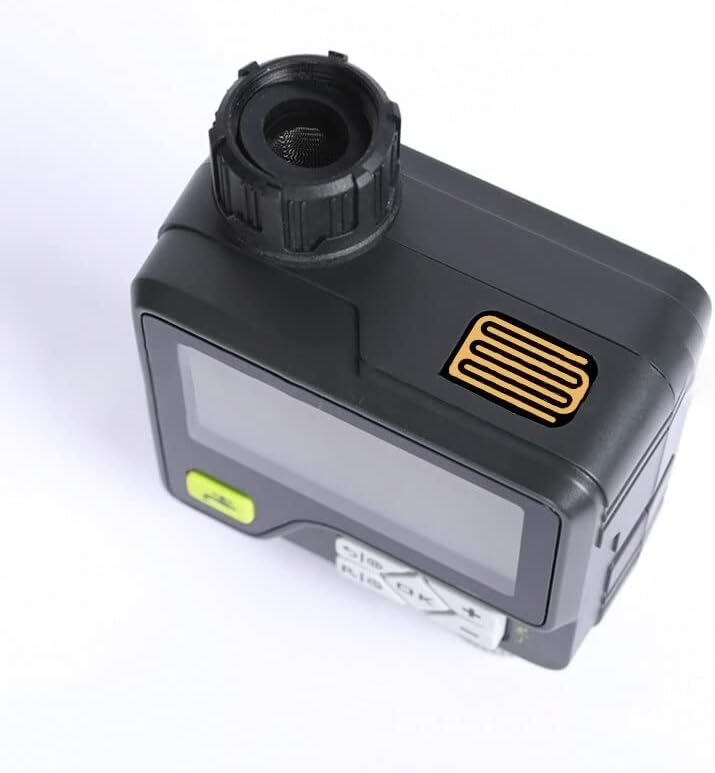
Image: A side profile of the HCT-366, clearly showing the rain sensor grid located on the top of the unit, designed to detect precipitation.
Child Lock Function
To prevent accidental changes to your watering schedule, activate the child lock:
- To activate: Press and hold the "LOCK" button (or a combination like "OK" and "-" simultaneously, refer to the device's button labels) until the lock icon appears on the screen.
- To deactivate: Repeat the action. The lock icon will disappear.
Manual Watering
To initiate watering outside of the programmed schedule:
- Press the "MANUAL" button (often indicated by a water droplet or faucet icon).
- Use "+" and "-" to set the desired manual watering duration.
- Press "OK" to start manual watering.
- To stop manual watering, press the "MANUAL" button again or "OFF".
Maintenance
Cleaning the Water Inlet Filter
Periodically check the water inlet filter for debris and sediment. If clogged, carefully remove the filter and rinse it under running water. Reinsert the filter securely before reattaching the device to the faucet.
Battery Replacement
When the battery indicator shows low power, replace the two AA alkaline batteries promptly to ensure continuous operation. Always use fresh alkaline batteries for best performance.
Winter Storage
Before the first frost, disconnect the watering device from the faucet and drain any remaining water. Store the device indoors in a dry, frost-free location. Remove batteries if storing for an extended period to prevent leakage.
Troubleshooting
- Device not turning on: Check if batteries are installed correctly and are not depleted. Replace with fresh batteries if necessary.
- No water flow:
- Ensure the faucet is fully open.
- Check the water inlet filter for clogs and clean if needed.
- Verify that the water pressure is within the operating range (0.05-0.8 MPA).
- Confirm that a watering program is active or manual watering is initiated.
- Watering not starting at scheduled time:
- Check if the current time and day are set correctly on the device.
- Verify that the program's start time and frequency are correctly set.
- Ensure the rain sensor is not wet, pausing the schedule.
- Check if the child lock is active and interfering with settings.
- Rain sensor not working: Ensure the rain sensor area is clean and free from obstructions.
Specifications
| Model | HCT-366 |
| Program Parameters | 6 programmable timing groups (Week/Cycle, Dual Mode) |
| Operating Voltage | 2 x AA Alkaline Batteries (not included) |
| Water Pressure Range | 0.05 - 0.8 MPA |
| Watering Duration | 1 second - 99 minutes 59 seconds |
| Net Weight | 382g (without battery) |
| Dimensions (L x W x H) | 10.1 x 5.5 x 13.6 cm |
| Manufacturer Reference | 9444325645163 |
| ASIN | B0B6STPQMH |
Warranty and Support
For warranty information and technical support, please refer to the retailer's policy or contact LARIAU customer service through their official website or the point of purchase. Keep your purchase receipt as proof of purchase.