
1. Introduction
Welcome to the world of interactive play with your new EduCuties Smart Programmable Robot Toy. This manual provides essential information for setting up, operating, and maintaining your robot to ensure a fun and engaging experience. Please read these instructions carefully before use.
2. Product Overview
2.1 Components
- 1 x EduCuties Smart Robot (Model EC22-5R)
- 1 x Remote Control
- 1 x USB Charging Cable
- 1 x Instruction Manual
2.2 Key Features
- Remote Control & Gesture Control: Operate the robot using the included infrared remote or intuitive hand gestures.
- Intelligent Programming: Program up to 50 actions for customized sequences.
- Dynamic Modes: Enjoy dancing, singing, walking, patrolling, and speaking functions.
- Rechargeable Battery: Built-in lithium-ion battery for convenient USB charging.
- Durable Design: Made from non-toxic ABS plastic with flexible multi-joints.

Figure 1: The EduCuties Smart Robot, shown in blue and white, standing upright with its remote control beside it.

Figure 2: A detailed diagram highlighting the robot's LED eyes, on-off button, motion sensing area, charging port, surround stereo, flexible arms and thumb, and integrated wheels.
3. Setup
3.1 Remote Control Battery Installation
- Locate the battery compartment on the back of the remote control.
- Using a Phillips head screwdriver, unscrew and remove the battery cover.
- Insert two (2) AA batteries, ensuring correct polarity (+/-).
- Replace the battery cover and secure it with the screw.
3.2 Robot Charging
The robot is powered by a built-in rechargeable lithium-ion battery.
- Locate the charging port on the robot's chest (refer to Figure 2).
- Connect the small end of the USB charging cable to the robot's charging port.
- Connect the larger USB end of the cable to a USB power source (e.g., computer, power bank, USB wall adapter).
- Charging typically takes approximately 2 hours. The robot's eyes may indicate charging status.
- Once fully charged, disconnect the charging cable. Playtime is approximately 60 minutes on a full charge.

Figure 3: The robot connected to a laptop via a USB charging cable, demonstrating its convenient rechargeable feature.
4. Operating Instructions
4.1 Power On/Off
Press the power button located on the robot's chest to turn it on or off. The robot will greet you upon powering on.
4.2 Remote Control Operation
Use the remote control to direct the robot's movements and activate various functions. Refer to the remote control diagram in the included manual for button layout.
- Movement: Use the directional arrows to move the robot forward, backward, turn left, or turn right.
- Slide: The robot can slide forward or backward.
- Volume: Adjust the robot's volume using the volume up/down buttons.
- Stop: Press the 'Stop' button to halt all current actions.
4.3 Gesture Control
The robot features gesture sensing for intuitive control without the remote.
- Ensure the robot is in standby mode.
- Perform specific hand gestures in front of the robot's motion sensor to command movements:
- Forward Gesture: Move your hand forward.
- Backward Gesture: Move your hand backward.
- Turn Left/Right Gesture: Swipe your hand left or right.
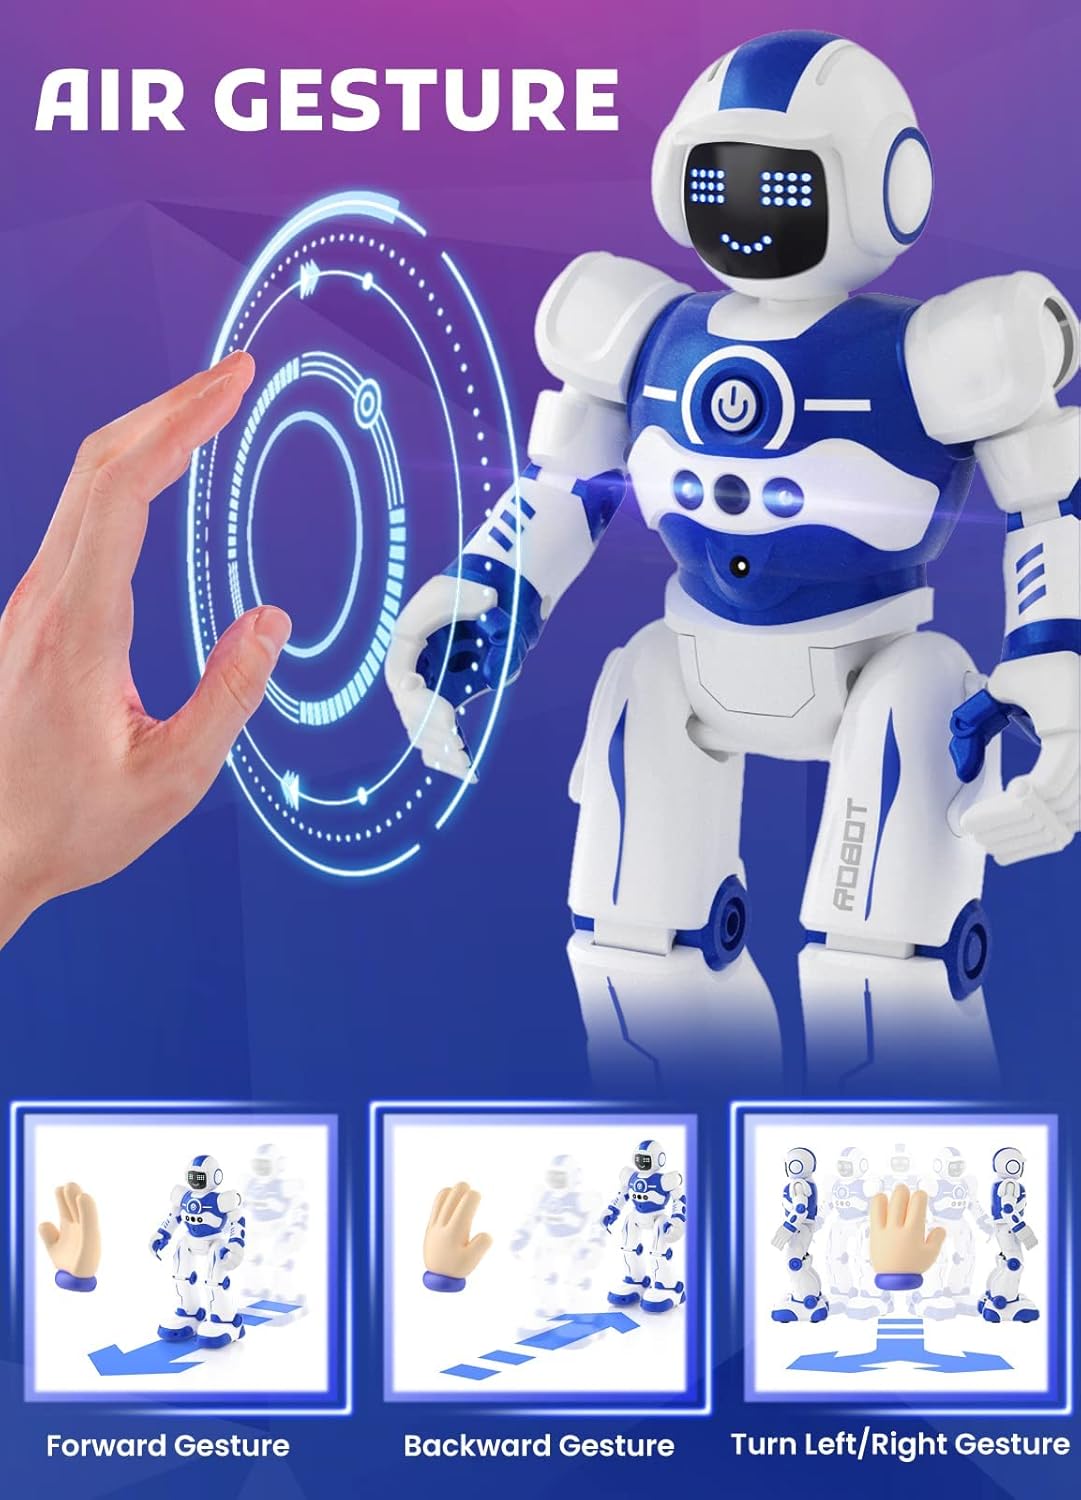
Figure 4: An image illustrating how hand gestures control the robot's movement, including forward, backward, and turn left/right gestures.
4.4 Intelligent Programming
Program the robot to perform a sequence of up to 50 actions.
- Press the 'Program' button on the remote control.
- Input desired actions using the remote control buttons (e.g., walk forward, turn left, dance).
- Press the 'Program' button again to save and execute the sequence. The robot will perform the recorded actions one by one.

Figure 5: The robot demonstrating its programming function, showing a sequence of movements (1st, 2nd, 3rd, up to 50th) controlled by the remote.
4.5 Dynamic Modes
- Dance Mode: Press the 'Dance' button on the remote to make the robot perform various dance routines with music.
- Music Mode: Press the 'Music' button to play different songs.
- Patrol Mode: Activate 'Patrol' mode for the robot to move around and avoid obstacles automatically.

Figure 6: The robot performing a dance, with musical notes and lights in the background, showcasing its entertainment capabilities.
4.6 Official Product Videos
Video 1: EduCuties Robot for Kids is a Fun Learning Toy. This video demonstrates the robot's various functions and interactive capabilities, highlighting its appeal as a learning toy.
Video 2: Why I love the EduCuties Robot Toys for Kids. This video provides a detailed overview of the robot's features and user experience from a seller's perspective.
5. Maintenance
5.1 Cleaning
To clean your robot, gently wipe its surface with a dry, soft cloth. Avoid using water or cleaning solutions, as these can damage electronic components.
5.2 Storage
When not in use, store the robot and its accessories in a cool, dry place, away from direct sunlight and extreme temperatures. Remove batteries from the remote control if storing for extended periods.
6. Troubleshooting
If you encounter any issues with your EduCuties Smart Robot, please refer to the following common solutions:
| Problem | Possible Solution |
|---|---|
| Robot does not turn on. | Ensure the robot is fully charged. Press the power button firmly. |
| Remote control is not working. | Check if the remote control batteries are correctly installed and not depleted. Replace if necessary. Ensure there are no obstructions between the remote and the robot. |
| Robot's movements are erratic or slow. | Recharge the robot's battery. Ensure the robot is on a smooth, flat surface. Clear any obstructions around its wheels. |
| Gesture control is unresponsive. | Ensure the robot is in standby mode. Perform gestures clearly and directly in front of the sensor. |
7. Specifications
- Product Dimensions: 5 x 3 x 10 inches
- Item Weight: 1.12 pounds
- Item Model Number: EC22-5R
- Manufacturer Recommended Age: 36 months - 10 years
- Batteries: 1 Lithium Ion battery required (included for robot), 2 AA batteries required for remote (not included).
- Material: Non-toxic ABS plastic
8. Warranty and Support
For any questions, concerns, or technical support regarding your EduCuties Smart Programmable Robot Toy, please contact EduCuties customer service. Please retain your proof of purchase for warranty claims.