
1. Introduction
The VENTS-US PS 100 is a passive fresh air intake ventilation kit designed to improve indoor air quality by facilitating fresh air circulation without the need for a motor. This system includes a telescopic air duct and an adjustable airflow regulator, allowing for customized ventilation. It is intended for through-the-wall installation.
2. Safety Information
- Always wear appropriate personal protective equipment (PPE) during installation, including safety glasses and gloves.
- Ensure the installation area is clear of electrical wiring, plumbing, and other obstructions before drilling.
- Do not modify the product in any way not described in this manual.
- Keep packaging materials away from children.
3. Package Contents
Verify that all components are present before beginning installation:
- Telescopic Air Duct
- Interior Wall Vent Cover with Adjustable Airflow Regulator
- Exterior Wall Vent Cover
- Mounting Hardware (screws, anchors)

Image 3.1: Assembled VENTS-US PS 100 Passive Fresh Air Intake Ventilation Kit, showing the interior and exterior covers connected by the telescopic duct.
4. Setup and Installation
The VENTS-US PS 100 is designed for straightforward through-the-wall installation. Ensure the chosen location allows for proper air circulation and is free from obstructions.
4.1. Site Preparation
- Select a suitable wall location, typically near a window or in a living area, ensuring it is away from direct drafts or heat sources.
- Mark the center point for the duct hole on both the interior and exterior walls. Use a level to ensure accuracy.
- Drill a pilot hole through the wall from the interior to the exterior.
4.2. Drilling the Opening
- Using an appropriate core drill bit (refer to specifications for duct diameter), carefully drill the main opening through the wall, starting from the exterior side if possible to minimize chipping on the exterior finish.
- Clean any debris from the drilled opening.
4.3. Duct and Cover Installation
- Insert the telescopic air duct into the drilled opening. Adjust its length to fit the wall thickness.
- Secure the exterior wall vent cover to the exterior wall using the provided mounting hardware. Ensure it is flush and sealed to prevent water ingress.
- Attach the interior wall vent cover to the interior wall, aligning it with the telescopic duct. Secure it with the provided mounting hardware.
- Ensure the airflow regulator on the interior cover is accessible and moves freely.

Image 4.1: Illustrative diagram of the installation process for a passive ventilation kit, showing the duct passing through a wall and the interior and exterior covers.
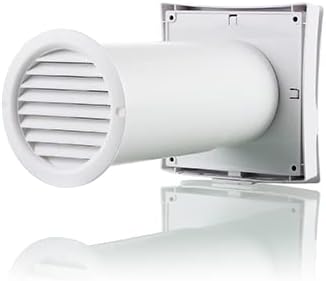
Image 4.2: Close-up of the interior wall vent cover, featuring adjustable louvers for airflow control.
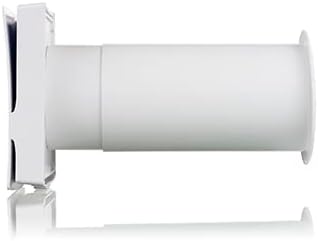
Image 4.3: View of the exterior wall vent cover, designed to protect the opening from elements.
5. Operating Instructions
The VENTS-US PS 100 operates passively, meaning it does not use a motor. Airflow is regulated manually.
5.1. Adjusting Airflow
The interior wall vent cover features a slide lever or similar mechanism to adjust the opening of the louvers. Moving the lever will increase or decrease the amount of fresh air entering the room. Adjust this to achieve your desired level of ventilation and comfort.
6. Maintenance
Regular maintenance ensures optimal performance and longevity of your ventilation kit.
6.1. Cleaning
- Periodically clean the interior and exterior vent covers with a mild detergent and a soft cloth.
- Inspect the telescopic duct for any dust or debris accumulation and clean as necessary.
- If a filter element is present, remove and clean or replace it according to its specific instructions.
6.2. Inspection
- Regularly check the exterior vent cover for any damage or obstructions (e.g., leaves, insect nests).
- Ensure the seals around the vent covers are intact to prevent air leakage or water penetration.
- Consider adding an additional fine mesh screen to the exterior vent for enhanced protection against insects, as the included filter may not be sufficient for all types of pests.
7. Troubleshooting
If you experience issues with your VENTS-US PS 100, consider the following:
- Reduced Airflow: Check if the interior airflow regulator is fully open. Inspect both interior and exterior covers for obstructions or excessive dust buildup.
- Drafts: Ensure the interior airflow regulator is adjusted to a comfortable setting. Verify that the exterior cover is properly sealed to the wall.
- Noise: Check for loose components or debris within the duct. Ensure the covers are securely fastened.
8. Specifications
| Feature | Detail |
|---|---|
| Brand | VENTS |
| Model Name | PS 100 |
| Product Dimensions | 8.06"D x 6.44"W x 6.44"H |
| Installation Type | Through the wall |
| Motor Type | No Motor (Passive) |
| Control Method | Manual (Slide Lever) |
| Room Type Recommendation | Bedroom, Garage, Home Office, Living Room |
| Special Feature | Water Resistant |
| Color | White |
9. Warranty and Support
For warranty information or technical support, please contact VENTS-US directly through their official website or customer service channels. Keep your purchase receipt as proof of purchase.


