
1. Introduction
This manual provides essential information and instructions for the installation and testing of your A-MIND LCD Display and Touch Digitizer Screen Replacement for the Samsung Galaxy E7 series. Please read all instructions carefully before proceeding with the installation.

Image 1.1: Overview of the A-MIND screen replacement kit for Samsung Galaxy E7, featuring the LCD assembly and various repair tools.
2. Compatibility
This replacement screen is compatible with the 5.5-inch Samsung Galaxy E7 models: E700H, E700F, and E700M. It is designed to address issues such as broken screens, liquid crystal ruptures, dead pixels, touch unresponsiveness, display problems, and false color displays.
Important: Before purchase and installation, verify that your phone's malfunction is specifically caused by the LCD or the touch panel. Incorrect diagnosis may lead to unnecessary replacement.
3. Package Contents
The package includes the following items:
- 1 x A-MIND Touch LCD Panel Assembly (Black OLED)
- 1 x Screwdriver set (various sizes)
- 1 x Pry bar
- 1 x Triangular pry piece
- 1 x Tweezer
- 1 x SIM card tray ejector pin
- 1 x Double-sided adhesive tape
- 1 x Tempered screen protection film
- 1 x Opening Card
Note: The included toolset is a general kit and may not be suitable for opening all phone models. Additional specialized tools may be required.

Image 3.1: Contents of the A-MIND screen replacement kit, showing the LCD assembly, various screwdrivers, pry tools, tweezers, and a tempered glass screen protector.
4. Important Precautions and Warnings
- Professional Installation Recommended: Installation requires specific techniques and equipment. For personal use or non-professionals, it is highly recommended to seek professional service or refer to detailed video tutorials. Damage caused during installation is not covered under warranty.
- Fragile Component: The LCD assembly is a fragile component. Handle with extreme care. Avoid applying excessive force or bending the flex cables. Glass fragments from a broken screen can cause injury; wear protective gloves if necessary.
- Static Electricity: Pay close attention to static electricity. Ground yourself using an ESD (Electrostatic Discharge) wrist strap to prevent damage to the phone's electronic components.
- Pre-Installation Testing: Always test the product thoroughly before full installation. Do not remove any protective films or labels until testing is complete and the screen is confirmed to be fully functional.
- No Manual Included: This product does not come with a printed installation manual. Refer to online video tutorials for detailed step-by-step guidance.
5. Installation Guide
Due to the complexity of phone disassembly and reassembly, a detailed step-by-step guide is best followed via video tutorials. We strongly recommend searching for "Samsung Galaxy E7 E700 screen replacement" on platforms like YouTube for visual instructions.
General Steps (Refer to Video Tutorials for Details):
- Power Off Device: Ensure your Samsung Galaxy E7 is completely powered off before beginning.
- Remove SIM Tray: Use the ejector pin to remove the SIM card tray.
- Heat and Separate: Carefully heat the edges of the screen to loosen the adhesive. Use a suction cup and pry tools to gently separate the old screen from the phone frame.
- Disconnect Cables: Disconnect the battery cable connector first. Then, carefully disconnect the flex cables of the old LCD display and touch screen from the motherboard.
- Clean Frame: Remove any old adhesive residue from the phone frame.
- Connect New Screen (for testing): Before fully installing, connect the flex cables of the new A-MIND LCD assembly to the motherboard. Do not apply new adhesive or fully secure the screen yet.
- Perform Test: Proceed to Section 6 for detailed testing procedures.
- Final Installation: If the new screen functions correctly, disconnect the battery, then the screen flex cables. Apply new double-sided adhesive tape to the frame, carefully align and secure the new screen, reconnect all cables, and reassemble the phone.
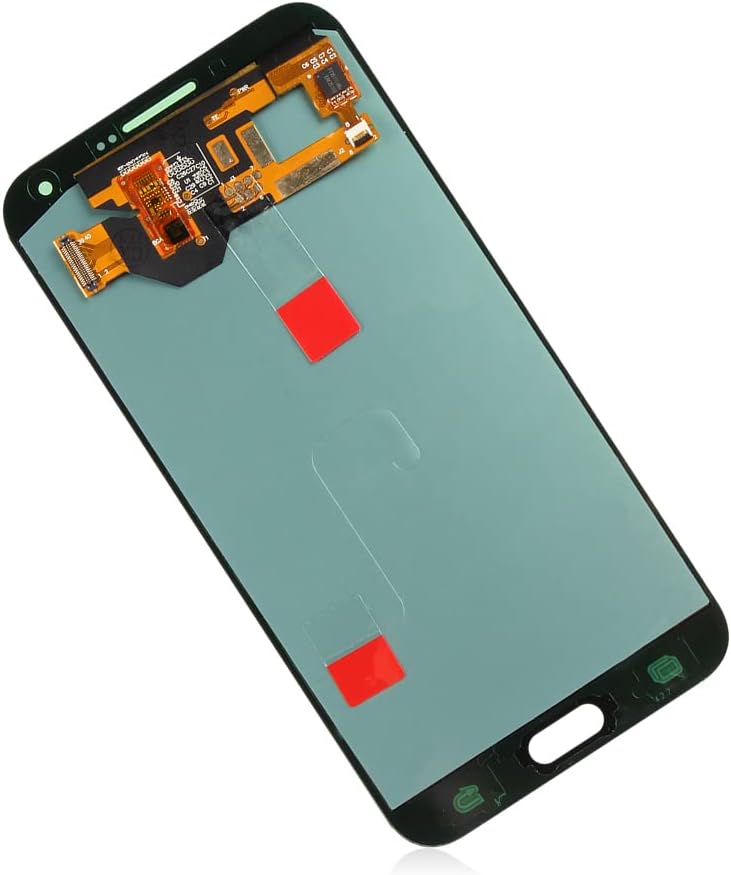
Image 5.1: Rear view of the replacement LCD assembly, highlighting the flex cables and connection points that attach to the phone's motherboard.
6. Testing Procedures (Simulation Test)
It is crucial to test the new screen before final installation to ensure full functionality. Follow these steps:
- Preparation: Ensure all protective films and labels remain on the new screen. Do not remove them during testing.
- Static Discharge: Wear an ESD wrist strap or frequently touch a grounded metal object to discharge static electricity.
- Connect for Test: With the phone disassembled and the old screen removed, connect the flex cables of the new A-MIND LCD assembly to the motherboard. Keep the battery cable disconnected initially.
- Power On: Reconnect the battery cable. Then, connect a charging cable to the phone to power it on.
- Functionality Check:
- Display Test: Check for any dead pixels, lines, discoloration, or abnormal display patterns.
- Touch Test: Verify touch responsiveness across the entire screen. Drag an icon around the screen to ensure there are no dead spots.
- Brightness Adjustment: Test the screen's brightness adjustment.
- Troubleshooting During Test: If any abnormalities are observed (e.g., display issues, unresponsive touch), immediately power off the phone, disconnect the battery, and re-check all flex cable connections. If the issue persists, contact customer support with video or photo evidence. Do not proceed with full installation if the screen is not functioning correctly.

Image 6.1: The A-MIND replacement screen displaying its key specifications, which can be used to verify display functionality during testing.
7. Troubleshooting Common Issues
- Screen Not Turning On:
- Ensure all flex cables are securely connected to the motherboard.
- Check if the battery is charged or try connecting the charger.
- Verify the battery connector is properly seated.
- Touch Not Responding:
- Re-seat the touch digitizer flex cable.
- Ensure no debris is obstructing the connection points.
- Perform a hard reset of the phone (if possible).
- Lines or Discoloration on Display:
- Check the LCD flex cable for any damage or improper connection.
- Ensure no pressure is being applied to the screen from the frame or internal components.
- Screen Flickering:
- Verify all connections are firm.
- This could indicate a faulty screen or an issue with the phone's motherboard.
If troubleshooting steps do not resolve the issue, please contact A-MIND customer service for further assistance.
8. Specifications
| Brand | A-MIND |
| Model Compatibility | Samsung Galaxy E7 (E700, E700H, E700F, E700M) |
| Display Type | OLED |
| Screen Size | 5.5 inches |
| Color | Black |
| Manufacturer | A-MIND |
9. Warranty and Support
A-MIND offers a 3-month free replacement or refund for non-human product damage or manufacturing faults. This warranty does not cover damages or malfunctions caused by incorrect installation work.
Upon Receipt: If the product is broken, damaged, or missing items upon receipt, do not install it. Please take photos and email our service team immediately for assistance.
For any questions or further assistance, please contact A-MIND customer service. Provide video or photo evidence if reporting an issue.