
1. Product Overview
The Spider Farmer SF-1000 Grow Tent Kit is a complete indoor growing system designed for plant cultivation. It includes a high-efficiency LED grow light, a durable grow tent, an effective ventilation system, and essential accessories to support plant growth from germination to harvest.
Key Components:
- SF1000 LED Grow Light: Features dimmable Samsung LM301H EVO diodes for full-spectrum lighting.
- Grow Tent: Constructed from 1680D Oxford fabric with 100% reflective Mylar interior, measuring 70x70x160cm.
- Ventilation System: Includes a 4-inch inline fan, carbon filter, and flexible aluminum ducting.
- Accessories: Humidity controller, thermometer/hygrometer, timer, planting bags, trellis net, and hanging hooks.
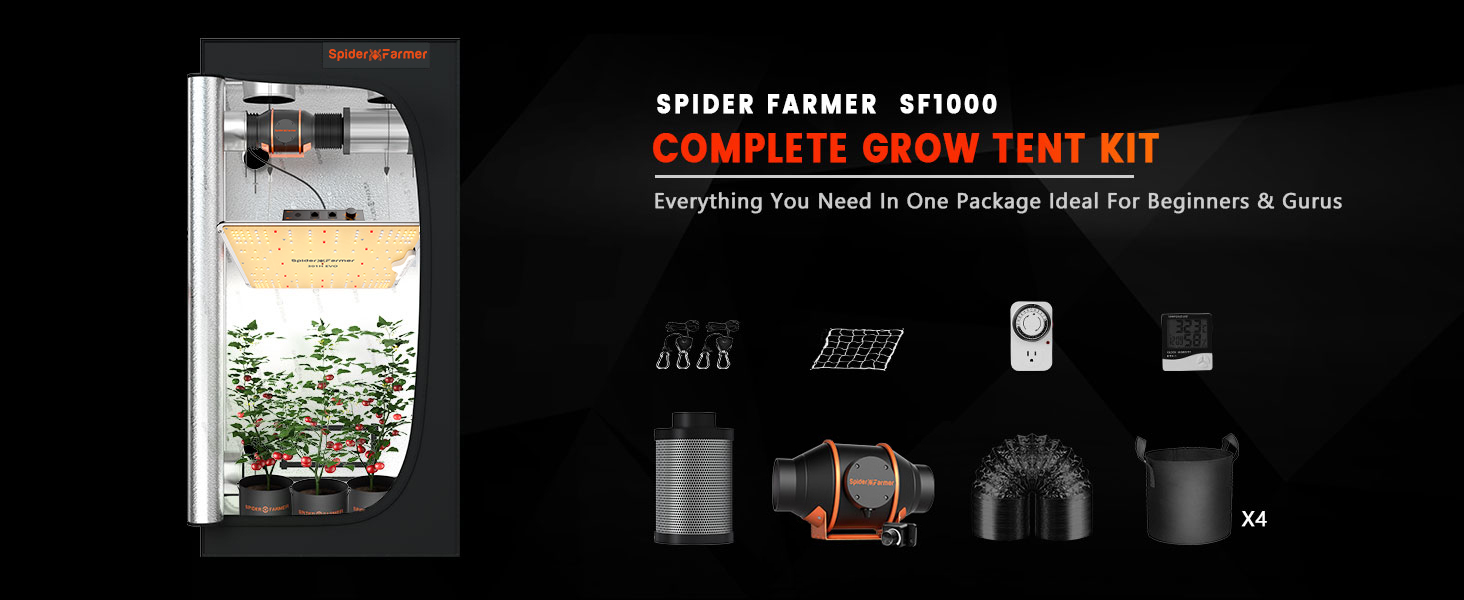
An illustration showing all components included in the Spider Farmer SF-1000 Grow Tent Kit, including the grow tent, LED light, inline fan, carbon filter, ducting, timer, thermometer/hygrometer, planting bags, and trellis net.
2. Safety Information
Read all instructions carefully before assembly and operation. Failure to follow these safety guidelines may result in injury or damage to the product.
- Electrical Safety: Ensure all electrical connections are secure and conform to local electrical codes. Do not operate with damaged cords or plugs.
- Water and Moisture: Keep electrical components away from water. The grow tent is designed to manage humidity, but direct water contact with electrical parts must be avoided.
- Ventilation: Ensure proper airflow to prevent overheating of electrical components and to maintain a healthy environment for plants.
- Weight Limit: Do not exceed the tent's maximum weight limit of 70 kg (154 lbs) for hanging equipment.
- Assembly: Assemble the tent and components on a flat, stable surface. It is recommended to have two people for tent assembly.
3. Setup Instructions
3.1 Grow Tent Assembly
- Unpack Components: Carefully remove all parts from the packaging and verify against the packing list.
- Assemble Frame: Connect the metal poles using the corner connectors. The triangular design ensures stability.
- Drape Tent Fabric: Carefully pull the tent fabric over the assembled frame. Ensure zippers are open to ease the process.
- Secure Fabric: Close all zippers and ensure the fabric is taut and properly fitted around the frame.

An image illustrating the robust triangular design of the grow tent frame, showing its ability to support significant weight, up to 120 lbs (approximately 54 kg).
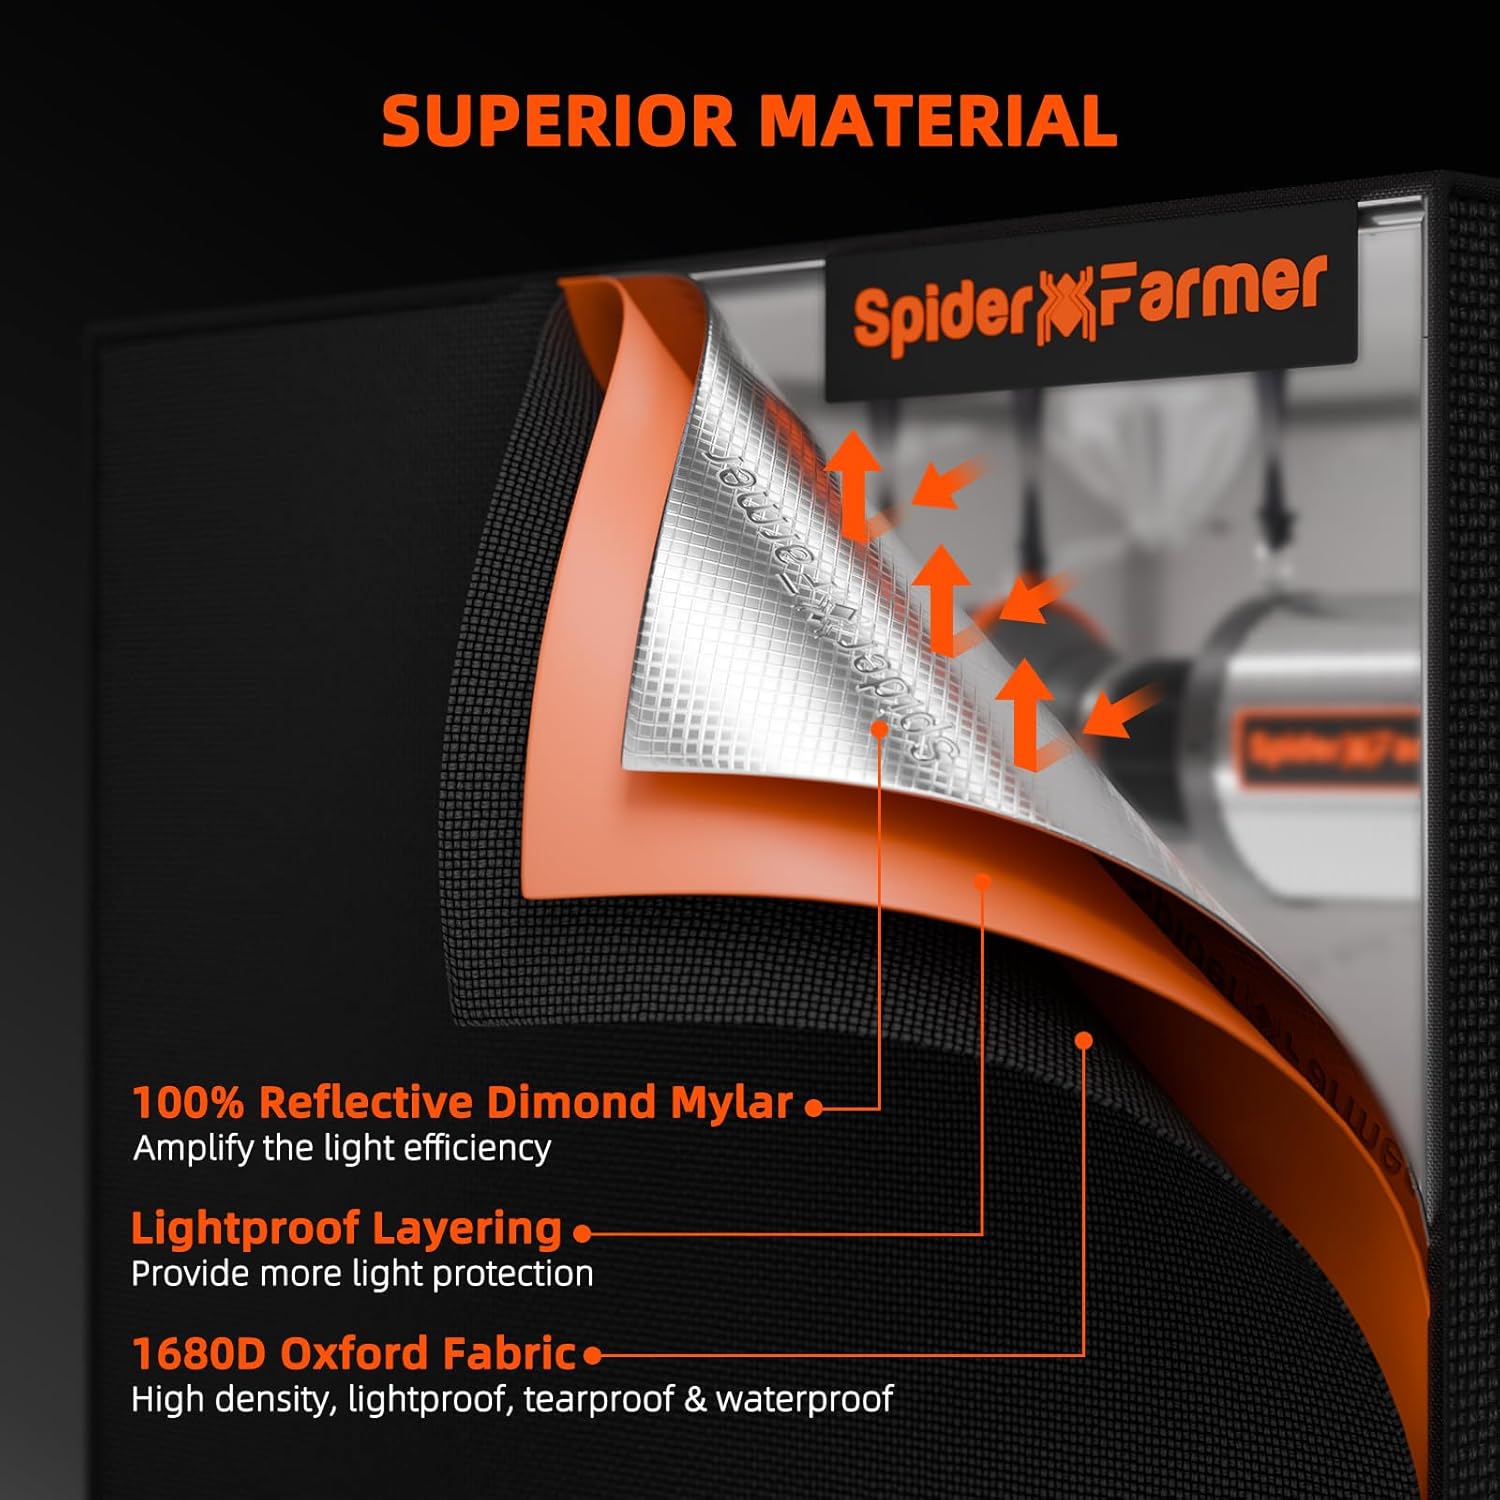
A detailed view of the grow tent's construction, highlighting the 100% reflective Mylar interior, lightproof layering, and durable 1680D Oxford fabric. Also shows heavy-duty SBS zippers and 0.8mm solid connectors.
3.2 SF1000 LED Grow Light Installation
- Attach Hanging Kit: Securely attach the provided hanging ropes or chains to the grow light.
- Hang Light: Suspend the grow light from the tent's crossbars using the hanging kit. Ensure it is level and at the recommended height above the plant canopy (refer to operating section for height guidelines).
- Connect Power: Plug the grow light into a suitable power outlet.
A close-up image of the SF1000 LED grow light, highlighting its design and LED diodes.
3.3 Ventilation System Installation
- Mount Inline Fan: Secure the 4-inch inline fan to a sturdy point within the tent, typically near an exhaust port, using the provided straps or hangers.
- Connect Carbon Filter: Attach the carbon filter to one end of the inline fan. Ensure a tight seal to prevent air leaks.
- Attach Ducting: Connect the flexible aluminum ducting to the other end of the inline fan and route it to an exhaust port outside the tent. Use duct clamps to secure all connections.
- Connect Controller: Plug the inline fan into the programmable controller.

An illustration demonstrating the airflow through the grow tent ventilation system, showing the inline fan, carbon filter, and ducting working together to circulate and filter air.

A cutaway view of the inline fan, illustrating its PWM-controlled EC motor, strong fan blades for airflow, and low-noise operation, housed in an ABS casing.

Diagram showing the dimensions and specifications of the 4-inch carbon filter, including its Australian charcoal grade and stainless steel material.
3.4 Accessory Placement
- Thermometer/Hygrometer: Place the sensor inside the tent at canopy level to monitor temperature and humidity.
- Timer: Connect the grow light and/or fan to the timer to automate on/off cycles.
- Planting Bags: Fill with growing medium and place plants inside the tent.
- Trellis Net: Install the trellis net if desired, to support plant growth and manage canopy.
4. Operating Instructions
4.1 SF1000 LED Grow Light Operation
The SF1000 LED grow light features a full spectrum output and a dimmable function.
- Power On/Off: Use the power switch on the light or the connected timer.
- Dimming: Adjust the dimmer knob to control light intensity.
- Recommended Light Schedule:
- Germination/Seedling: 18-24 hours light, 0-6 hours dark (low intensity).
- Vegetative Growth: 18 hours light, 6 hours dark (medium intensity).
- Flowering: 12 hours light, 12 hours dark (high intensity).
- Light Height: Adjust the light height based on plant stage and intensity. Refer to the PPFD map for optimal coverage at different heights.
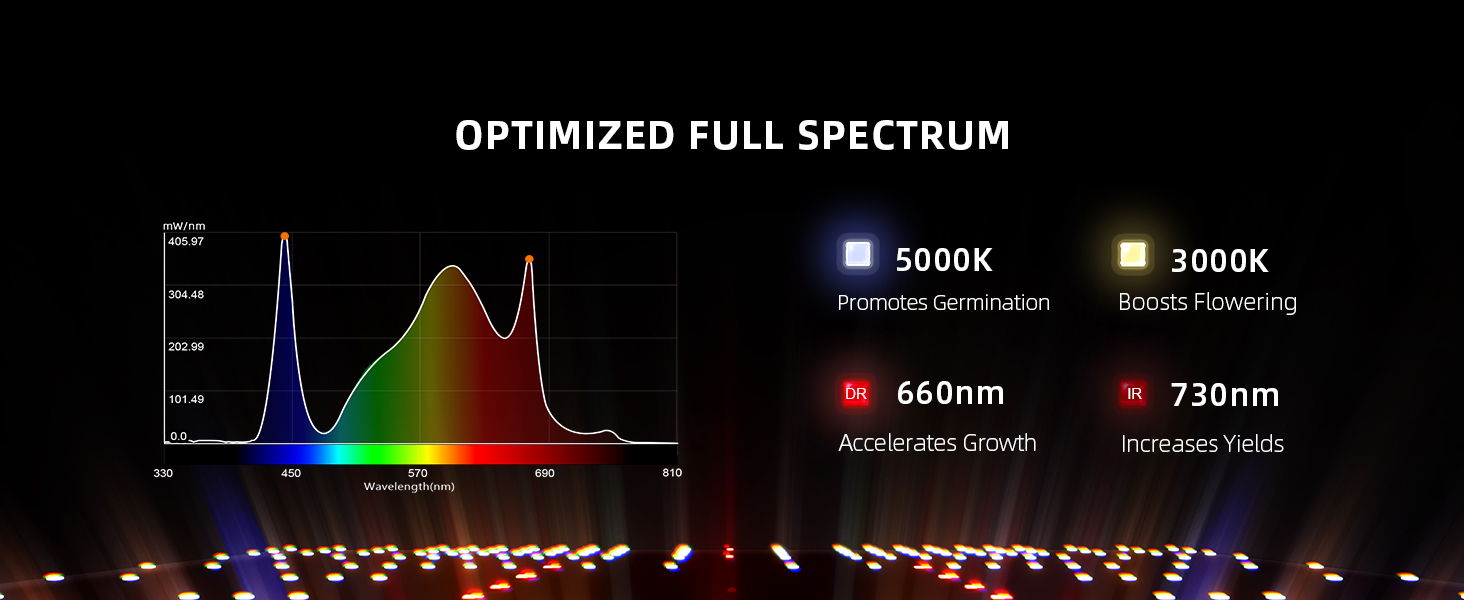
A graph illustrating the optimized full spectrum of the SF1000 LED grow light, showing peaks for 5000K (germination), 3000K (flowering), 660nm (growth), and 730nm (yields).

PPFD (Photosynthetic Photon Flux Density) maps for the SF1000 EVO grow light at different heights (30cm, 36cm, 46cm) in a 60x60cm grow tent, showing light intensity distribution.
4.2 Ventilation System Operation
The inline fan and carbon filter maintain optimal air quality and temperature within the tent.
- Controller Functions: The programmable controller allows setting target temperature and humidity levels.
- Fan Speed: Adjust the fan speed (10 levels) via the controller to achieve desired airflow.
- Auto Mode: Utilize the auto mode to automatically adjust fan speed based on temperature and humidity readings from the probe.
- Odor Control: The carbon filter effectively removes odors from the exhaust air.

A diagram of the programmable controller, showing its display for current mode, probe humidity, 10-level fan speed, setting value (temperature), switch mode button, probe temperature input, and fan to controller cord.
4.3 Clip Fan Operation
The clip fan provides air circulation within the tent, helping to strengthen plant stems and prevent hot spots.
- Mounting: Clip the fan to a tent pole at a height that provides gentle air movement over the plant canopy.
- Speed Adjustment: Adjust the fan speed as needed.
- Rotation: Utilize the 90°H and 90°V flexible rotation to direct airflow.

An infographic detailing the features of the SF-CLIPFAN6, including its 9W power draw, 10 speed settings, 0-2500 RPM powerful airflow, low noise level (35 dB), strong grip clip, flexible 90°H/V rotation, IP-44 protection, 67000H lifespan, and detachable front frame.
5. Maintenance
- Grow Tent Cleaning: Periodically wipe down the interior Mylar lining with a damp cloth to maintain reflectivity. Ensure the tent is dry before closing.
- Carbon Filter Replacement: The carbon filter has a limited lifespan. Replace it when odor control diminishes, typically every 6-12 months depending on usage.
- Fan Cleaning: Disconnect power before cleaning the inline fan. Use a soft brush or compressed air to remove dust and debris from the fan blades and housing.
- LED Grow Light: Keep the LED light clean from dust and debris. Use a soft, dry cloth. Do not use liquid cleaners directly on the diodes.
6. Troubleshooting
6.1 Grow Light Issues
- Light Not Turning On:
- Check power connections and ensure the light is securely plugged in.
- Verify the timer settings if one is in use.
- Inspect the power cord for any damage.
- Dimming Malfunction:
- Ensure the dimmer knob is functioning correctly.
- Contact support if the issue persists after checking connections.
6.2 Ventilation System Issues
- Fan Not Operating:
- Check power connections to the fan and controller.
- Verify controller settings, especially if in auto mode.
- Ensure the fan blades are not obstructed.
- Excessive Noise:
- Ensure the fan is securely mounted and not vibrating against the tent frame.
- Check for any loose components or debris inside the fan.
- If the noise is persistent and unusual, contact support.
- Poor Odor Control:
- Ensure all ducting connections are sealed tightly.
- Check if the carbon filter needs replacement.
6.3 Environmental Control Issues
- Inaccurate Temperature/Humidity Readings:
- Ensure the thermometer/hygrometer sensor is placed correctly and not directly exposed to light or airflow from the fan.
- Calibrate the device if possible, or replace batteries.
7. Product Specifications
| Feature | Specification |
|---|---|
| Brand | SPIDER FARMER |
| Model Number | SF1000KIT-DE-CP-FBM |
| Grow Tent Dimensions (L x W x H) | 70L x 70W x 160H cm (27" x 27" x 62") |
| Grow Tent Material (Exterior) | 1680D Fabric |
| Grow Tent Material (Interior) | Mylar (100% Reflective) |
| Frame Material | Aluminium |
| Max Weight Limit (Hanging) | 70 Kilograms (154 lbs) |
| SF1000 LED Grow Light Power | 100 Watts |
| LED Diodes | Samsung LM301H EVO |
| Inline Fan Duct Opening | 4 Inch / 100 mm |
| Inline Fan Max Airflow | 205 CFM |
| Carbon Filter Grade | Australian Charcoal 1200+ |
| Included Components | SF1000 Grow Light, 70x70x160cm Grow Tent, 4-inch Inline Fan, Carbon Filter, Aluminum Ducting, Duct Clamps, Fan Speed Controller, Thermometer/Hygrometer, Timer, 4x 5-gallon Planting Bags, Trellis Net, Hanging Hooks. |

EU Energy Label for Spider Farmer SF-1000, showing an energy efficiency class C and energy consumption of 100 kWh/1000h. A QR code is also visible for more information. View EU EPREL Product Information
8. Warranty & Support
The SF1000 LED grow light offers a 3-year after-sales service. For any questions or support needs, please contact Spider Farmer customer service via email. Spider Farmer is committed to providing excellent customer service before and after purchase.
For further assistance, please visit the official Spider Farmer website or contact their support team directly.


