
1. Important Safety Instructions
Read all instructions carefully before using the appliance. Keep this manual for future reference.
- Ensure proper ventilation in the kitchen area when the gas stove is in use.
- Do not store flammable materials near the appliance.
- Always use appropriate cookware for the burner size.
- Keep children away from the appliance during operation.
- In case of a gas leak, immediately turn off the gas supply, open windows, and do not operate any electrical switches. Contact a qualified technician.
- Ensure the gas connection is installed by a certified professional.
2. Product Overview
The Elica IND FLEXI FB 470 DX DFS is a 4-burner gas stove designed for efficient cooking. It features a toughened glass top, direct flame full brass burners, and automatic ignition.

Image 2.1: Top view of the Elica IND FLEXI FB 470 DX DFS 4 Burner Gas Stove, showcasing the black toughened glass surface, four brass burners, and metallic control knobs.
Components:
- Toughened Glass Top: Durable and easy-to-clean cooking surface.
- Direct Flame Full Brass Burners: Two triple-ring (2.9 kW) and two double-ring (1.7 kW) burners for varied cooking needs.
- Round Metallic Knobs: For precise flame control.
- Cast Iron Pan Supports: Provides stable support for cookware.
- Auto Electric Ignition: Battery-operated ignition system.
3. Setup and Installation
This appliance is a Flexi Hobtop, allowing for both built-in and free-standing installation.
3.1 Built-in Installation
- Ensure the countertop opening dimensions are 66 cm (Width) x 48 cm (Depth) x 5 cm (Height).
- Carefully place the hob into the cutout, ensuring it is level and securely seated.
3.2 Free-standing Installation
- Place the hob on a stable, flat, and heat-resistant surface.
- Ensure adequate clearance from walls and other appliances for ventilation.
3.3 Gas Connection
- A qualified gas technician must perform the gas connection to ensure safety and compliance with local regulations.
- Verify that the gas type matches the appliance's specifications.
3.4 Battery Installation for Auto Ignition
- Locate the battery compartment, typically underneath the hob.
- Insert the required battery (usually a D-cell) according to the polarity markings.
- Close the compartment securely.
4. Operation
4.1 Lighting a Burner
- Push down the desired burner knob and rotate it counter-clockwise to the 'Ignite' position.
- The automatic ignition system will generate sparks to light the gas.
- Once the flame is lit, hold the knob for a few seconds before releasing it to ensure the flame is stable.
- If the flame does not light, repeat the process.

Image 4.1: A close-up view of a gas stove burner with a stable blue flame, indicating proper operation.
4.2 Adjusting Flame
- After lighting, rotate the knob further counter-clockwise to increase the flame intensity.
- Rotate the knob clockwise to decrease the flame intensity.
- To turn off the burner, rotate the knob clockwise until it clicks into the 'Off' position.

Image 4.2: A metallic control knob with markings indicating flame adjustment and ignition positions.
4.3 Using Cookware
- Place cookware centrally on the cast iron pan supports.
- Ensure the flame does not extend beyond the base of the cookware to prevent energy waste and potential damage.

Image 4.3: A cooking pan placed on a lit burner of the Elica gas stove, demonstrating proper cookware placement.
5. Features
5.1 Direct Flame Burners
The direct flame burners utilize a vertical flame design, which optimizes the mixture of air and gas. This design contributes to higher efficiency and faster cooking.

Image 5.1: Illustration of the direct flame burner technology, showing vertical flame burning for efficient heat transfer.
5.2 Fully Sealed Burner Cups
The fully sealed burner cups with vertical injectors are designed to prevent spillage from entering the internal components. This feature helps maintain consistent flame quality and prevents injector blockage.

Image 5.2: Diagram illustrating the fully sealed burner cups, highlighting their role in preventing spillage and maintaining injector function.
5.3 Full Brass Heavy-Duty Burners
The burners are constructed from full brass, offering durability and high-efficiency flame levels suitable for various cooking methods.
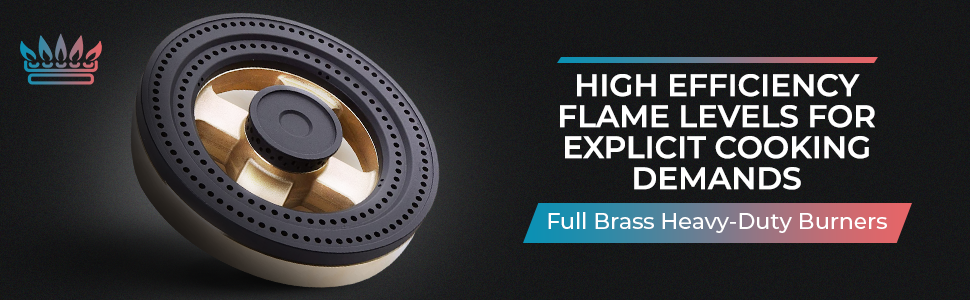
Image 5.3: Close-up view of a full brass heavy-duty burner, emphasizing its robust construction and design for efficient flame distribution.
5.4 360° Rotating Round Metallic Knobs
The metallic control knobs are designed for smooth 360-degree rotation, allowing for precise adjustment of flame intensity.

Image 5.4: Graphic illustrating the 360-degree rotation capability of the metallic control knobs for precise flame adjustment.
6. Cleaning and Maintenance
Regular cleaning and maintenance ensure the longevity and optimal performance of your gas stove.
6.1 Cleaning the Glass Surface
- Allow the glass top to cool completely before cleaning.
- Use a soft cloth or sponge with mild detergent and warm water.
- For stubborn stains, use a non-abrasive glass cleaner.
- Wipe dry with a clean, soft cloth to prevent streaks.
6.2 Cleaning Burner Components
- Ensure all burners are cool and the gas supply is turned off.
- Remove the pan supports, burner caps, and burner rings.
- Wash these components with warm soapy water. For brass parts, avoid harsh chemicals that may cause discoloration.
- Clean the burner cups and injectors carefully to prevent blockages. A soft brush can be used for this.
- Ensure all parts are completely dry before reassembling them.

Image 6.1: Disassembled burner components, including the brass burner ring and cap, ready for cleaning.

Image 6.2: A close-up of a burner cup with its vertical injector, illustrating the area to be cleaned to prevent spillage and blockage.
6.3 Pan Supports
- Clean cast iron pan supports with warm soapy water.
- Dry thoroughly to prevent rust.
7. Troubleshooting
If you encounter issues with your gas stove, refer to the following common problems and solutions before contacting customer service.
| Problem | Possible Cause | Solution |
|---|---|---|
| Burner does not ignite | No gas supply, faulty ignition battery, clogged burner port, faulty spark plug/wire. | Check gas supply. Replace ignition battery. Clean burner ports. Contact service for spark plug/wire issues. |
| Weak or yellow flame | Clogged burner ports, incorrect air-gas mixture, low gas pressure. | Clean burner ports. Ensure burner components are correctly assembled. Contact gas provider for pressure issues or service for air-gas mixture adjustment. |
| Gas smell | Gas leak. | Immediately turn off gas supply, open windows, do not operate electrical switches. Contact a qualified technician or emergency services. |
For issues not listed above or if solutions do not resolve the problem, please contact customer support.
8. Specifications
| Feature | Detail |
|---|---|
| Brand | Elica |
| Model Number | IND FLEXI FB 470 DX DFS |
| Number of Burners | 4 (2 Triple Ring - 2.9 kW, 2 Double Ring - 1.7 kW) |
| Total Burner Power | 9.2 kW |
| Color | Black |
| Power Source | Gas Powered |
| Fuel Type | Unspecified Gas |
| Special Features | Automatic Ignition, Sealed Burner |
| Ignition System Type | Battery Operated |
| Control Type | Knob |
| Installation Type | Flexi Hobtop (Built-In / Free Standing) |
| Product Dimensions (W x D x H) | 70 cm x 52 cm x 10.6 cm |
| Carcass Cutting (W x D x H) | 66 cm x 48 cm x 5 cm |
| Item Weight | 17 Kilograms |
| Heater Surface Material | Tempered Glass |
| Burner Material | Brass |
| Included Components | 1 Unit Hob, User Manual, Warranty Card |
| Specifications Met | BIS |
9. Warranty and Support
9.1 Warranty Information
- 5 Years Warranty: On Glass, Burner, and Valves from the date of purchase.
- 2 Years Comprehensive Warranty: From the date of purchase.
Please retain your purchase receipt for warranty claims.
9.2 Customer Support
For any queries, service requests, or technical assistance, please contact Elica customer care:
- Customer Care Number: 7447440983 / 7447440984 / 7447440985
- Manufacturer: WHIRLPOOL OF INDIA KITCHEN APPLIANCES PRIVATE LIMITED
- Address: 32/5 A1 Kondhwa-Pisoli Road, Pisoli, Pune 411060 Maharashtra India


