
1. Introduction
Thank you for choosing the Limino Silicone Mold Making Kit. This kit provides all necessary components for creating flexible, durable silicone molds for various crafting projects such as resin, wax, candle, and soap casting. This manual will guide you through the proper setup, operation, and maintenance of your kit to ensure optimal results and safety.
The Limino Silicone Mold Making Kit is designed for ease of use, featuring a simple 1:1 mixing ratio and self-degassing properties, making it suitable for both beginners and experienced crafters.
2. Safety Information
Please read and understand all safety precautions before using the Limino Silicone Mold Making Kit. Failure to follow these instructions may result in injury or damage to the product.
- Not for Food Use: This silicone rubber is not intended for making food-grade molds. Do not use for food, beverage, or culinary applications.
- Keep Away from Children: Store all components of the kit out of reach of children and pets.
- Ventilation: Use in a well-ventilated area.
- Skin and Eye Contact: Avoid direct contact with skin and eyes. Wear the provided gloves and eye protection during handling and mixing. In case of contact, wash thoroughly with soap and water. If irritation persists, seek medical attention.
- Spill Cleanup: In case of spills, clean immediately with soapy water or rubbing alcohol.
- Temperature: Ensure the silicone components are at room temperature (approximately 70-75°F / 21-24°C) before use. If the silicone has been stored in cold conditions and appears frozen or very thick, allow it to warm up to room temperature for at least 24 hours prior to use.
- Prevent Fusion: Do not mix the silicone in silicone cups or mold directly onto silicone projects, as this can cause fusion and permanent bonding. Use plastic, glass, or metal containers for mixing.

Image: Limino Silicone Rubber Part A and Part B bottles, highlighting non-toxic and BPA-free properties.
3. Kit Contents
Your Limino Silicone Mold Making Kit includes the following items:
- 1 x Part A Liquid Silicone Rubber (1kg / 32 fl. oz.)
- 1 x Part B Liquid Silicone Rubber (1kg / 32 fl. oz.)
- 8 x 10ml Silicone Pigment (various colors)
- 100 x Demolding Bricks (reusable)
- 2 x Measuring Cups
- 10 x Gloves (5 pairs)
- 4 x Stir Sticks
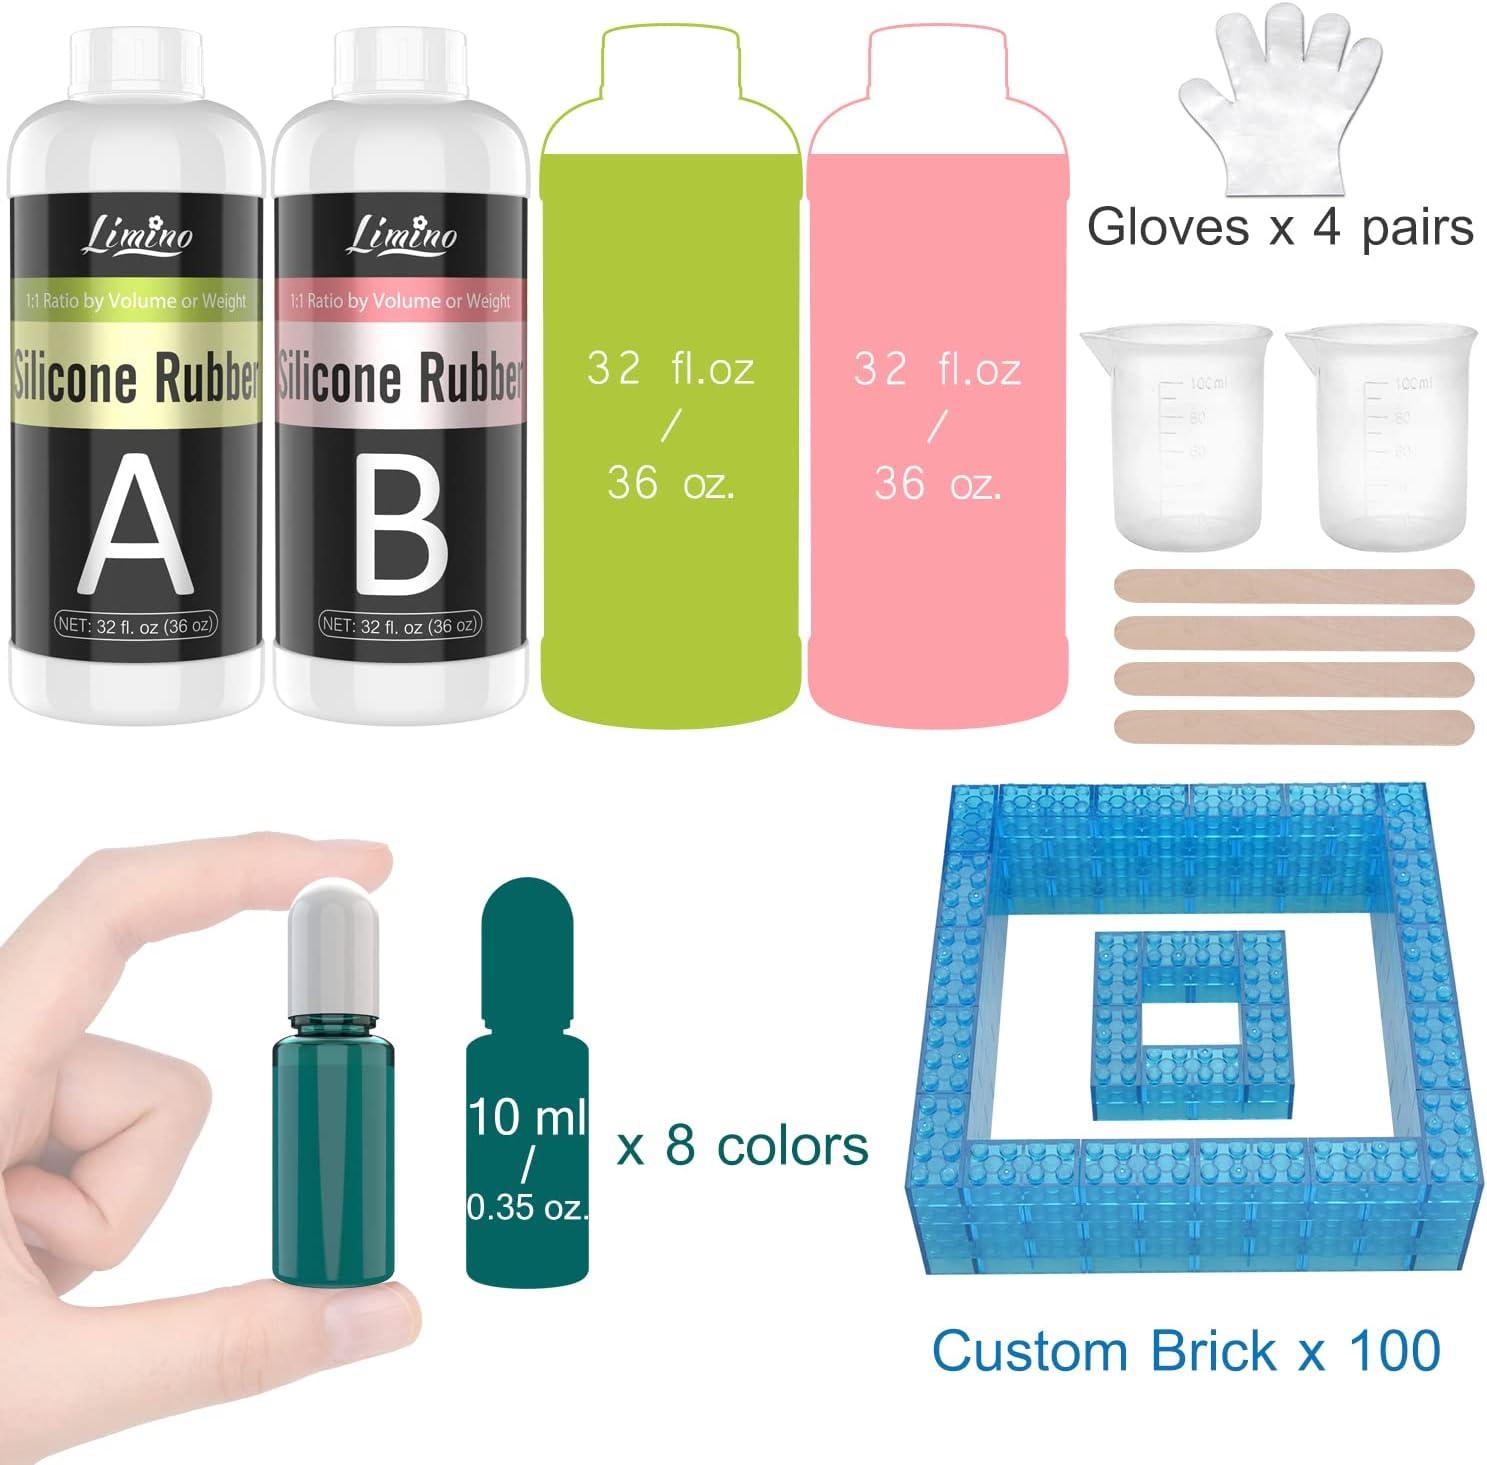
Image: All components included in the Limino Silicone Mold Making Kit.
4. Setup and Preparation
- Prepare Your Workspace: Choose a clean, level, and well-ventilated area. Cover your work surface with a protective sheet or newspaper to prevent spills.
- Gather Materials: Ensure you have your original object for molding, the Limino Silicone Mold Making Kit components, and any additional tools like a mixing container (non-silicone), a scale (for precise weight mixing), and a timer.
- Object Preparation: Clean your original object thoroughly to remove any dust, oils, or debris. If your object is porous or has intricate details, consider applying a mold release agent to ensure easy demolding later.
- Build a Mold Box: Use the provided demolding bricks to construct a container around your original object. The container should be slightly larger than your object, allowing for at least 0.5 inches (1.27 cm) of silicone on all sides and above the highest point of the object. Secure the bricks firmly and use tape to seal any gaps at the bottom or sides to prevent silicone leakage.
- Wear Protective Gear: Put on the provided gloves and any additional eye protection you deem necessary.
5. Operating Instructions
5.1. Mixing the Silicone Rubber
- Measure Part A: Pour the desired amount of Part A liquid silicone rubber into one of the measuring cups. Remember the 1:1 mixing ratio.
- Measure Part B: Pour an equal amount of Part B liquid silicone rubber into the same measuring cup as Part A. The ratio is 1:1 by volume or weight. Accurate measurement is crucial for proper curing.
- Add Pigment (Optional): If you wish to color your mold, add a few drops of the silicone pigment to the mixture. Start with a small amount and add more gradually until the desired color intensity is achieved.
- Mix Thoroughly: Using a stir stick, mix Part A and Part B thoroughly for 3-5 minutes. Scrape the sides and bottom of the mixing cup frequently to ensure all material is fully incorporated. Continue mixing until the color is uniform and no streaks are visible. Incomplete mixing will result in uncured or tacky spots.

Image: Translucent liquid silicone rubber being poured, illustrating its low viscosity and clarity.
5.2. Pouring the Silicone
- Pour Slowly: Slowly pour the mixed silicone rubber into your prepared mold box, starting from one corner and allowing it to flow over your original object. Pouring from a height of about 12-18 inches (30-45 cm) in a thin stream can help release trapped air bubbles.
- Cover Object: Ensure the silicone completely covers your original object within the mold box, maintaining at least 0.5 inches (1.27 cm) of silicone above the highest point.
- Bubble Release: The Limino silicone is self-degassing, meaning most bubbles will rise and pop on their own. For intricate molds, gently tap the sides of the mold box or use a vibratory table to encourage bubble release.
5.3. Curing and Demolding
- Curing Time: Allow the silicone to cure at room temperature for a minimum of 6-12 hours. The curing time can vary based on ambient temperature and humidity. Do not disturb the mold during this period.
- Check for Cure: Before demolding, gently touch the surface of the silicone. It should feel firm, non-tacky, and elastic. If it feels sticky or soft, allow more time for curing.
- Demolding: Once fully cured, carefully remove the demolding bricks. Gently peel the silicone mold away from your original object. The flexibility of the silicone allows for easy demolding without damaging the original.

Image: Examples of resin castings made using silicone molds.

Image: Examples of soap castings made using silicone molds.

Image: Examples of multi-purpose molds for various crafts, including candles and decorative items.
6. Maintenance and Storage
- Cleaning Molds: After use, clean your silicone molds with mild soap and water. Allow them to air dry completely before storage.
- Storage of Silicone Rubber: Store unused Part A and Part B in their original, tightly sealed containers in a cool, dry place away from direct sunlight. Ensure the caps are securely fastened to prevent air exposure, which can affect shelf life.
- Storage Temperature: Optimal storage temperature is room temperature. Avoid extreme cold or heat. If the silicone freezes, allow it to return to room temperature before use.
- Demolding Bricks: Clean the demolding bricks with water and store them for future use.
7. Troubleshooting
| Problem | Possible Cause | Solution |
|---|---|---|
| Silicone remains tacky or uncured after 12 hours. |
|
|
| Mold has visible air bubbles. |
|
|
| Silicone leaks from the mold box. |
|
|
8. Specifications
| Brand | Limino |
| Model Number | L57a |
| Material | Platinum-cured Silicone Rubber |
| Color | Translucent (with included pigments for coloring) |
| Mixing Ratio | 1:1 by Volume or Weight |
| Hardness | 15A (Shore A) |
| Curing Time | 6-12 hours at room temperature (approx. 70-75°F / 21-24°C) |
| Total Weight | 4.5 pounds (2kg silicone rubber) |
| Product Dimensions | 7.87 x 7.87 x 3.94 inches (packaging) |
9. Warranty and Support
For any questions, concerns, or support regarding your Limino Silicone Mold Making Kit, please refer to the retailer's return policy or contact Limino customer service through the official Limino store page on the platform where the product was purchased. Please have your purchase details and model number (L57a) available when contacting support.