
1. Introduction
The HappyModel ES24TX Pro Micro ExpressLRS TX module is an upgraded version of the ES24TX module, designed for FPV drones. It features a maximum output of 1000mW, a dedicated cooling fan, and an RGB LED module. This Micro TX module is compatible with most OpenTX radio transmitters that include a Micro JR bay. The ES24TX Pro module comes fully assembled from the factory. The accompanying EP1 RX is a Nano 2.4GHz receiver based on ESP8285 MCU, offering low-latency and high-refresh-rate RF performance, suitable for FPV racing and long-range applications, especially for tiny whoops due to its ultra-light and nano size.
2. Package Contents
- ES24TX Pro Module x1
- HappyModel 2.4GHz Moxon Antenna x1
- EP1_RX Receiver x1
- 40MM Antenna x1
- 90MM Antenna x1

3. Specifications
ES24TX Pro Micro ExpressLRS TX Module:
- Regulatory Domain: ISM2400
- MCU: ESP32 (main), ESP8285 (aux, as espbackpack)
- RF Chip: SX1281IMLTRT
- Socket: JR standard 5pin
- Frequency Range: 2400 MHz to 2500 MHz
- Max Output Power: >30dBm (up to 1000mW)
- Power Supply Voltage: 5V~10V
- Weight: 51g (without antenna)
- Dimensions: 70mm x 49mm x 32.5mm
- Antenna Gain: 4.18dBi
- Firmware Target: HappyModel_ES24TX_Pro_Series_2400_TX
EP1_RX ELRS Nano Long Range Receiver:
- Type: ISM
- MCU: ESP8285
- RF Module: SX1280IMLTRT
- Antenna: Omnidirectional
- Frequency Range: 2400 MHz to 2500 MHz
- Maximum Receive Refresh Rate: 500Hz
- Minimum Receiver Refresh Rate: 25Hz
- Working Voltage: 5V
- Weight: 0.42g (without antenna)
- Dimensions: 10mm x 10mm x 6mm
- Peak Gain: 2.23dB
4. Setup and Installation
4.1. EP1 RX Receiver Wiring
The EP1 RX receiver requires soldering to connect to your flight controller. Ensure correct polarity and signal connections (GND, +5V, TX, RX).

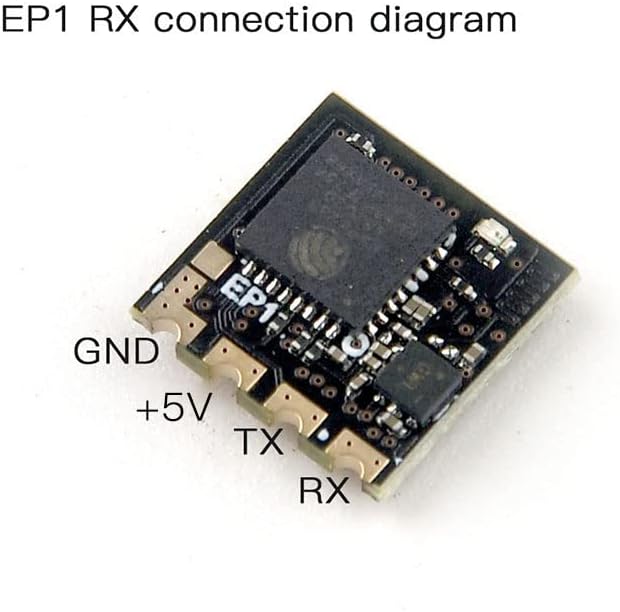
Connect the EP1 RX to your flight controller (e.g., Radiolink F722) and then connect the flight controller to your computer via a USB-C cable. Refer to your flight controller's manual for specific pinouts. For example, connect the receiver's GND to FC's GND, +5V to FC's 4V5, TX to FC's R2, and RX to FC's T2.

4.2. ES24TX Pro Module Installation
The ES24TX Pro module is designed to fit into a Micro JR bay on compatible OpenTX radio transmitters. Simply slide the module into the JR bay until it clicks into place. Ensure the antenna is securely attached.


5. Operating Instructions
5.1. Binding Procedure (Example with Radiolink T16D)
To establish communication between the ES24TX Pro module and the EP1 RX receiver, a binding procedure is required. This example uses a Radiolink T16D transmitter with an ExpressLRS module.
- Connect Receiver: Connect the EP1 RX receiver to your flight controller (e.g., Radiolink F722) and then connect the flight controller to your computer via a USB-C cable. The receiver's LED will flash slowly, indicating it is not yet bound.
- Power On Transmitter: Power on your Radiolink T16D transmitter with the ES24TX Pro module installed.
- Access RF Settings: Navigate to the main menu on your transmitter, then select "Receiver Setting" and then "RF Setting."
- Select External Module & Protocol: In the RF Setting menu, select "External Module" and set the protocol to "ELRS." Ensure the baud rate is set to "400K."
- Enter Binding Mode (Receiver): To put the receiver into binding mode, repeatedly power cycle the receiver three times. This is done by unplugging and replugging the USB-C cable from the flight controller three times in quick succession. The receiver's LED will then flash quickly, indicating it is in binding status.
- Initiate Binding (Transmitter): On your transmitter, navigate to the "Bind" option within the RF Setting menu and select it.
- Verify Binding: Once binding is successful, the short line in the upper right corner of the transmitter's display will change, and the LED on the EP1 RX receiver will turn solid blue. This indicates a successful bind.
Note: After successful binding, the connection will be recorded, and you will not need to re-bind every time the receiver is powered on. If binding fails, the receiver's LED will continue to flash slowly. Repeat the binding steps if necessary.
6. Maintenance
- Firmware Updates: The EP1/EP2 receivers use an ESP8285 MCU, allowing for firmware upgrades via Wi-Fi. Regularly check for and install the latest firmware from HappyModel or ExpressLRS official sources to ensure optimal performance and access to new features.
- Cooling Fan: The ES24TX Pro module includes a cooling fan. Ensure the fan is free from obstructions and clean it periodically to maintain efficient heat dissipation, especially during high-power operation.
- Antenna Care: Handle antennas with care. Ensure they are securely connected and not bent or damaged, as this can affect signal range and reliability.
- Storage: Store the module and receiver in a dry, cool environment away from direct sunlight and extreme temperatures.
7. Troubleshooting
- Receiver LED Flashing Slowly: This indicates the receiver is not bound to the transmitter or has lost connection. Re-perform the binding procedure as described in Section 5.1.
- No Signal/Intermittent Signal:
- Check antenna connections on both the TX module and RX receiver.
- Ensure the TX module is correctly installed in the JR bay.
- Verify the transmitter's RF settings (External Module, ELRS protocol, 400K baud rate).
- Check for potential interference sources in your operating environment.
- Ensure the receiver is receiving adequate power (5V).
- Module Overheating: Ensure the cooling fan on the ES24TX Pro module is functioning correctly and is not obstructed. Reduce output power if overheating persists in extreme conditions.
- Firmware Update Issues: If experiencing issues during Wi-Fi firmware updates, ensure a stable Wi-Fi connection and follow the official HappyModel/ExpressLRS update guides precisely.
8. Support
For further assistance, technical support, or to access the latest firmware and documentation, please visit the official HappyModel or ExpressLRS websites. You may also refer to the LIBOQIAO Store on Amazon for product-related inquiries.
9. Warranty Information
This product is covered by a standard manufacturer's warranty. Please retain your proof of purchase for any warranty claims. For detailed warranty terms and conditions, refer to the documentation provided with your product or contact the manufacturer directly.
Optional protection plans are available for purchase:
- 2-Year Protection Plan: $6.99 (one-time)
- 3-Year Protection Plan: $8.99 (one-time)
- Complete Protect: $16.99 (monthly, covers all eligible past and future purchases)