
Introduction
This manual provides detailed instructions for the installation, operation, and maintenance of your ECO-WORTHY 260W Flexible Solar Panel Kit for Golf Carts. This kit is designed to extend your golf cart's range and battery life by utilizing solar power, offering up to 10400Wh daily from 4 hours of sunlight. It includes two 130W flexible solar panels and an MPPT boost charge controller compatible with 24V, 36V, 48V, 60V, and 72V golf cart batteries.
The kit prevents low-power slowdowns and unexpected shutdowns, contributing to longer battery life. The MPPT boost controller ensures efficient charging with up to 95% efficiency and includes built-in protections for safe operation.
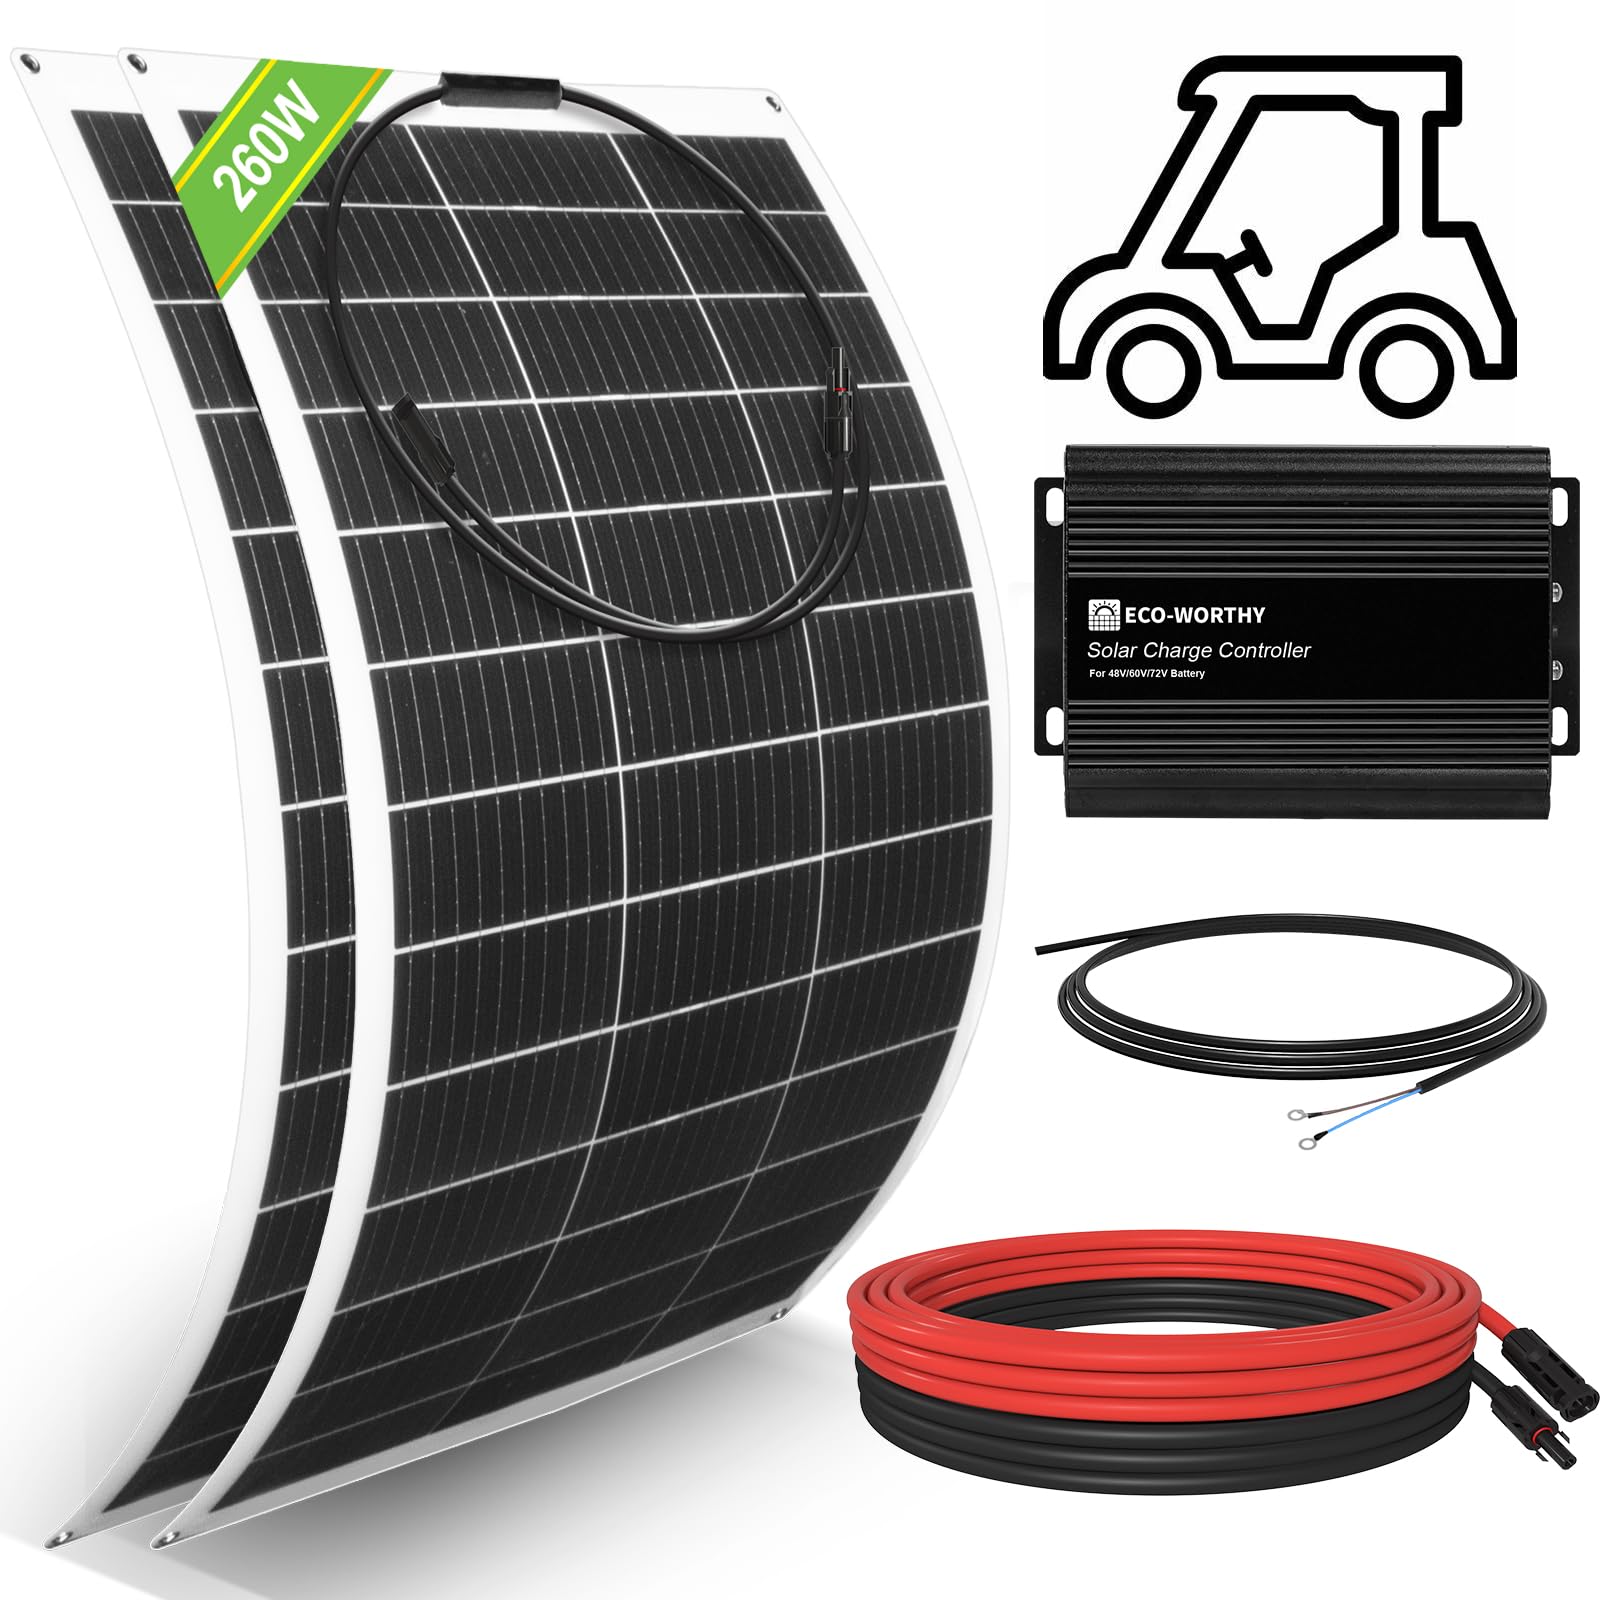
Image: The ECO-WORTHY 260W Flexible Solar Panel Kit components.
Setup and Installation
The ECO-WORTHY 260W Flexible Solar Panel Kit is delivered in two separate packages. Please ensure all packages have arrived before beginning assembly.
Package Contents:
- Package 1: Two (2) 130W flexible solar panels.
- Package 2: Accessory kit including one (1) 12A solar boost controller, one (1) 16ft Extension Cable, and one (1) Tray cable.
Installation Steps:
- Mounting the Solar Panels: The flexible solar panels are 70% lighter than traditional glass panels and feature a bendable design suitable for various golf cart roof surfaces. They have 6 metal mounting holes for secure attachment. Ensure the panels are positioned to receive maximum sunlight.
- Connecting the Controller to the Battery: Connect the boost charge controller directly to your golf cart's battery bank using the provided tray cable. Ensure correct polarity (positive to positive, negative to negative).
- Setting up the Controller: Use the voltage switch on the controller to select the appropriate voltage for your golf cart's battery bank (48V, 60V, or 72V). For 24V/36V/48V battery options, flip the voltage switch to 48V.
- Connecting the Solar Panels to the Controller: Connect the solar panels to the boost charge controller using the extension cable. The controller will boost the voltage from the 12V or 24V solar panels to charge your higher voltage golf cart batteries.

Image: Flexible solar panel dimensions (37.8"L x 27.1"W x 0.1"H) and mounting points.

Image: Illustration of the flexible solar panel's bendability. Note: Bend the entire panel, not just a single corner.
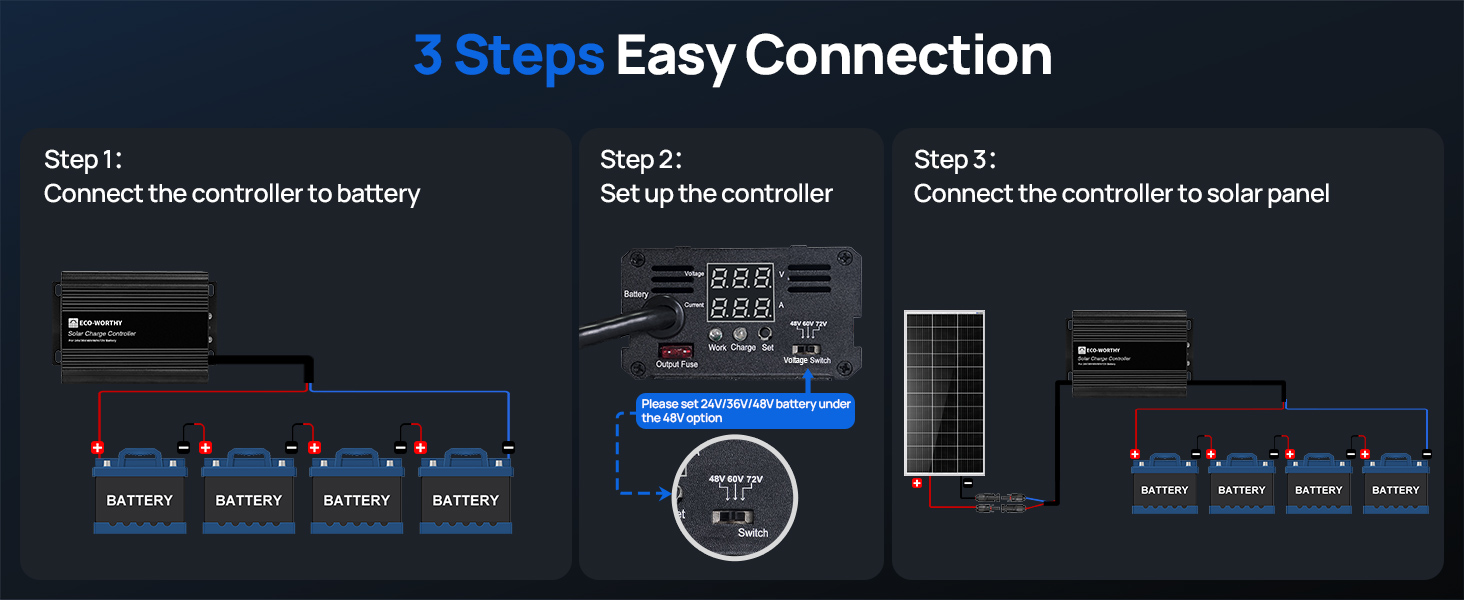
Image: A visual guide to the 3-step connection process: controller to battery, controller setup, and solar panel to controller.

Image: Detailed wiring diagram showing the connection of two 24V solar panels to the 12A MPPT boost controller and then to a 48V, 60V, or 72V battery bank.
Operating Instructions
MPPT Boost Charge Controller:
The 12A MPPT boost charge controller is designed to optimize power transfer from your solar panels to your golf cart batteries. It is compatible with Lead-acid, Lithium, GEL, and Flooded battery types.
LED Display and Monitoring:
The controller features an LED display for easy monitoring of your battery status. It shows charging voltage and current. The display cycles between main and secondary information after 3 seconds of inactivity.
- Main Display: Shows Battery Voltage and PV Input Current.
- Secondary Display: Shows PV Input Current and Controller Temperature (°C).

Image: Close-up of the controller's LED display, showing how it cycles between battery voltage/PV input current and controller temperature.
LED Indicators:
- Work Indicator (Red): Indicates the PV input states.
- Charge Indicator (Green): Indicates the battery states.

Image: Table explaining the meaning of the red (Work) and green (Charge) LED indicators based on PV input voltage and battery connection status.
Setting Charging Voltage for LiFePO4 Battery:
If you are using a LiFePO4 battery, you can adjust the charging voltage:
- Long press the "SET" button for 5 seconds to enter the battery voltage setting mode.
- Short press the "SET" button to add 0.1V each time. Long press "SET" button to add 1.0V each time.
- After 5 seconds of setup, the number will be auto-saved.

Image: Table showing default and best charging voltages for various battery voltages (24V, 36V, 48V, 60V, 72V) when using LiFePO4 batteries.
Charging While Driving:
The system is designed to charge your golf cart batteries continuously while driving, extending your range and reducing the need for frequent plug-in charging.

Image: A golf cart with solar panels on its roof, illustrating the 'charging while driving' feature.

Image: A graphic comparing the extended mileage of a golf cart equipped with the solar kit versus one without.
Maintenance
Regular maintenance ensures optimal performance and longevity of your solar panel kit.
- Panel Cleaning: Keep the surface of the solar panels clean from dust, dirt, leaves, and other debris. Use a soft cloth and mild soapy water to gently clean the panels. Avoid abrasive materials or harsh chemicals that could scratch the surface.
- Cable and Connection Inspection: Periodically check all cables and connections for any signs of wear, damage, or loose connections. Ensure MC4 connectors are securely fastened.
- Controller Inspection: Ensure the charge controller is free from dust and moisture. Check the LED display for normal operation and any error indicators. The controller has a cooling fan that automatically turns on at 131°F (55°C) for heat dissipation.
- Battery Health: Monitor your golf cart batteries regularly. While the solar kit helps extend battery life, proper battery maintenance (e.g., checking water levels for flooded batteries) is still recommended.
Troubleshooting
If you encounter issues with your ECO-WORTHY solar panel kit, refer to the following common troubleshooting steps:
- No Power Output from Panels:
- Ensure panels are exposed to direct sunlight.
- Check for any shading on the panels.
- Verify all panel connections (MC4 connectors) are secure and correctly polarized.
- Inspect cables for damage.
- Controller Not Charging Battery:
- Check the battery connections to the controller for correct polarity and secure attachment.
- Verify the solar panel input to the controller is active (check the red 'Work' indicator).
- Ensure the correct battery voltage is selected on the controller's switch.
- Check the controller's LED display for any error codes or unusual readings.
- Low Charging Efficiency:
- Clean solar panels to remove any dirt or debris.
- Ensure panels are angled optimally towards the sun.
- Verify that the controller is not overheating (the cooling fan should activate if needed).
- Controller Display Not Working:
- Check power input from both the solar panels and the battery to the controller.
- Ensure the output fuse on the controller is intact.
The controller includes built-in protections against overcharge, reverse current, overheating, and miswiring. If issues persist after basic troubleshooting, please contact customer support.

Image: Features of the ECO-WORTHY solar charge controller, highlighting its intelligent temperature control, multiple protection mechanisms (overcharge, reverse current, overheating, miswiring), and independent power source from the solar panel.
Specifications
130W Flexible Solar Panel (x2):
| Feature | Specification |
|---|---|
| Maximum Power at STC | 130W |
| Optimum Operating Voltage (Vmp) | 21.10V |
| Optimum Operating Current (Imp) | 6.16A |
| Open Circuit Voltage (Voc) | 24.50V |
| Short Circuit Current (Isc) | 6.50A |
| Operating Temperature | -40 °F ~ +185 °F (-40 °C ~ +85 °C) |
| Cable Length | 12AWG (2.9ft long) |
| Dimensions (L x W x H) | 37.8" x 27.1" x 0.1" |
| Weight | 12.57 lbs (5.7 kg) per panel |
| Fire Class | Class C |
| Material | Fiberglass |
| Efficiency | 23.5% (Photoelectric conversion) |

Image: Detailed specifications for the 130W flexible solar panel.
12A MPPT Boost Charge Controller:
| Feature | Specification |
|---|---|
| Display | LED digital |
| PV Input Voltage | DC 13-50V |
| PV Input Power | 450W |
| Working Current | 12A |
| Charge Efficiency | >93% |
| Output Voltage | 24V/36V/48V/60V/72V |
| Battery Type Compatibility | Lead-acid, Lithium, GEL, Flooded |
| Working Temperature | -4°F ~ 140°F (-20°C ~ 60°C) |
| Heat Dissipation | Cooling fan (Auto-turn-on at 131°F / 55°C) |
| Dimensions (L x W x H) | 5.2" x 3.4" x 2.0" (133 x 87 x 52 mm) |
| Weight | 0.93 lbs (420g) |

Image: Detailed specifications for the 12A MPPT boost charge controller.
Warranty and Support
Your ECO-WORTHY 260W Flexible Solar Panel Kit is backed by 3-year technical support. For any questions, concerns, or technical assistance, please contact ECO-WORTHY customer service.
Product Videos
ECO-WORTHY Solar Panel Overview
Video: An official overview of the ECO-WORTHY Solar Panel, demonstrating its features and applications.