1. Product Overview
The ezcap234 TapeDigi 1 is a multi-functional device designed to bring your analog audio into the digital age. It combines a cassette player, AM/FM radio, and a digital audio recorder/converter into one portable unit. You can enjoy your old cassette tapes, tune into your favorite radio stations, and even record audio directly to a Micro SD card.
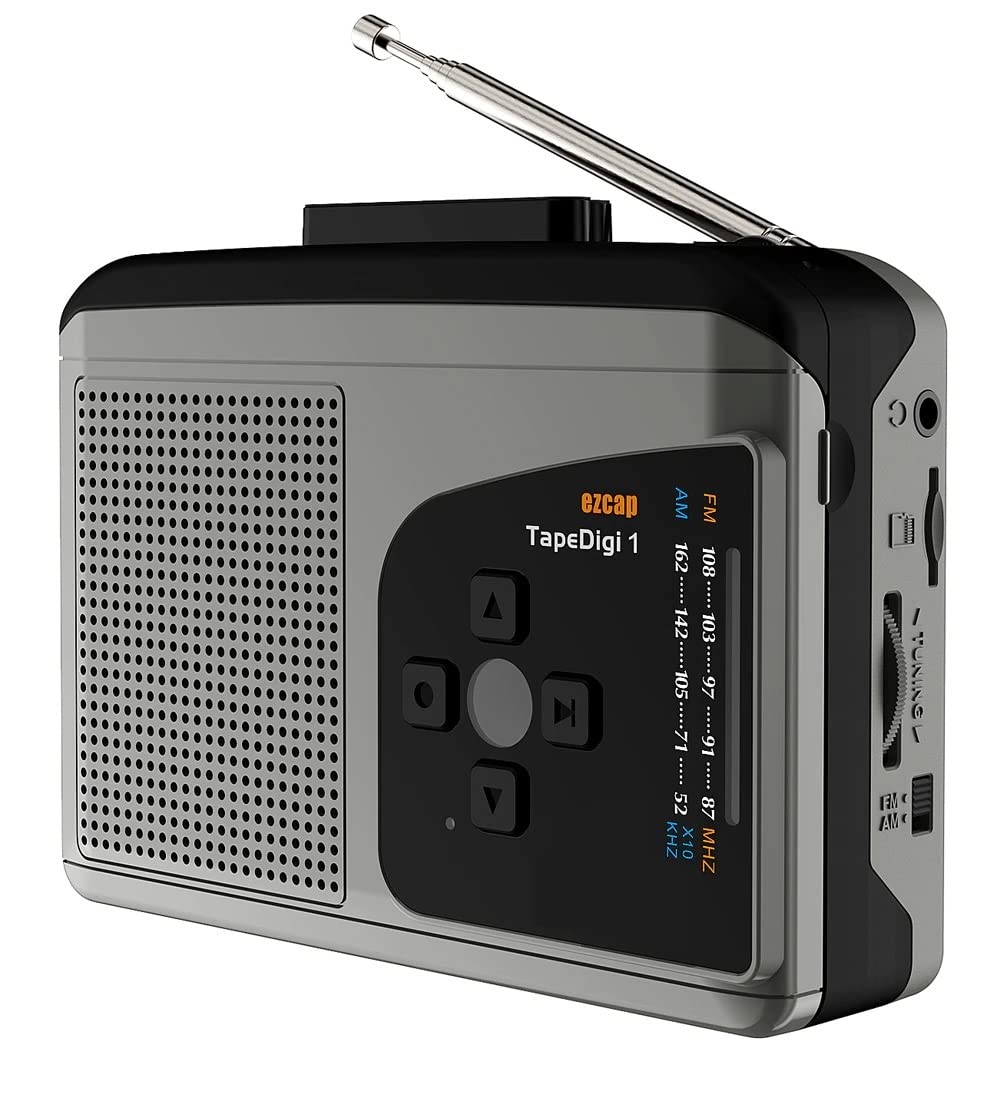
Image: Front view of the ezcap234 TapeDigi 1, showcasing its speaker grille, control buttons, and extended antenna.
2. Key Features
- Cassette Player: Playback your classic cassette tape collection.
- AM/FM Radio: Tune into local radio stations with clear reception.
- MP3 Conversion: Convert cassette tapes and radio broadcasts directly to MP3 files on a Micro SD card (up to 32GB).
- Voice Recorder: Built-in microphone allows for direct voice recording to Micro SD card.
- Integrated Speaker: Enjoy audio playback directly from the device.
- Earphone Jack: For private listening.
- Dual Power Options: Operates via USB power or 2x AA batteries (not included).

Image: Visual representation of the device's core functionalities, including tape playback, radio, recording, and audio output options.
3. Component Identification
Familiarize yourself with the various parts of your ezcap234 TapeDigi 1:

Image: Detailed diagram labeling the antenna, volume adjustment, earphone jack, Micro SD card slot, radio tuning knob, FM/AM switch, Tape/Radio switch, Record/Stop recording button, Indicator LED, UP/DOWN/Play/Stop playing buttons, Speaker, Tape fast forward/rewind, Stop playing tape, Play tape, Microphone inside, and 5V DC jack.
- Antenna: Extendable for FM/AM radio reception.
- Volume Adjustment: Rotary knob to control audio output level.
- Earphone Jack: 3.5mm port for connecting headphones.
- Micro SD Card Slot: Insert Micro SD card for recording and playback.
- Radio Tuning Knob: Adjusts radio frequency.
- FM/AM Switch: Selects between FM and AM radio bands.
- Tape/Radio Switch: Toggles between cassette player and radio modes.
- Record/Stop Recording Button: Initiates and ends audio recording.
- Indicator LED: Shows device status (e.g., recording, power).
- Control Buttons (UP/DOWN/Play/Stop): For navigation and playback control.
- Speaker: Built-in speaker for audio output.
- Tape Controls (Fast Forward/Rewind/Stop/Play): Standard cassette player controls.
- Microphone: Internal microphone for voice recording.
- 5V DC Jack: Power input port.
4. Powering the Device
The ezcap234 TapeDigi 1 can be powered in two ways:
- USB Power: Connect a 5V DC power adapter (not included) to the 5V DC jack using a USB cable.
- AA Batteries: Insert 2x AA batteries (not included) into the battery compartment located on the back of the device. Ensure correct polarity.

Image: The device demonstrating its power options, showing both USB cable connection and the open battery compartment for AA batteries.
5. Cassette Playback
To play a cassette tape:
- Open the cassette compartment.
- Insert a cassette tape, ensuring it is properly seated.
- Close the cassette compartment.
- Slide the Tape/Radio Switch to the 'Tape' position.
- Press the Play button on the cassette controls.
- Adjust the Volume Adjustment knob to your desired listening level.
- Use the Fast Forward and Rewind buttons to navigate the tape.
- Press the Stop button to stop playback.

Image: The ezcap234 TapeDigi 1 positioned on a wooden surface, surrounded by various cassette tapes, illustrating its primary function as a cassette player.
6. AM/FM Radio Operation
To listen to the radio:
- Slide the Tape/Radio Switch to the 'Radio' position.
- Extend the Antenna for optimal reception.
- Slide the FM/AM Switch to select your desired band (FM: 87-108MHz, AM: 520-1610 KHz).
- Rotate the Radio Tuning Knob to find a station.
- Adjust the Volume Adjustment knob to your preferred listening level.

Image: The device with its telescopic antenna fully extended, highlighting its capability as a portable FM/AM radio receiver.

Image: A conceptual image showing the device broadcasting radio waves, with text bubbles indicating various types of content such as music, news, and talk shows, emphasizing its AM/FM radio function.
7. Recording Audio
The device supports recording from cassette tapes, AM/FM radio, and the built-in microphone directly to a Micro SD card.
7.1. Preparing for Recording
- Ensure a Micro SD card (up to 32GB, formatted to FAT32) is inserted into the Micro SD Card Slot.
- Select the desired audio source (Tape or Radio) using the Tape/Radio Switch, or prepare to use the built-in microphone.

Image: A close-up view of the side of the device, clearly showing the Micro SD card slot, indicating where to insert the storage for recordings.
7.2. Recording from Tape or Radio
- Start playback of the cassette tape or tune to the desired radio station.
- Press the Record/Stop Recording Button. The Indicator LED will illuminate, indicating recording is in progress.
- Press the Record/Stop Recording Button again to stop recording. The LED will turn off.
7.3. Recording Voice (Built-in Microphone)
- Ensure the device is in 'Radio' mode (even if not listening to radio) or 'Tape' mode without a tape playing.
- Press the Record/Stop Recording Button. The Indicator LED will illuminate.
- Speak clearly towards the built-in Microphone.
- Press the Record/Stop Recording Button again to stop recording.

Image: The device next to a microphone icon and text, illustrating its capability to record voice using its built-in microphone and save to a Micro SD card.

Image: A person speaking near the device, with visual cues of sound waves, demonstrating the microphone recording function to a TF card.
7.4. Recording Modes (Auto/Manual)
The device supports both automatic and manual recording modes. In auto mode, the device can detect pauses in audio and automatically partition recordings into separate MP3 files, which is useful for digitizing albums or long broadcasts.

Image: A graphic illustrating audio waveforms, explaining the Auto or Manual Recording Mode feature, where auto mode can partition songs into separate MP3 files.
8. Converting Tapes to MP3
The ezcap234 TapeDigi 1 simplifies the process of converting your analog cassette tapes into digital MP3 files, saving them directly to a Micro SD card.
- Insert your Micro SD card into the slot.
- Insert the cassette tape you wish to convert.
- Ensure the Tape/Radio Switch is in the 'Tape' position.
- Press the Play button on the cassette controls.
- Immediately press the Record/Stop Recording Button to begin conversion. The audio from the tape will be recorded as an MP3 file onto the Micro SD card.
- Press the Record/Stop Recording Button again to stop the conversion.
The converted MP3 files can then be transferred to a computer or other devices for playback.

Image: A visual representation of the conversion process, showing a cassette tape transforming into MP3 format and being stored on a 32GB Micro SD card.

Image: An overhead shot of a workspace featuring the ezcap234 TapeDigi 1 alongside a laptop and other audio gear, demonstrating its role in converting old cassettes to MP3s for digital use.
9. Playback of Recorded Files
To listen to MP3 files stored on the Micro SD card:
- Ensure a Micro SD card with MP3 files is inserted.
- Slide the Tape/Radio Switch to the 'Radio' position.
- Press the Play/Stop playing button (often the center button in the control cluster).
- Use the UP/DOWN buttons to navigate between recorded tracks.
- Adjust the Volume Adjustment knob as needed.

Image: The device surrounded by icons for music, news, and talk shows, illustrating its dual function of playing FM/AM radio and recording that content to MP3 format.
10. Troubleshooting
| Problem | Possible Cause | Solution |
|---|---|---|
| No power / Device not turning on | Batteries are dead or incorrectly inserted; USB cable not connected properly or power source is faulty. | Replace batteries, ensuring correct polarity. Check USB cable connection and try a different power source. |
| No sound from speaker/earphones | Volume is too low; Earphones not fully plugged in; Device in wrong mode. | Increase volume. Ensure earphones are fully inserted. Check Tape/Radio switch position. |
| Poor radio reception | Antenna not extended; Weak signal area; Interference. | Fully extend the antenna. Try repositioning the device. Avoid areas with strong electromagnetic interference. |
| Cannot record to Micro SD card | Micro SD card is full, corrupted, or not formatted correctly (FAT32); Card not inserted properly. | Check Micro SD card capacity. Reformat the card to FAT32 on a computer. Reinsert the card firmly. Try a different Micro SD card. |
| Cassette tape not playing correctly | Tape is tangled or damaged; Tape compartment not closed properly. | Inspect the tape for damage. Ensure the tape compartment is securely closed. |
11. Specifications
| Feature | Detail |
|---|---|
| Brand | MICROWARE |
| Model | EZCAP-234-TapeDigi1 |
| Product Dimensions | 10 x 3 x 8 cm |
| Item Weight | 290 g |
| Power Supply | 5V DC (USB) or 2x AA Batteries |
| Radio Frequency | FM: 87-108MHz, AM: 520-1610 KHz |
| Recording Format | MP3 |
| Storage Medium | Micro SD Card (up to 32GB, FAT32 format) |
| Audio Output | Built-in Speaker, 3.5mm Earphone Jack |
| Input | Cassette Tape, AM/FM Radio, Built-in Microphone |
12. Care and Maintenance
- Keep the device dry. Do not expose it to moisture or extreme temperatures.
- Clean the exterior with a soft, dry cloth. Do not use abrasive cleaners or solvents.
- For cassette playback, periodically clean the tape head and pinch roller with a cotton swab lightly dampened with isopropyl alcohol to ensure optimal sound quality and prevent tape damage.
- When not in use for extended periods, remove batteries to prevent leakage.
- Avoid dropping or subjecting the device to strong impacts.
13. Warranty and Support
For warranty information and customer support, please refer to the documentation included with your purchase or visit the official MICROWARE website. Keep your purchase receipt as proof of purchase for warranty claims.
Manufacturer: Microware Multimedia Private Limited
Country of Origin: China


