
1. Introduction
The ISEEVY HEW5L WiFi HDMI Video Encoder is a professional device designed for audio and video encoding. It converts HDMI input into H.265/H.264 video and AAC/MP3 audio streams, supporting various protocols such as RTMP, RTMPS, SRT, RTSP, UDP, HTTP, HLS, FLV, and TS. This encoder is suitable for applications including live streaming, broadcasting, video conferencing, remote education, and network video recording.
This manual provides detailed instructions for the proper setup, operation, and maintenance of your ISEEVY HEW5L encoder.
2. Safety Information
- Ensure the device is powered by the specified 12V/DC adapter.
- Do not expose the device to water, moisture, or extreme temperatures.
- Avoid blocking ventilation openings to prevent overheating.
- Do not attempt to open or repair the device yourself. Refer all servicing to qualified personnel.
- Keep the device away from strong electromagnetic fields.
3. Package Contents
Please check the package contents upon unboxing. The standard package typically includes:
- ISEEVY HEW5L WiFi HDMI Video Encoder Unit
- Power Adapter (12V/DC)
- WiFi Antennas (2 units)
- User Manual (this document)
4. Product Overview
The ISEEVY HEW5L encoder features a compact design with essential ports for connectivity and operation.

Figure 4.1: Front and Rear View of the ISEEVY HEW5L Encoder. This image displays the encoder unit from a top-down perspective, highlighting the two WiFi antennas, the DC 12V power input, and the 'Full HD Video Encoder' branding on the top surface.
4.1. Front Panel
- Status Indicators: LEDs indicating power, network activity, and encoding status.
4.2. Rear Panel
- HDMI Input: Connect your HDMI source (e.g., camera, computer, DVD player).
- HDMI Loopout: For connecting to a local monitor or display.
- RJ45 Ethernet Port: For wired network connection.
- DC 12V Power Input: Connect the provided power adapter.
- Antenna Connectors: For attaching the WiFi antennas.
5. Setup
5.1. Hardware Connection
- Attach the two WiFi antennas to their respective connectors on the rear panel.
- Connect your HDMI video source (e.g., camera, computer) to the HDMI Input port using an HDMI cable.
- (Optional) Connect a monitor to the HDMI Loopout port if you need to view the input signal locally.
- For wired network access, connect an Ethernet cable from your router or switch to the RJ45 Ethernet Port.
- Connect the 12V/DC power adapter to the DC 12V Power Input and then plug it into a power outlet. The device will power on automatically.
5.2. Initial Network Configuration and Web Interface Access
The encoder can be configured via its web interface. By default, the device may obtain an IP address via DHCP or have a static IP. Refer to the device's label or documentation for the default IP if DHCP is not used.
- Ensure your computer is on the same network as the encoder (either via wired Ethernet or WiFi).
- Open a web browser (e.g., Chrome, Firefox) and enter the encoder's IP address in the address bar.
- Log in using the default username and password (refer to the device's documentation for default credentials, typically 'admin'/'admin' or similar).
6. Operating Instructions
The web interface provides comprehensive control over the encoder's functions. The main sections are typically Status, Encoder, OSD, and System.
6.1. Status Monitoring
The Status page provides real-time information about the encoder's operation, including CPU usage, memory usage, input video status, and network statistics for each stream.

Figure 6.1: Encoder Status Page. This screenshot shows the web interface's 'Status' tab, displaying operational metrics like CPU usage, memory, input video frames, and detailed information for Main Stream, Substream1, Substream2, and Substream3, including encoding type, resolution, and various stream URLs.
6.2. Encoder Settings
This section allows configuration of video and audio encoding parameters for the main stream and up to three substreams.
6.2.1. Main Stream Configuration
Configure the primary output stream for your main broadcast or recording.

Figure 6.2: Main Stream Configuration Page. This image shows the 'Main stream' configuration section within the web interface, allowing users to set parameters such as Encoding Type (H.265), FPS, GOP, Bitrate, Encoded Size, Bitrate Control (CBR/VBR), and enable/disable various streaming protocols like TS, HLS, FLV, RTSP, RTMP, SRT, and Multicast IP settings.
- Encoding Type: Select H.265 or H.264.
- FPS (Frame Rate): Set the frames per second (e.g., 60fps).
- GOP (Group of Pictures): Configure the interval between I-frames.
- Bitrate (kbit): Adjust the video bitrate (e.g., 0.32Mbps~32Mbps).
- Encoded Size: Choose resolution (e.g., 1920x1080P).
- Bitrate Control: Select CBR (Constant Bitrate) or VBR (Variable Bitrate).
- Protocol Settings: Enable and configure URLs for TS, HLS, FLV, RTSP, RTMP, RTMPS, SRT, and Multicast.
6.2.2. Substream Configuration
The encoder supports up to three substreams, allowing for multiple output qualities or destinations simultaneously. Configuration options are similar to the Main Stream.
6.2.3. Audio Settings
Configure the audio encoding parameters.

Figure 6.3: Audio Configuration Page. This screenshot displays the 'Audio' settings within the web interface, allowing users to select Audio Input (HDMI), Sampling Rate, Encoder (AAC, MP3), Audio Channel (L+R), Bitrate, Digital Volume Gain, and G711A Over UTP/RTSP options.
- Audio Input: Select HDMI.
- Sampling Rate: Choose the audio sampling rate (e.g., 48K).
- Encoder: Select AAC or MP3.
- Audio Channel: Typically L+R (Stereo).
- Bitrate: Set the audio bitrate (e.g., 64Kb/s~384Kb/s).
- Digital Volume Gain: Adjust audio input level.
6.2.4. Advanced Settings
This section contains advanced video processing and network settings.
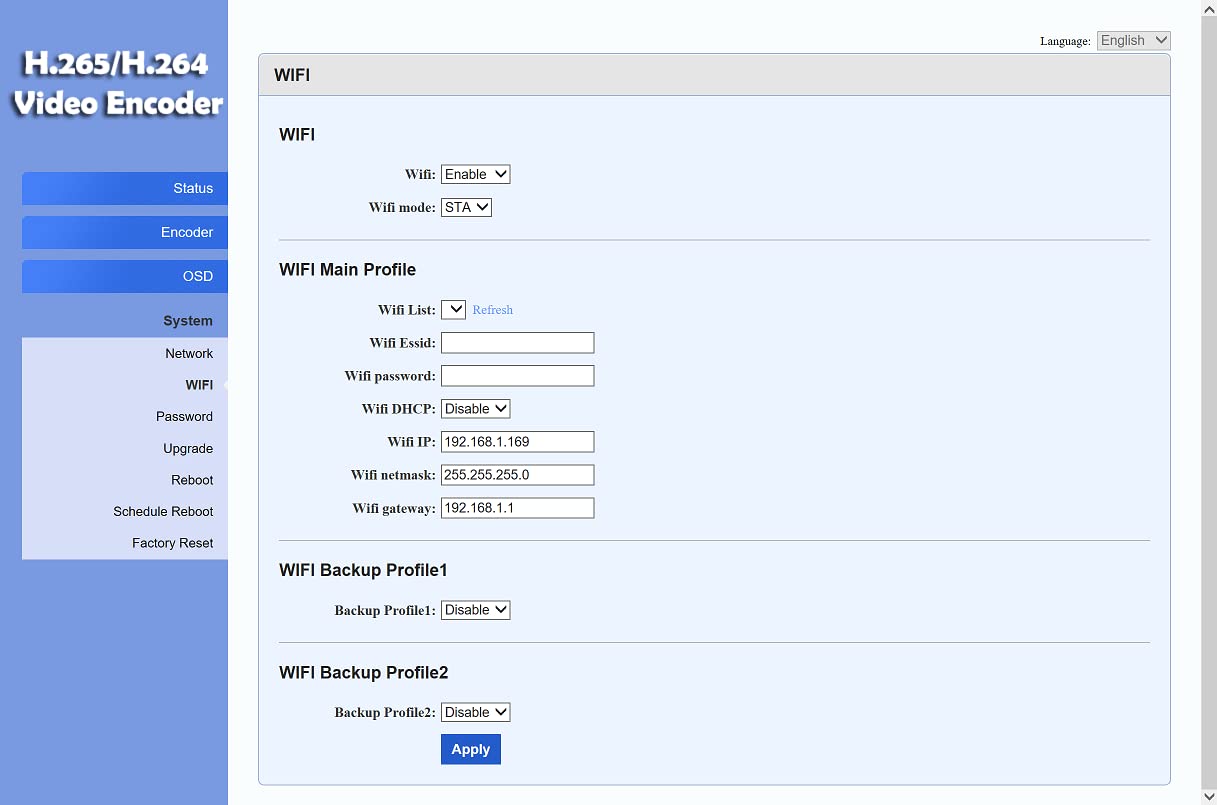
Figure 6.4: Advanced Settings Page. This image shows the 'Advanced' configuration section, offering options for EDID, Video Only, Deinterlaced mode, HLS Splitter Time/Number, SRT Latency, SRT Bandwidth, TS Muxer, Net Drop Threshold, TS Once Pack, TS transport stream ID, TS_pmt_start_pid, TS_start_pid, TS_tables_version, TS_service_name, TS_service_provider, TS Empty Packet, TS/RTSP Password, Vmix Compatible, TS Over RTSP, Multicast Type, Slice Split Enable, Slice Size, MIN_QP, MAX_QP, MTU Size, UDP TTL, UDP, SOCKET_BUF_SIZE, and image enhancement settings like Contrast, Image enhance, Y space filter, Y time filter, C space filter, C time filter.
- EDID: Configure Extended Display Identification Data.
- De-interlacing: Enable or disable de-interlacing for interlaced video sources.
- Noise Reduction/Sharpening: Adjust image quality.
- SRT Latency: Set latency for SRT protocol.
- TS Muxer: Compatible with FFMPEG.
- Network Parameters: MTU size, UDP TTL, etc.
6.3. OSD (On-Screen Display) Settings
Configure text or image overlays on your video streams.

Figure 6.5: OSD Settings Page. This image shows the 'OSD' (On-Screen Display) configuration section, allowing users to set Alpha transparency, enable/disable up to four text zones, define text content, font size, background color, and position (X, Y coordinates) for each zone.
- Alpha: Adjust transparency of the overlay.
- Zone 1-4: Enable individual zones for text or image overlays.
- Type: Select text or image (logo upload).
- Text: Enter the desired text.
- Font Size/Color/Background Color: Customize text appearance.
- X/Y Coordinates: Position the overlay on the screen.
6.4. System Settings
Manage general device settings, including network, WiFi, password, and firmware updates.
6.4.1. WiFi Configuration
Connect the encoder to a wireless network.

Figure 6.6: WiFi Configuration Page. This image shows the 'WIFI' settings within the web interface, allowing users to enable/disable WiFi, select WiFi mode (STA), refresh the WiFi list, enter WiFi SSID and password, configure WiFi DHCP, IP, netmask, and gateway, and set up two backup WiFi profiles.
- WiFi: Enable or disable WiFi functionality.
- WiFi Mode: Select STA (Station) mode to connect to an existing network.
- WiFi SSID: Enter the name of your wireless network.
- WiFi Password: Enter the password for your wireless network.
- WiFi DHCP: Enable DHCP for automatic IP assignment or disable for static IP configuration.
- Backup Profiles: Configure additional WiFi networks for redundancy.
6.4.2. Other System Settings
- Network: Configure wired Ethernet settings (DHCP/Static IP).
- Password: Change the web interface login password.
- Upgrade: Update the device firmware.
- Reboot: Restart the encoder.
- Schedule Reboot: Set a schedule for automatic reboots.
- Factory Reset: Restore the device to its default factory settings.
7. Application Connections
The ISEEVY HEW5L encoder supports various streaming platforms and software. The diagram below illustrates common application scenarios.

Figure 7.1: Multiple Application Connections Diagram. This diagram illustrates how the ISEEVY HDMI Encoder integrates into various network and streaming setups. It shows HDMI input sources (Computer, DVD, Camera, STB) feeding into the encoder. The encoder then outputs network streams (RTMP, RTMPS, RTSP, RTP, UDP, HTTP, etc.) via LAN or WiFi to a router and the internet. Downstream, these streams can be received by devices like Laptops, Phones, STBs, or an ISEEVY Decoder connected to a Monitor. Examples of play software (VLC, OBS), stream servers (WOWZA, FMS), and live platforms (Facebook, YouTube, Twitch, Ustream) are also indicated.
The encoder can be used with:
- Live Platforms: Facebook Live, YouTube Live, Twitch, Ustream, Livestream.
- Streaming Servers: WOWZA Streaming Server, FMS, XTREAM.
- Play Software: VLC Media Player, OBS Studio, vMix, PotPlayer.
To connect to a specific platform, obtain the RTMP/SRT/RTSP URL and Stream Key from your platform's dashboard and enter them into the corresponding protocol settings in the encoder's web interface.
8. Troubleshooting
- No Video Output:
- Check HDMI cable connections.
- Ensure the HDMI source is active and outputting a signal.
- Verify input resolution is supported (Max 1920*1080P).
- No Network Connection:
- For wired connection, check Ethernet cable and router status.
- For WiFi, ensure correct SSID and password are entered in the web interface.
- Verify the encoder has a valid IP address.
- Streaming Issues (Buffering, Disconnections):
- Check internet bandwidth and stability.
- Reduce video bitrate in encoder settings.
- Ensure streaming server URL and key are correct.
- Web Interface Inaccessible:
- Verify the encoder's IP address and your computer's network settings.
- Try rebooting the encoder.
- Perform a factory reset if necessary (note: this will erase all custom settings).
9. Specifications
| Feature | Specification |
|---|---|
| Video Input | 1 channel HDMI input, support HDCP |
| Max Resolution | 1920x1080P |
| Frame Rate | 60fps |
| Video Encoding | H.265, H.264 (High/Main/Baseline Profile) |
| Video Bit Rate | 0.32Mbps~32Mbps |
| Bit Rate Control | CBR/VBR |
| Audio Encoding | AAC, MP3 |
| Audio Sampling Rate | 32K/48K/64K/96K/128K/160K/192K/256K |
| Audio Bit Rate | 64Kb/s~384Kb/s |
| Network Interface | RJ45 1000 Base-T Ethernet, Dual band 300M HG WiFi (2.4GHz/5GHz) |
| Protocols Supported | SRT, HTTP, UDP, RTP, RTSP, RTMP, RTMPS, HLS, FLV, TS, Multicast, Unicast |
| Configuration | WEB UI |
| Dimensions | 165mm x 85mm x 24mm (6.5 x 3.3 x 0.9 inches) |
| Weight | 0.3kg (0.66 lbs) |
| Power Supply | 12V/DC |
| Power Consumption | 5W |
| Operating Temperature | 0~45℃ (32~113℉) |
| Storage Temperature | -20~80℃ (-4~176℉) |
10. Maintenance
- Cleaning: Use a soft, dry cloth to clean the device. Do not use liquid cleaners or aerosols.
- Firmware Updates: Periodically check the manufacturer's website for firmware updates. Updates can improve performance, add features, or fix bugs. Follow the instructions provided with the firmware update package carefully.
- Storage: If storing the device for an extended period, ensure it is kept in a cool, dry place, away from direct sunlight and extreme temperatures.
11. Warranty and Support
For warranty information and technical support, please refer to the documentation provided with your purchase or visit the official ISEEVY website. Contact details for customer service are typically available on the product packaging or the manufacturer's support page.