
1. Introduction
This manual provides essential instructions for the installation, operation, and maintenance of the Dieffematic WLA1 Electronic Control Unit. Please read this manual carefully before use to ensure proper functionality and safety. The WLA1 is designed as an original replacement control board, specifically compatible with WL1024C systems.
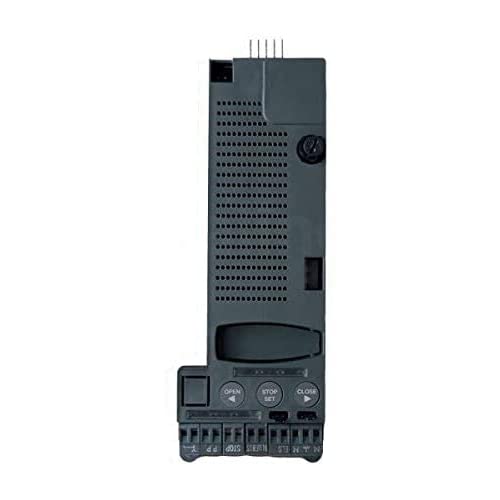
Figure 1: Dieffematic WLA1 Electronic Control Unit. This image displays the compact design of the control unit, highlighting its various connection terminals and components.
2. Safety Information
Important Safety Instructions:
- Installation and maintenance must be performed by qualified personnel only.
- Disconnect power to the control unit and the gate system before performing any installation, maintenance, or troubleshooting.
- Ensure all electrical connections comply with local and national electrical codes.
- Do not expose the control unit to moisture, rain, or extreme temperatures.
- Keep children and unauthorized persons away from the gate operating area.
3. Package Contents
Verify that your package contains the following items:
- Dieffematic WLA1 Electronic Control Unit
- Instruction Manual (this document)
If any items are missing or damaged, please contact your supplier immediately.
4. Setup
The Dieffematic WLA1 control unit is designed for integration into existing gate automation systems, specifically as a replacement for WL1024C boards. Professional installation is highly recommended.
4.1. Mounting the Control Unit
- Ensure the power supply to the gate system is disconnected.
- Carefully remove the old control unit from its housing, noting all existing connections.
- Mount the WLA1 control unit securely within the designated enclosure, ensuring it is protected from environmental elements.
4.2. Electrical Connections
Refer to the wiring diagram provided with your specific gate motor system for detailed connection instructions. General connections include:
- Power Supply: Connect the main power supply to the designated terminals.
- Motor Connections: Connect the gate motor(s) to the appropriate output terminals.
- Safety Devices: Connect photocells, safety edges, and other safety devices.
- Command Devices: Connect remote controls, keypads, and other activation devices.
Always double-check all connections before restoring power.
5. Operating
Once the WLA1 control unit is correctly installed and configured, it will manage the operation of your gate system. The specific operating modes and programming options will depend on the gate system it is integrated with.
5.1. Basic Operation
- Opening/Closing: Activate the gate using a connected command device (e.g., remote control button).
- Stop Function: Most systems include a stop command to halt gate movement at any point.
- Automatic Closing: If configured, the gate will automatically close after a set time delay.
Refer to the specific programming manual for your gate system for detailed instructions on setting parameters such as force, speed, and automatic closing times.
6. Maintenance
Regular maintenance ensures the longevity and reliable operation of your Dieffematic WLA1 control unit and the entire gate system.
6.1. Periodic Checks
- Visual Inspection: Periodically inspect the control unit for any signs of damage, loose connections, or corrosion.
- Cleaning: Keep the control unit enclosure clean and free from dust, insects, and debris. Use a soft, dry cloth. Do not use abrasive cleaners or solvents.
- Safety Devices: Regularly test all connected safety devices (e.g., photocells) to ensure they are functioning correctly.
Always disconnect power before performing any cleaning or inspection inside the control unit enclosure.
7. Troubleshooting
This section provides solutions to common issues you might encounter with your WLA1 control unit.
| Problem | Possible Cause | Solution |
|---|---|---|
| Gate does not respond to commands. | No power to the control unit; remote control battery low; safety device activated. | Check power supply; replace remote battery; check safety devices for obstructions or faults. |
| Gate opens but does not close. | Photocells obstructed or faulty; automatic closing disabled. | Clear photocell path; clean photocell lenses; check photocell wiring; verify automatic closing setting. |
| Gate operates intermittently. | Loose wiring connection; interference with remote signal; motor issue. | Inspect all wiring connections; check for sources of interference; consult a technician for motor diagnosis. |
If the problem persists after attempting these solutions, contact qualified technical support.
8. Specifications
| Manufacturer | Dieffematic |
| Model | WLA1 |
| Article Code | PS124 |
| Manufacturer Reference | PS124 |
| ASIN | B0B434JL4R |
| First Available Date | May 30, 2022 |
9. Warranty and Support
This Dieffematic WLA1 Electronic Control Unit is covered by a standard manufacturer's warranty against defects in materials and workmanship. The duration and terms of the warranty may vary by region and retailer.
For warranty claims, technical assistance, or further support, please contact your authorized Dieffematic dealer or visit the official Dieffematic website for contact information.