1. Safety Information
Always read and understand all safety warnings, instructions, illustrations, and specifications provided with this power tool. Failure to follow all instructions listed below may result in electric shock, fire, and/or serious injury.
General Safety Precautions:
- Always wear appropriate personal protective equipment, including safety glasses, hearing protection, and gloves.
- Keep the work area clean and well-lit. Cluttered or dark areas invite accidents.
- Do not operate power tools in explosive atmospheres, such as in the presence of flammable liquids, gases, or dust.
- Keep children and bystanders away while operating a power tool. Distractions can cause you to lose control.
- Disconnect the battery pack from the tool before making any adjustments, changing accessories, or storing power tools.
- Never point the tool at yourself or others.
- Ensure the contact pin is depressed against the workpiece before squeezing the trigger in single firing mode.
Battery Safety:
- To prevent battery over-discharge and potential damage, recharge the device at least once every three months, even if not in use.
- Use only the specified charger for the battery pack.
- Do not expose battery packs to rain or wet conditions.
- Do not incinerate the battery pack, even if it is severely damaged or completely worn out.
2. Product Overview
The DURATECH 20V Cordless Brad Nailer is a versatile 2-in-1 tool designed for driving both 18 gauge staples and brad nails. It is suitable for various applications such as woodworking, upholstery, flooring, and general DIY projects.
Components:

Figure 2.1: Key Components of the Brad Nailer
- Cylinder: Houses the driving mechanism.
- Trigger: Activates the firing mechanism.
- LED Lighting / Indicator Switch: Controls the work lights and displays tool status.
- Battery: Provides cordless power to the tool.
- Belt Clip: For convenient carrying.
- Depth Adjustment Wheel: Adjusts the driving depth of fasteners.
- Nail Viewer Window: Allows visual inspection of fastener levels.
- LED Indicator: Provides visual feedback on tool status, including jams.
- Single/Contact Firing Knob: Selects between firing modes.
- Magazine: Holds staples or nails.
Package Contents:
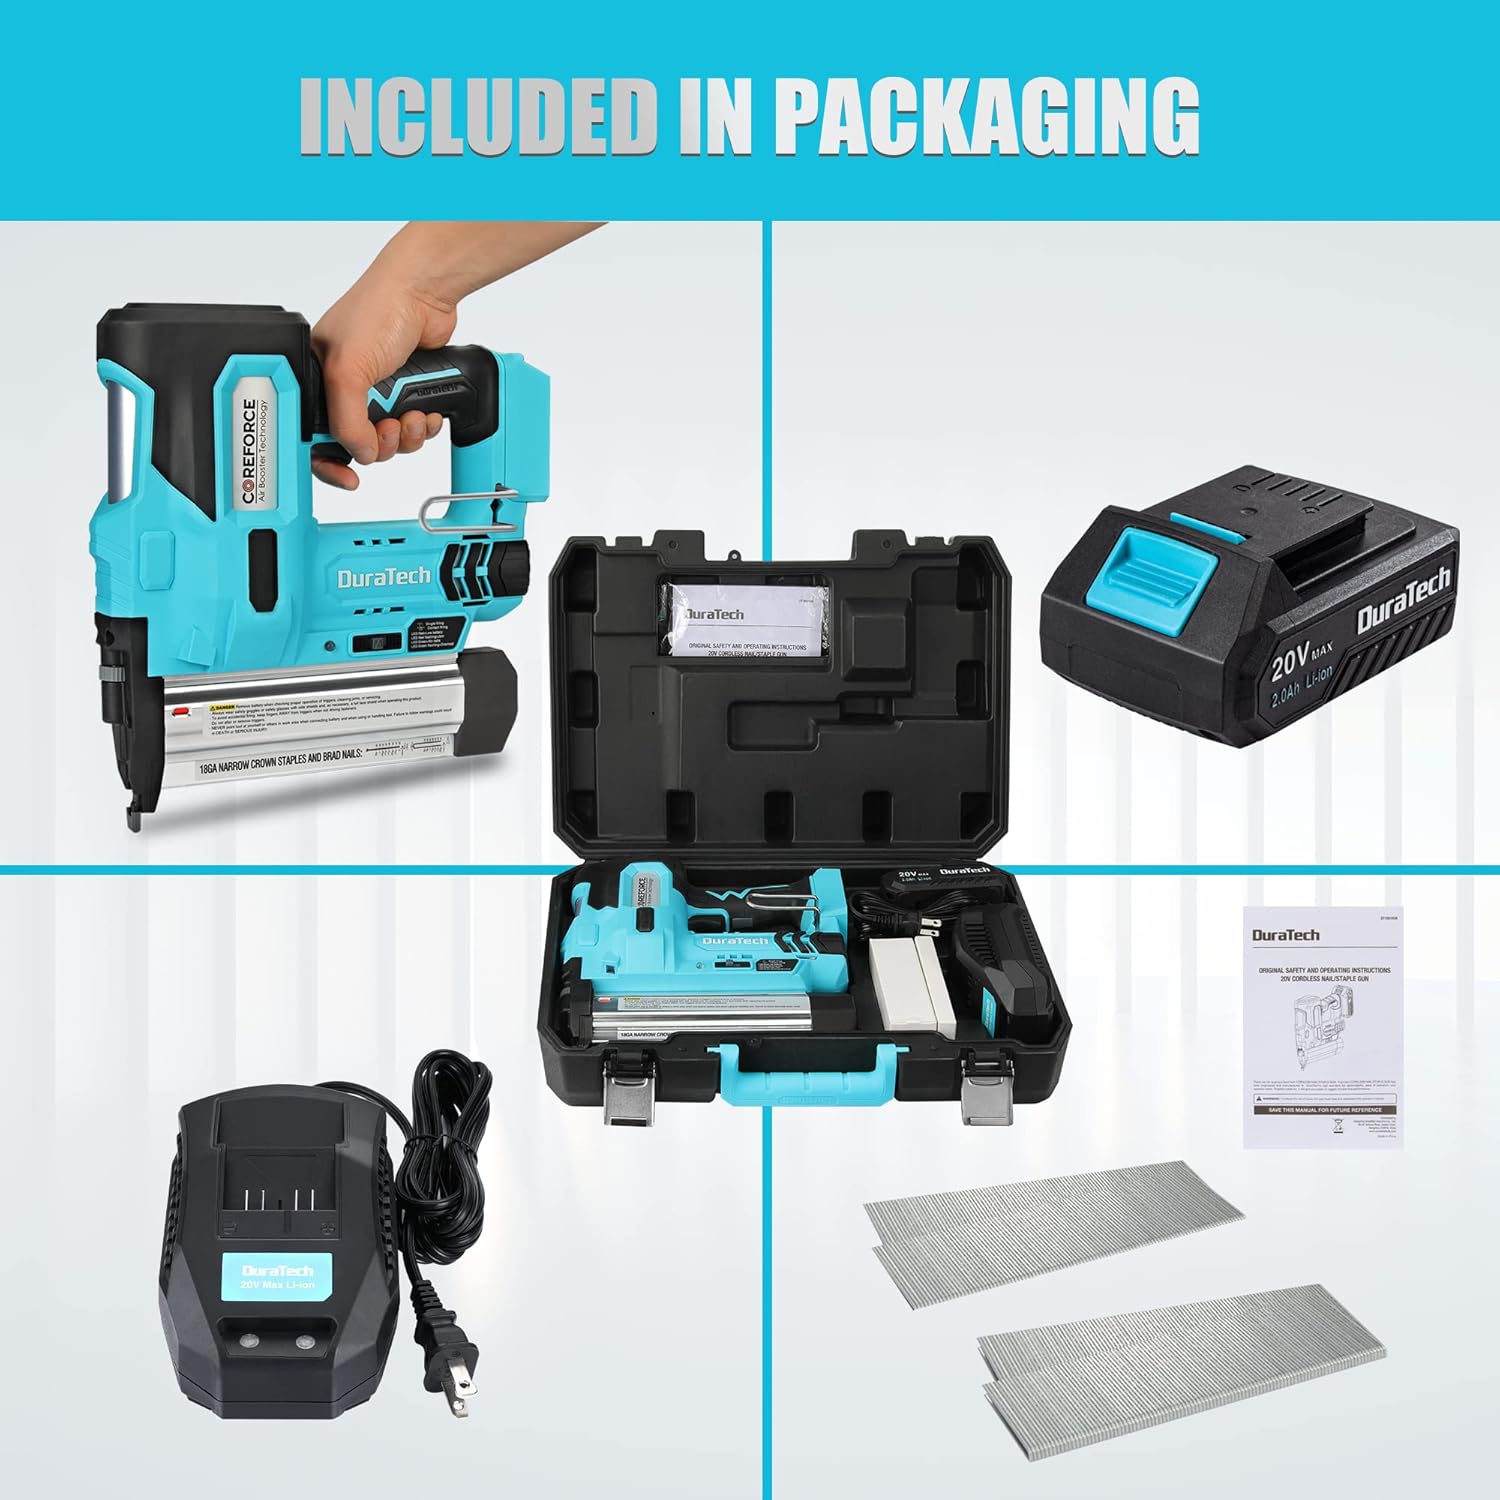
Figure 2.2: Included Items
- 1 x DURATECH 20V Cordless Brad Nailer
- 1 x 2.0Ah Rechargeable Battery
- 1 x 1H Quick Charger
- 1000 x 1-1/4" Staples (18GA)
- 1000 x 1-9/16" Nails (18GA)
- 1 x Carrying Case
- 1 x Instruction Manual
3. Specifications
| Feature | Specification |
|---|---|
| Brand | DURATECH |
| Model Number | DT105103AE |
| Item Weight | 6.19 pounds (without battery) |
| Product Dimensions | 9.45 x 1.96 x 10.83 inches (24 x 5 x 27.5 cm) |
| Color | Blue, Black |
| Material Type | Plastic |
| Nail/Staple Gauge | 18GA |
| Staple Length Compatibility | 3/4" to 1-9/16" (19mm to 40mm) |
| Nail Length Compatibility | 3/4" to 2" (19mm to 50mm) |
| Magazine Capacity | 100 fasteners |
| Shots per Charge | Up to 500 nails (with 2.0Ah battery) |
| Battery Type | 20V Li-ion |
4. Setup
4.1 Battery Installation and Charging:
- Ensure the battery is fully charged before first use. Connect the charger to a power outlet and insert the battery. The charger indicator will show charging status.
- To install the battery, align the battery pack with the receptacle on the tool handle and slide it in until it clicks securely into place.
- To remove the battery, press the release button on the battery pack and slide it out.
4.2 Loading Fasteners (Staples or Nails):

Figure 4.1: Loading Fasteners
- Ensure the battery is removed from the tool for safety.
- Press the magazine release button and pull out the magazine cover.
- Tilt the tool and place the strip of staples or nails into the track of the magazine channel. Ensure the fastener points are facing downwards and are against the bottom of the magazine.
- Push the magazine cover back into place until it engages with the release button, securing the fasteners.
- Verify the fastener type and length are compatible with the tool and your application. The tool accepts 18GA staples from 3/4" to 1-9/16" and 18GA nails from 3/4" to 2".
5. Operating Instructions
5.1 Selecting Firing Mode:
The nail gun features two firing modes: Single Firing Mode and Contact Firing Mode. Select the appropriate mode using the Single/Contact Firing Knob.
- Single Firing Mode: For precise fastener placement. You must depress the contact pin against the workpiece before squeezing the trigger.
- Contact Firing Mode: For rapid, sequential fastening. You can squeeze the trigger first, then depress the contact pin against the workpiece to fire.
5.2 Adjusting Depth:
The depth adjustment wheel allows you to control how deep the fasteners are driven into the material. Rotate the wheel to increase or decrease the driving depth. Test on a scrap piece of material to achieve the desired depth before working on your project.
5.3 Using LED Lights:
The integrated LED lights illuminate the work area, which is beneficial in low-light conditions. Activate the LED lights using the LED Lighting/Indicator Switch.
5.4 General Operation:
- Ensure the correct fasteners are loaded and the battery is installed.
- Select the desired firing mode.
- Adjust the depth setting as needed.
- Place the nose of the tool firmly against the workpiece.
- Follow the firing mode instructions (depress contact pin, then squeeze trigger for single mode; squeeze trigger, then depress contact pin for contact mode).
- After firing, lift the tool from the workpiece.
6. Maintenance
6.1 Clearing Fastener Jams:
If the LED indicator turns red and flashes, it signifies a fastener jam. Follow these steps to clear it:
- Immediately remove the battery pack from the tool to prevent accidental firing.
- Open the magazine cover.
- Carefully remove any jammed staples or nails from the magazine and the firing channel. Use pliers if necessary, but avoid damaging the tool.
- Close the magazine cover securely.
- Reinsert the battery pack. The tool should now be ready for use.
6.2 General Cleaning and Storage:
- Keep the tool's air vents clean to ensure proper motor cooling.
- Wipe the tool with a clean, damp cloth. Do not use harsh chemicals or abrasive cleaners.
- Store the tool and battery in a dry, secure location, out of reach of children and away from direct sunlight or extreme temperatures.
- Always remove the battery pack before storing the tool for extended periods.
7. Troubleshooting
| Problem | Possible Cause | Solution |
|---|---|---|
| Tool does not fire | Battery not installed or discharged | Ensure battery is fully charged and properly installed. |
| Fastener jam (LED indicator flashing red) | Remove battery, clear jam from magazine and firing channel (refer to Section 6.1). | |
| Contact pin not fully depressed (Single Firing Mode) | Ensure the contact pin is firmly pressed against the workpiece before squeezing the trigger. | |
| Fasteners not driven to full depth | Depth adjustment set too shallow | Adjust the depth adjustment wheel to a deeper setting. |
| Insufficient pressure on workpiece | Apply more firm pressure to the tool against the workpiece during firing. | |
| Battery drains quickly | Battery not fully charged or old | Ensure battery is fully charged. Consider replacing an aging battery. |
| Operating in extreme temperatures | Operate the tool within recommended temperature ranges. |
8. Warranty Information
For detailed warranty terms and conditions, please refer to the product packaging or visit the official DURATECH website. Keep your purchase receipt as proof of purchase for any warranty claims.
9. Customer Support
If you have any questions, require technical assistance, or need to report an issue with your DURATECH 20V Cordless Brad Nailer, please contact DURATECH customer service. Contact information can typically be found on the product packaging, the official DURATECH website, or through your retailer.


