
ELECTCOM PRO ELC-225
ELECTCOM PRO DVD Player ELC-225
Instruction Manual
Introduction
The ELECTCOM PRO ELC-225 DVD Player is designed to provide an immersive viewing and listening experience with its ability to up-convert DVD video to 1080p HD and deliver clear, engaging audio with Dolby Digital surround sound. This versatile player supports multiple DVD and CD formats, including DVD, DVD-R/+R, DVD-/+RW, CD, CD-R/RW, VCD, and SVCD. It also features a convenient USB port for playing MP3, AVI, WMA, and JPEG files directly from a flash drive. Its user-friendly design makes it simple to operate for all users.
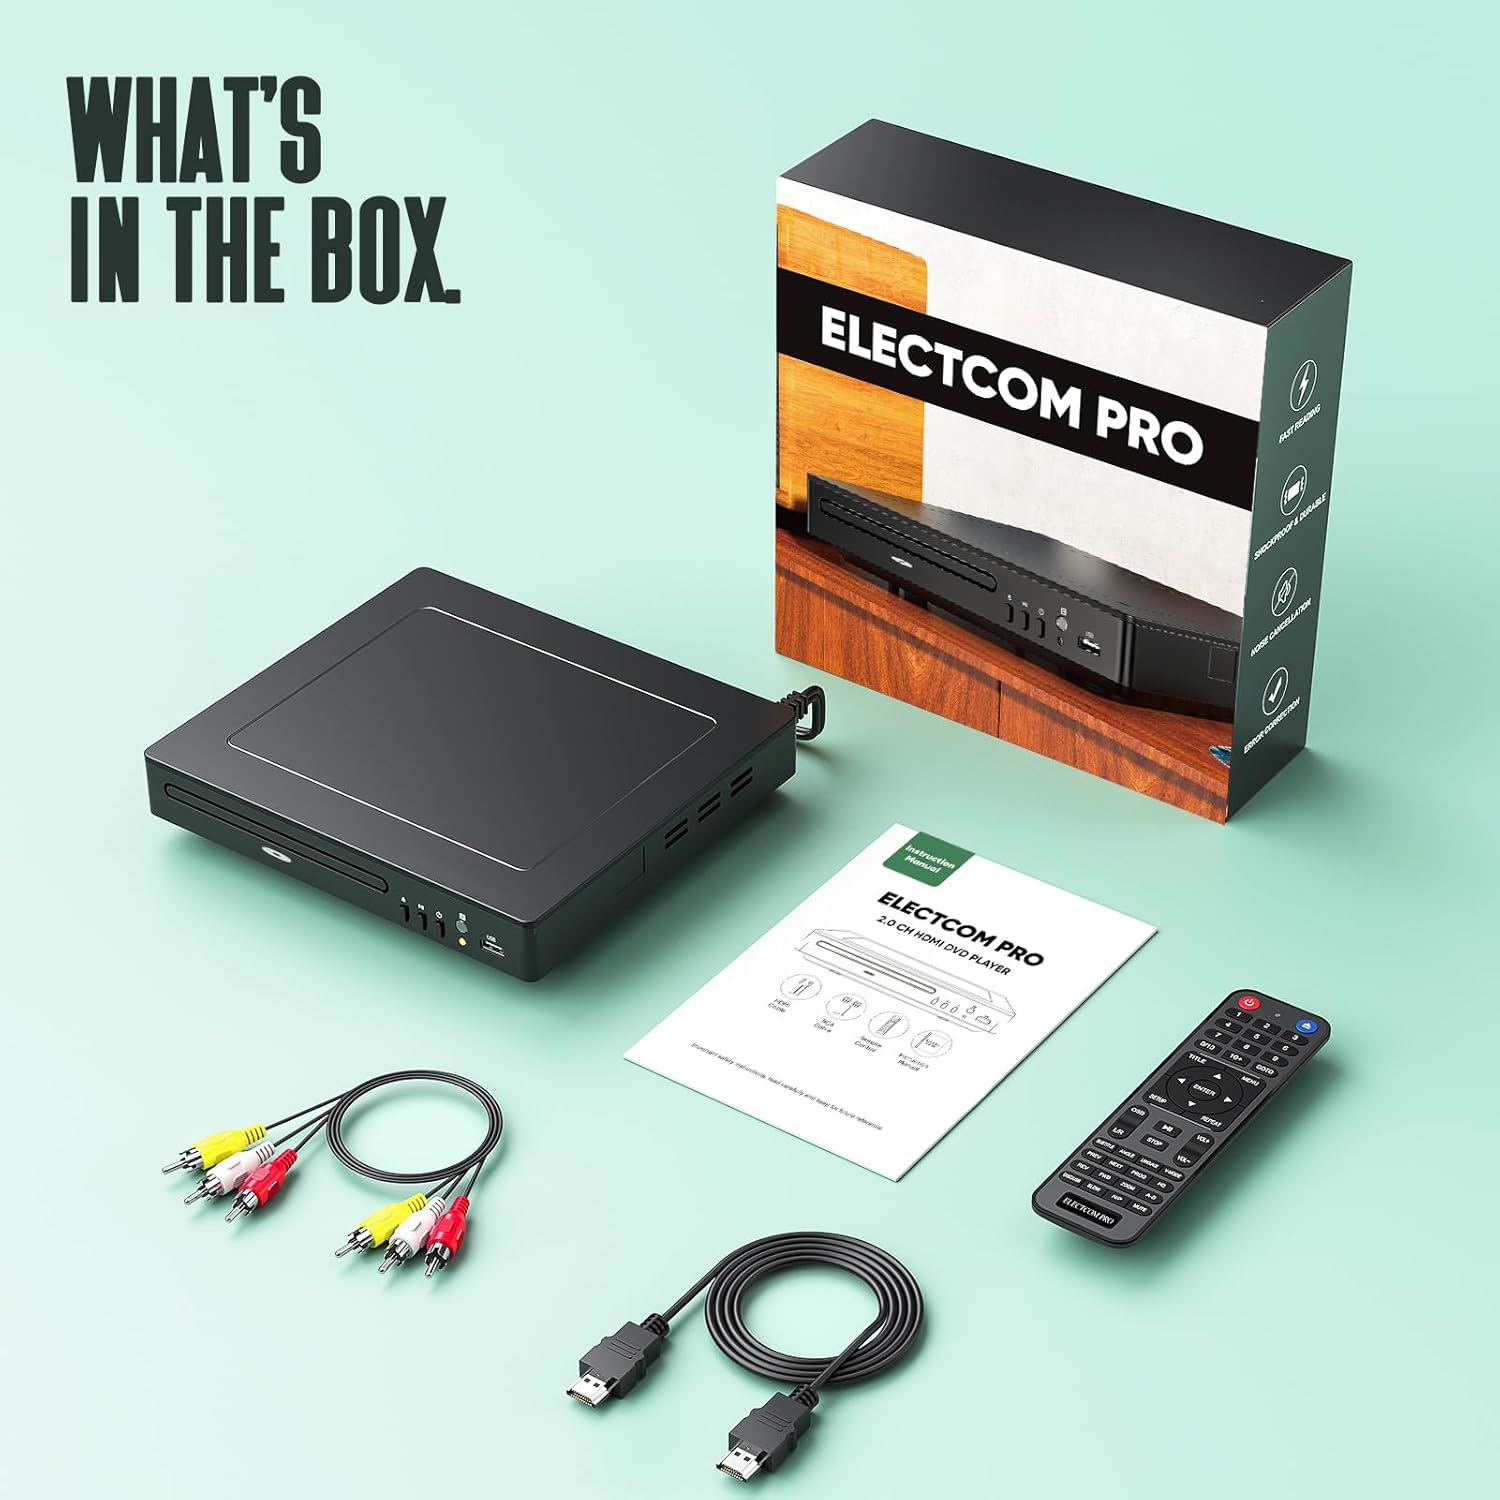
What's in the Box

Image: The ELECTCOM PRO DVD Player, remote control, HDMI cable, RCA cables, and user manual are included in the box.
- ELECTCOM PRO DVD Player ELC-225
- Remote Control
- HDMI Cable
- RCA Cables
- User Manual
Setup
Connecting to Your TV
The ELECTCOM PRO DVD Player offers multiple connection options for compatibility with various display devices.

Image: The back panel of the DVD player highlighting HDMI and RCA output ports for multi-connection.
- HDMI Connection (Recommended for Smart TVs/Projectors/Monitors): Connect one end of the provided HDMI cable to the 'HD OUT' port on the back of the DVD player and the other end to an HDMI input port on your TV or display.
- RCA Connection (For Older TVs/Speakers/Sound Bars/Amplifiers): Connect the red, white, and yellow RCA cables to the corresponding 'AUDIO OUT' (red for right audio, white for left audio) and 'VIDEO OUT' (yellow for video) ports on the back of the DVD player. Connect the other ends to the matching input ports on your TV or audio system.
Powering On
After connecting the necessary cables, plug the DVD player's power cord into a standard electrical outlet. Press the 'POWER' button on the front panel of the DVD player or on the remote control to turn the unit on.
Product Overview Video
Video: A brief overview of the ELECTCOM PRO DVD Player, demonstrating its features and ease of use.
Operating Instructions
Loading and Playing Discs
To load a disc, press the 'OPEN/CLOSE' button on the front panel or remote control. Place the disc gently onto the disc tray with the label side facing up. Press 'OPEN/CLOSE' again to close the tray. The player will begin reading the disc automatically.

Image: The ELECTCOM PRO DVD Player with a DVD being inserted, demonstrating the disc loading process.
USB Playback
Insert a USB flash drive into the USB port on the front of the DVD player. Use the remote control to navigate to the USB input mode. You can then browse and play supported media files (MP3, AVI, WMA, JPEG) stored on your USB drive.
Remote Control Functions
The remote control provides full functionality for operating your DVD player. Ensure batteries are inserted correctly (2 x AAA, not included).

Images: Detailed diagrams of the remote control, illustrating the layout and numbering of each button for easy reference.
| No. | Function | Description |
|---|---|---|
| 1 | POWER ON/OFF | Press to Power On, press again for Standby mode. |
| 2 | NUMBERS 0-9/10+ | While playing DVD/VCD/CD/MP3 discs, use key to select desired track/chapter in menu selection. |
| 3 | TITLE | When using DVDs, press to return to the title menu. |
| 4 | Directional Arrows | Select the direction within the menu. |
| 5 | ENTER | Confirm your selection. |
| 6 | SETUP | Press to get into Setup menu. |
| 7 | OSD | Press for the relative information of the disc to Display. |
| 8 | L/R | When playing VCD or CD discs. Press button to select left or right channel, or stereo. |
| 9 | OPEN/CLOSE | Press to load and remove discs. Place disc into tray with the title side facing up. Press button again to close the disc tray. |
| 10 | GOTO | Press GOTO button to select title time, chapter time and track time. You can use digit keys to input the go to the specific time. |
| 11 | MENU | When playing DVD discs press MENU once to return to sub menu. Press MENU again to return to the main menu. When playing VCD discs, press MENU button to turn on PBC, the VCD is played by menu, press MENU button again to turn off PBC, then VCD is played in sequence. |
| 12 | REPEAT | Press REPEAT button to repeat a title, chapter, track or the whole disc. When playing DVD discs, press REPEAT button continually, the TV screen shows chapter repeat, title repeat, all repeat, repeat cancel in turn. When playing SVCD, VCD, CD discs, the sequence is track repeat, all repeat, repeat cancel. When playing MP3 discs, the sequence is single repeat, directory repeat, repeat cancel. |
| 13 | VOLUME+/- | Increase/decrease volume. |
| 14 | PLAY/PAUSE | Press once to pause, press again to play. |
| 15 | STOP | Press to stop media. Press the Play/Pause button to resume. |
| 16 | SUBTITLE | When playing the DVD discs with multi-subtitles, press SUBTITLE continually to get to the language you desire. |
| 17 | ANGLE | Change angle in DVD mode. |
| 18 | PREV (PREVIOUS, |<<) | In DVD mode, press to go to previous chapter. With SVCD, VCD, CD, MP3 discs, press to go to previous track. |
| 19 | NEXT (NEXT, >>|) | In DVD mode, press to go to next chapter. With SVCD, VCD, CD, MP3 discs, press to go to next track. |
| 20 | REV | Press this button for quick rewind search. |
| 21 | FWD | Press this button for quick forward search. |
| 22 | DISC/USB | Press this button to switch the play between DISC and USB. |
| 23 | SLOW | Press to select slow speed playing. |
| 24 | LANGUAGE | When playing DVD with more than one audio stream, press LANGUAGE to select what you desired. |
| 25 | CD RIPPING | Press the button to use the CD ripping function. |
| 26 | PROG | If the disc is with 2 or more tracks, chapters or titles, set up the playing order as your reference. Press this button to enter program menu. Press digit key to input the number of the track, title or chapter. If the programmed tracks are over ten press 10+ to go on programming. (Maximum 16 programmable items) use the up / down / left / right key to move the cursor to the PLAY. Press ENTER to start Program play. |
| 27 | HD | Press the button to choose the following resolution levels from the HDMI output. |
| 28 | A-B | Press to repeat certain sections. Press button on start point (A) and the end point (B) to select section. Cancel by pressing button a third time. |
| 29 | ZOOM | Press to Zoom in, press again to zoom out. Use arrow keys to move picture. |
| 30 | MUTE | Mute the sound during playing. |
| 31 | N/P | Press to switch the TV system between NTSC and PAL. |
Maintenance
To ensure the longevity and optimal performance of your ELECTCOM PRO DVD Player, follow these maintenance guidelines:
- Cleaning the Unit: Use a soft, dry cloth to wipe the exterior of the player. Do not use liquid cleaners or aerosol sprays, as they may damage the finish or internal components.
- Disc Care: Handle discs by their edges. Keep them clean and free of dust, fingerprints, and scratches. Use a soft, lint-free cloth to wipe discs from the center outwards.
- Ventilation: Ensure the player is placed in a well-ventilated area. Do not block any ventilation openings on the unit.
- Storage: When not in use for extended periods, unplug the player and store it in a cool, dry place.
Troubleshooting
If you encounter issues with your DVD player, please refer to the following common problems and solutions:
| Problem | Possible Cause | Solution |
|---|---|---|
| No Power | Power cord not connected; Power outlet not active. | Ensure the power cord is securely plugged into the player and a working electrical outlet. |
| No Picture | Incorrect video cable connection; Incorrect TV input selected. | Check HDMI or RCA cable connections. Select the correct input source (e.g., HDMI 1, AV) on your TV. |
| No Sound | Incorrect audio cable connection; TV/audio system volume too low or muted. | Verify RCA audio cable connections. Increase volume on your TV/audio system and ensure it is not muted. |
| Disc Error / No Disc / ERR DISC | Disc is dirty, scratched, or incompatible format; Disc inserted incorrectly. | Clean the disc with a soft cloth. Try a different disc. Ensure the disc is inserted correctly with the label side facing up. Verify the disc format is supported (DVD, CD, VCD, SVCD). |
| Remote Control Not Working | Batteries are dead or inserted incorrectly; Obstruction between remote and player. | Replace batteries with new ones, ensuring correct polarity. Remove any obstructions between the remote and the player's sensor. |
| Player Freezes During Playback | Disc issue; Temporary software glitch. | Try cleaning the disc or using a different one. Power off the player, wait a few seconds, then power it back on. |
Specifications
| Feature | Detail |
|---|---|
| Product Dimensions | 1 x 11 x 3 inches |
| Item Weight | 1 pounds (16 ounces) |
| Model Number | ELC-225 |
| Brand | ELECTCOM PRO |
| Media Type Supported | CD, DVD (DVD, DVD-R/+R, DVD-/+RW, CD, CD-R/RW, VCD, SVCD) |
| Special Feature | Region Free |
| Resolution | 1920x1080 (1080p Upscaling) |
| Connector Type | HDMI, RCA |
| Connectivity Technology | HDMI |
| Color | Black |
| Controller Type | Remote Control |
| Manufacturer | ELECTCOM PRO |
| Country of Origin | China |
| First Available Date | May 30, 2022 |
Warranty and Support
This product is typically covered by a standard return policy, which allows for returns or replacements within 30 days of purchase. For specific warranty details, please refer to the documentation provided with your purchase or contact the retailer.
For technical support, troubleshooting assistance beyond this manual, or inquiries regarding your product, please contact ELECTCOM PRO customer service through their official website or the contact information provided with your purchase.
Ask a question about this manual
Ask about setup, troubleshooting, compatibility, parts, safety, or missing instructions. Manuals+ will review the question and use this page’s manual context to help answer it.